Home > Routing by tag for reactive chats: Configuration
Categories: Customization | JavaScript API | Chat Settings
(Last Updated On: July 30, 2021)
About This Article
This article explains how to use routing by tag, which is used to route.
Routing by Tag is an advanced feature, available only on Enterprise Accounts, which enables routing of chats to the most appropriate agent based on skill-set, language, specialty etc. Setting up this feature requires configuration in the SnapEngage Admin Dashboard and can also be used in conjunction with functions inserted into your website code.
Step 1. Enable the Feature
This is for reactive chats only. To enable Routing by Tag, please log into your Admin Dashboard, select the widget you want to configure and navigate to Settings -> Agent Settings -> Chat Assignment -> Routing by Tag. In this section, there is a checkbox labeled “Enable routing by tag”.
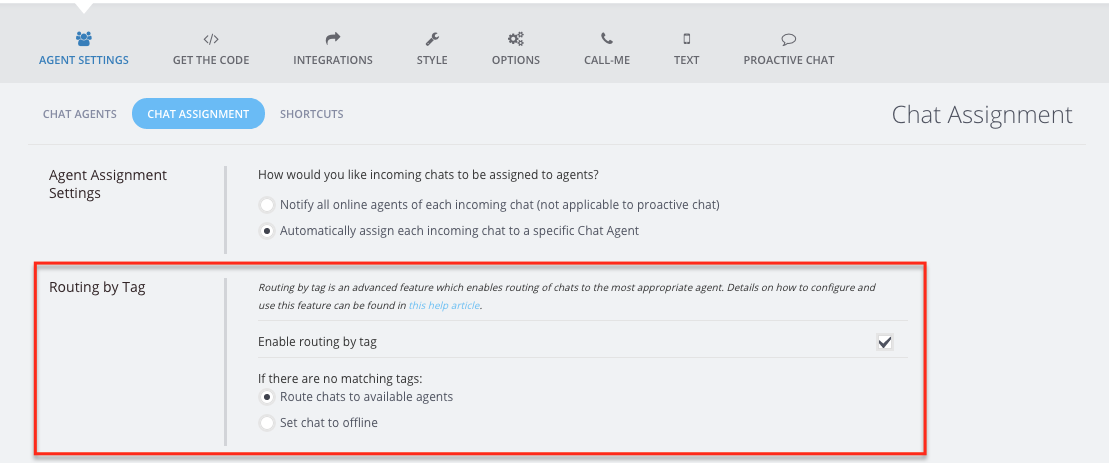
Before going into more detail about setting up the tags, we need to look into the two sub-options within this feature that are used to control what happens when there are no available agents who have a tag matching that of the visitor:
- The “Route chats to available agents” option. With this option enabled, if an agent with a matching tag is not available, your website visitors will be able to chat with another available agent even if this agent does not have a matching tag. In such a case, we will assign an incoming chat based on the “Agent Assignment Settings” which have been configured right above the “Routing by Tag” setting.
- The “Set chat to offline” option. If an agent with a matching tag is not available, this will make things appear as though chat is not available on your website (for this visitor). This includes changing the floating button to its offline state and only making the offline form available. Please note that using this option requires using the SnapEngageOptions JavaScript object as described further below. Also note that the agent has to have ALL the tags set on the page in order to “match”
Once the appropriate options are selected be sure to click on the “Save” button.
Step 2. Assign Tags to Agents
To assign tags to your agents, you go to Settings -> Agent Settings -> Chat Agents. Click on the “Edit” button to the right of the agent you would like to configure and a box will pop up where you can configure settings for this agent. At the bottom of the form, you will see the “Agent Tags:” field:
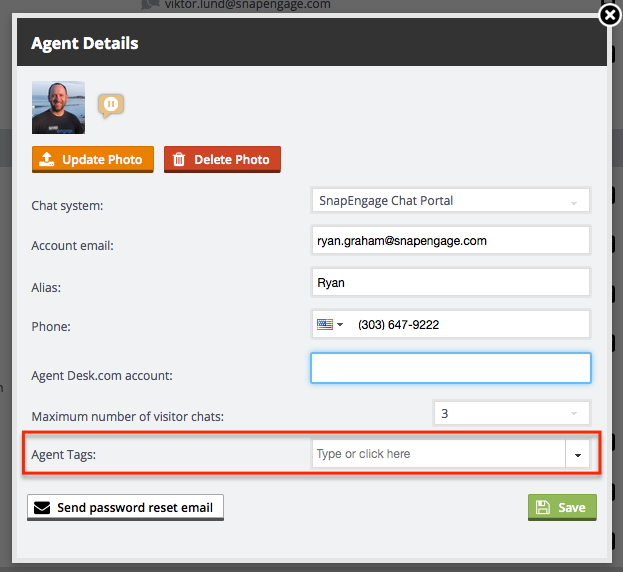
Within this field you can enter new tags or select from existing ones. To add a new tag, just type in the word you want to use as a tag and hit enter (eg. “anothertag” below). Once the agent has been configured with the appropriate tags click on the “Save” button. At this point the chat assignment will behave just as it did before having enabled the feature in step 1.

**Please note that just like different agents can be configured with different tags, some agents might not be assigned any tags at all.**
Step 3. Using the Tags
Now you can use the tags you have added to route chats to your agents using the JavaScript API. This is the point at which you actually start altering the behavior of how the chats are assigned. Again, this is for reactive chats only. If you want to route by tag using proactive chat, you do not need to enable the routing tag feature and you can read more about how to configure that here.
Assigning Visitor Tags via the JavaScript API
You have two different options when using the JavaScript API. Setting these up might require the assistance of your developers. When your website visitor starts a chat with you, they will have already been assigned tags based on the logic you/your developers build. SnapEngage will then know to which agents to direct the chat to, as the tags will have already been passed to the system.
It is essential to understand where the tags come from on the visitor side in order to accurately set up your tag assignment. Like mentioned above, that will depend on your logic but two seem to be the most common scenarios:
Option 1 – SnapEngageOptions: NOTE – This is required when using the offline option.
Create a global SnapEngageOptions object to set the most appropriate tags. As an example, let’s say in step #2 we had assigned an agent tag of “spanish” to Ryan. If we want to direct chats to that agent we would do the following:
<script type="text/javascript">
// must be set prior to the loading of the SnapEngage code
var SnapEngageOptions = {
 tags:"spanish"
}
</script>
You can use this option for visitors of certain account levels (if they are logged into your site) or certain locations (we use a similar premise to blacklist countries or IPs for you). You can pull in different variable values from your page to be tags and, as long as there are agents with those tags, we can toggle chat being off/online. For example, if you collect the user’s country in a variable called “country”, you could set a tag like this:
<script type="text/javascript">
// must be set prior to the loading of the SnapEngage code
var SnapEngageOptions = {
 tags:"country"
}
</script>
Multiple tags can be passed by adding commas between each tag. For instance:
<script type="text/javascript">
// must be set prior to the loading of the SnapEngage code
var SnapEngageOptions = {
tags:"spanish, gold"
}
</script>
Option 2 – SnapEngage.setTags:
You should use this Option if you are using routing by tag in combination with the Widget selector. Be aware that you cannot use the Set chat to offline option when using this method.
To use this option, you would need to add the SnapEngage.setTags(), function code under the ” /* Place your SnapEngage JS API code below */ ” part of your widget’s code snippet. In the above example, Jan has been assigned with the “german” tag. To be able to direct German chats to Jan, you would need to add the “german” tag in the function:
“SnapEngage.setTags(‘german’),”. The complete code would look like the following:
<!-- begin SnapEngage code -->
<script type="text/javascript">
(function() {
var se = document.createElement('script'); se.type = 'text/javascript'; se.async = true;
se.src = 'https://storage.googleapis.com/code.snapengage.com/js/eb74e368-1e70-40ea-aa49-95a624591adc.js';
var done = false;
se.onload = se.onreadystatechange = function() {
if (!done&&(!this.readyState||this.readyState==='loaded'||this.readyState==='complete')) {
done = true;
/* Place your SnapEngage JS API code below */
SnapEngage.setTags('german');
/* SnapEngage.allowChatSound(true); Example JS API: Enable sounds for Visitors. */
}
};
var s = document.getElementsByTagName('script')[0]; s.parentNode.insertBefore(se, s);
})();
</script>
<!-- end SnapEngage code -->
The SnapEngage.setTags(‘german’), function code could be placed on all the pages of your German website but not the English one. Chats initiated on your German website, would then be directed to agents with the “german” tag.
**Please note that multiple tags can be passed to the SnapEngage.setTags(”); function using commas between each tag.**
For instance, if you wanted to add a “tennis” tag for some pages of your German site and direct the chats to Jasmin who speaks German and knows everything about tennis, the function would become SnapEngage.setTags(‘german, tennis’), as shown below:
(function() {
var se = document.createElement('script');
se.type = 'text/javascript';
se.async = true;
se.src = '//storage.googleapis.com/code.snapengage.com/js/XXXXXXXX-XXXX-XXXX-XXXX-XXXXXXXXXXXX.js';
var done = false;
se.onload = se.onreadystatechange = function() {
if (!done&&(!this.readyState || this.readyState === 'loaded' || this.readyState === 'complete')) {
done = true;
/* Place your SnapEngage JS API code below */
SnapEngage.setTags('german, tennis');
}
};
var s = document.getElementsByTagName('script')[0];
s.parentNode.insertBefore(se, s);
})();
You will need to work with your website developer to determine the correct tags to set using the JavaScript API.
If you would like a few more examples, you can read more scenarios on how tags work for reactive chats here.
Did you find this article helpful?

 (5 votes, average: 4.60 out of 5)
Published February 2, 2017