Home > Guide Bot Recipe: Sales Qualification Questions
Categories: Chatbot Docs | Featured Article
(Last Updated On: August 4, 2020)
This article describes a single “recipe” for using our Guide Bot. Each recipe is a strategic guide for deploying the Guide Bot. Please refer to our Guide Bot Introduction and the Guide Bot Configuration Guide for more general information. This recipe assumes basic familiarity with SnapEngage configuration and setup (widgets, agents, design studio, etc). You may need to refer to other support pages for help on these topics.
The Guide Bot is available on SnapEngage “Professional” or “Enterprise“ accounts. If you do not see chatbots on your account, please chat with us.
Using our multi-step Guide Bot capabilities, you can really easily create a conversation with a visitor to guide them towards the best plan for their needs.
The Scenario
Most sales teams have specific questions to uncover a prospects needs and intentions. These questions qualify the prospect and start them down the path of the buyer journey. In addition to learning more about customer intent, knowing this information might determine which sales representative the lead belongs to (think territory manager or company size).
For example: a space travel company called Moonwalkers has 3 products or offerings; “Anti-Gravity Room”, “Space Shuttle Simulators”, and “Trip to the Moon”. Anti-Gravity Room and Space Shuttle Simulators are small business products managed by the bulk of the sales team. Trip to the Moon is the highest-tier product and has a dedicated Enterprise sales team.
Moonwalkers wants to proactively engage customers on the website and discover which product the customer is interested in. Based on the customer’s interest, the customer should be sent to either the Small-Business or Enterprise sales team.
Note: you may have some sales agents who work across both teams. That is okay, this recipe can handle such a scenario.
Ingredients
To handle the simplest version of this scenario, you will use the following ingredients:
- A base / default sales widget
- Additional sales widgets for each of your specialized sales teams
- Guide Bot
- Agent tiers
- Pre-chat settings (default message)
- Chat widget schedule for each widget OR 24/7 Agent Coverage
Solution Overview
This recipe covers incoming chats (both reactive and proactive), asks your visitor which product they are interested in, and routes the chat to the right sales team.
Your default sales widget will contain a Guide Bot. The first Guide Bot will include one “general” step to handle reactive chats and general proactive chats. One additional step will be used for a more focused routing option if a visitor isn’t sure what they need.
If you are sending your chats to an integration (helpdesk, CRM), you can route each in a different way depending on the type of question that was asked. Or, you could even send them to different integrations. Please note that this recipe describes the simplest approach to the scenario. There are many ways you could refine it. See “Improving the Recipe” below for details.
Setup Directions
Step 1: Base Sales Widget
First, if you don’t already have one, you will want to create a new sales widget or repurpose an existing one. This widget will be the one you embed in your site or application and it will determine the initial experience your visitors have when they interact with chat. This widget will contain the Guide Bot and determine how this bot interacts with your site.
Step 2: Sales Team Widgets
Create a new widget to contain each of your specialized sales teams. In our example for this recipe, we will have the following two specialized sales widgets:
- Sales Regular
- Sales Enterprise
Add your agents to each specialized widget, as needed. For each widget, you can set up priority tiers if you wish. Also, any individual agent can belong to more than one specialized widget. For example, some sales agents or managers might work both Regular and Enterprise sales (and belong to both of those widgets). How you construct your teams is incredibly flexible!
Step 3: Creating the Guide Bot
You are now ready to create your Guide Bot! This recipe will not cover all of the details of Guide Bot settings. To understand the configuration options, please read How to Configure Guide Bot.
Guide Bot – Step 1
For this recipe, you will want to configure a version of the following dialog:
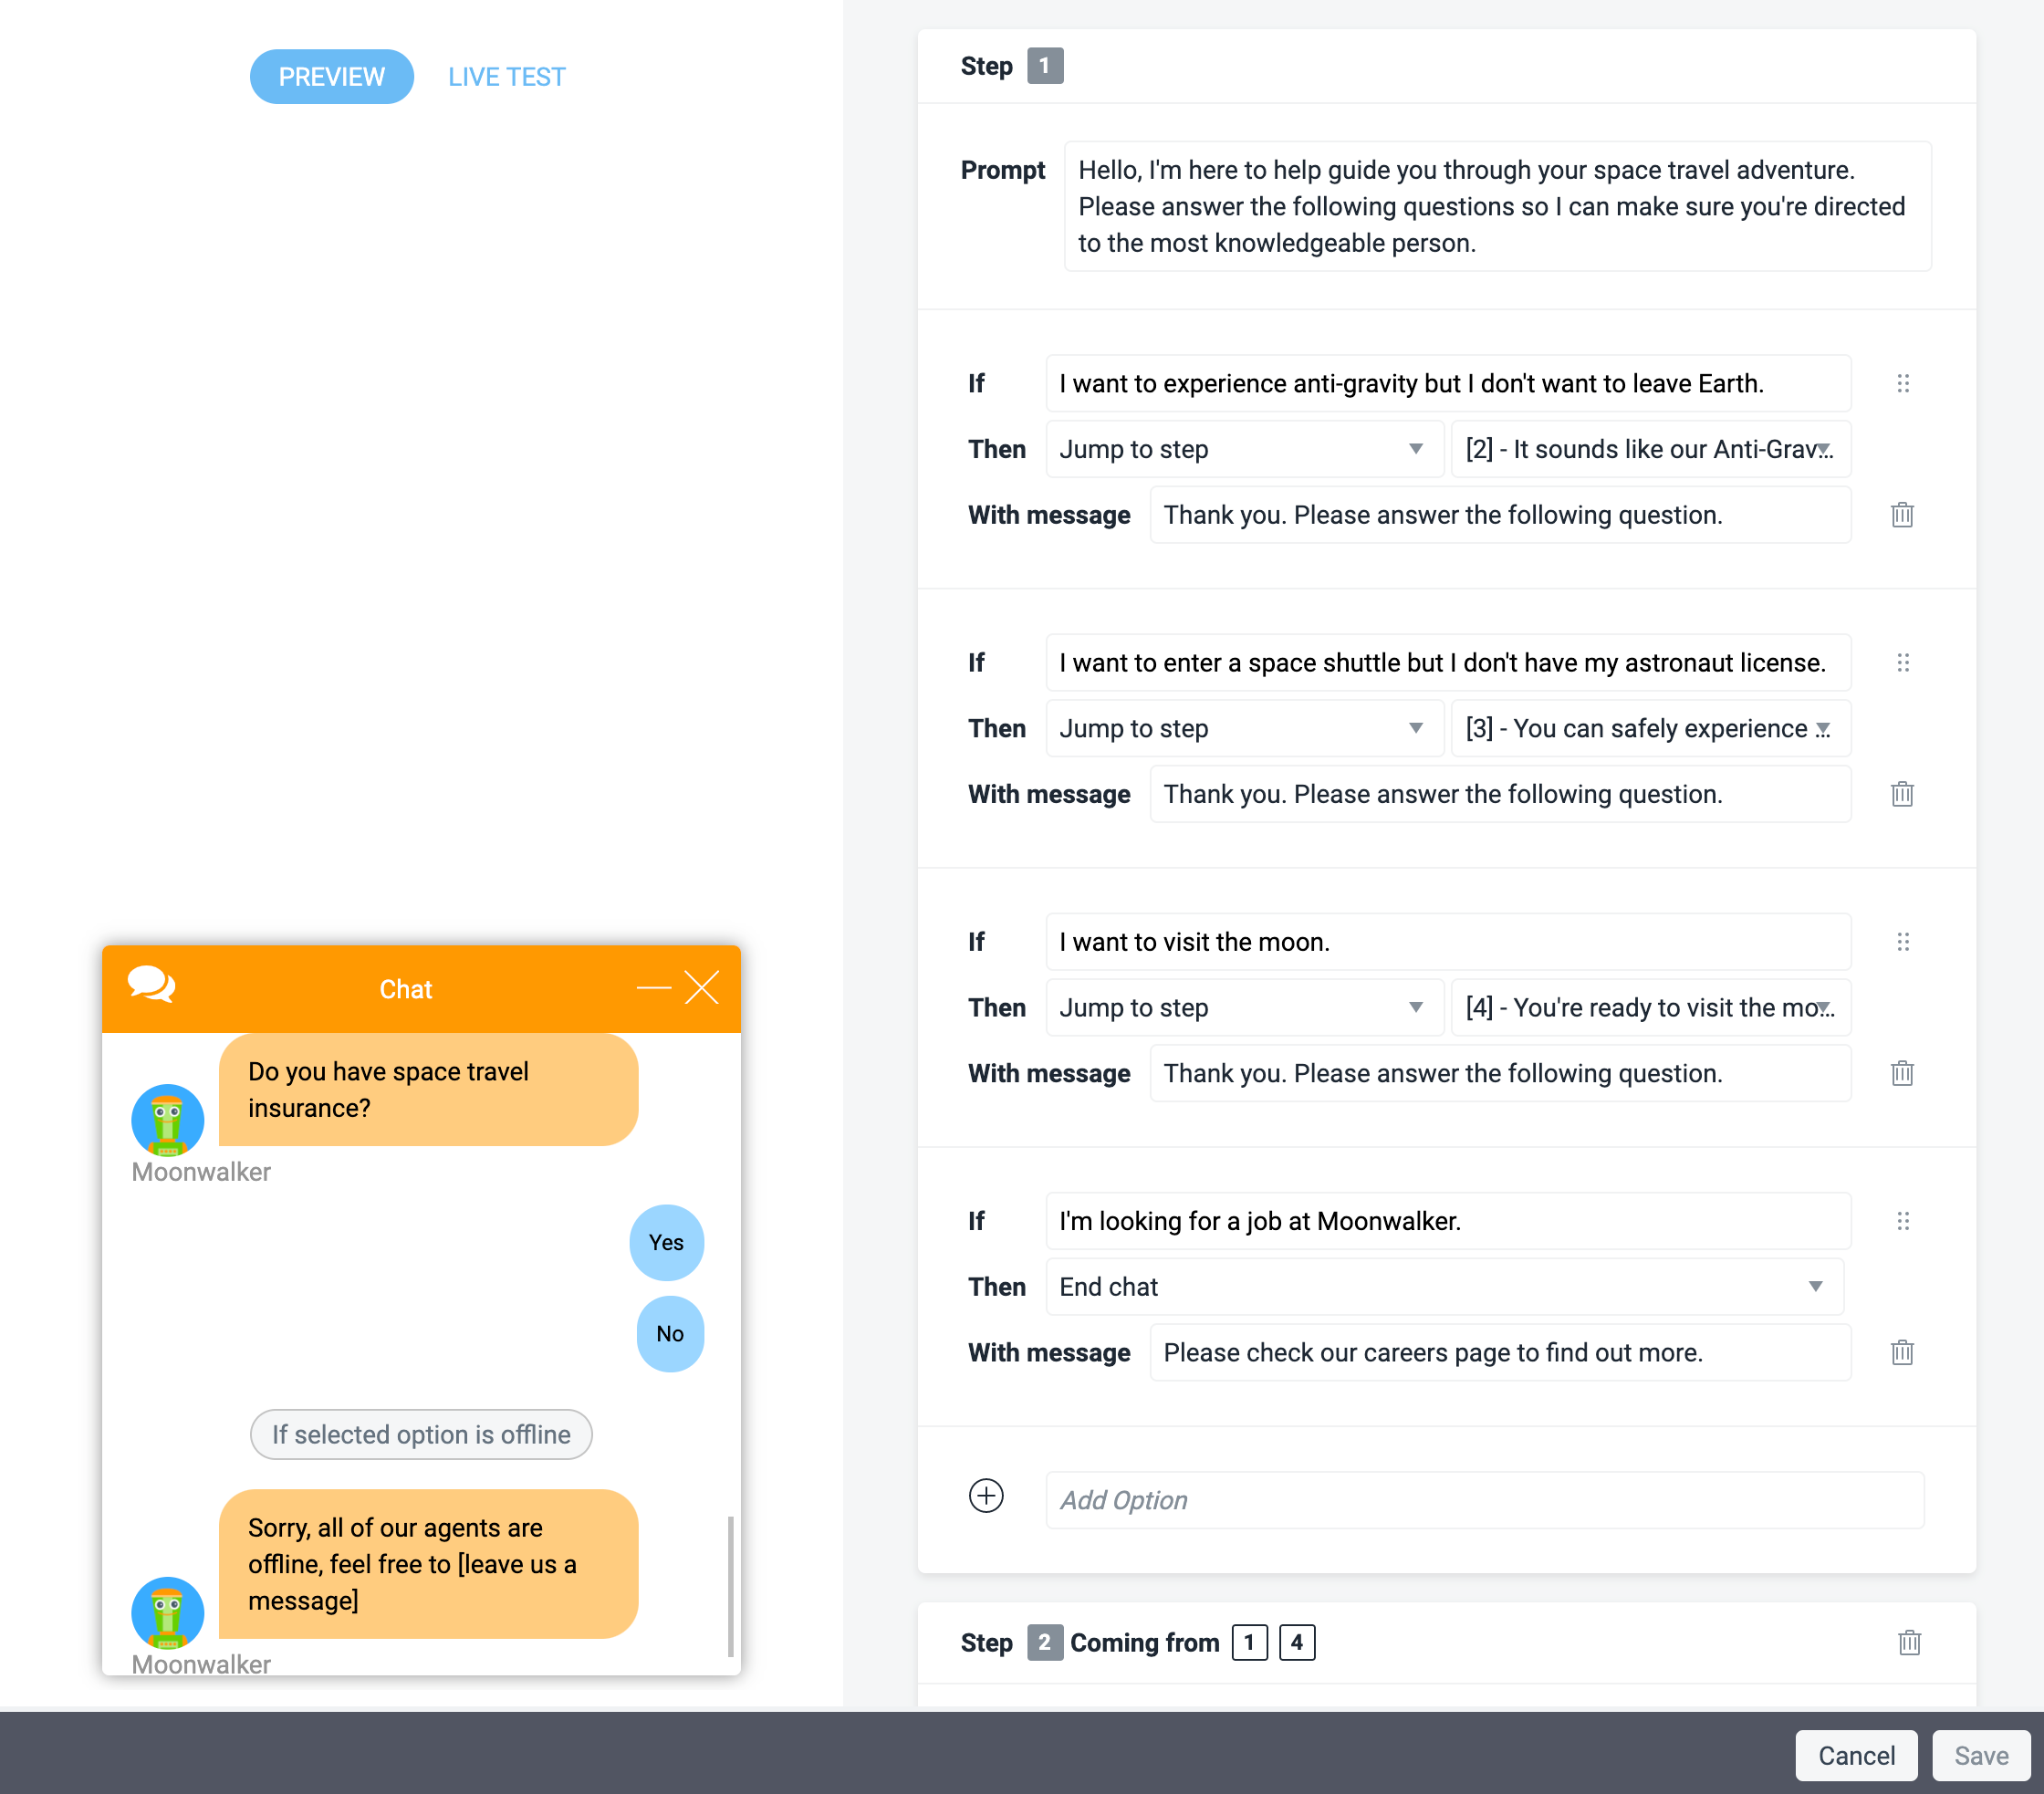
Each of these dialog options will guide the visitor towards a different product except for the last option. For the first three dialog options, the visitor is moved towards another individual step. This allows us to prompt more specialized questions based on the visitor’s selection.
For the last option, we assume that this company has a lot of people using the sales bot to ask about careers, and we now retroactively close the chat if that is why they are chatting. This is helpful to ensure traffic unrelated to sales doesn’t enter the sales funnel.
Guide Bot – Step 2
This next step will be prompted if the visitor clicks the first option, “I want to experience anti-gravity but I don’t want to leave Earth”. It will prompt the visitor to enter how many people they want to book the experience for.
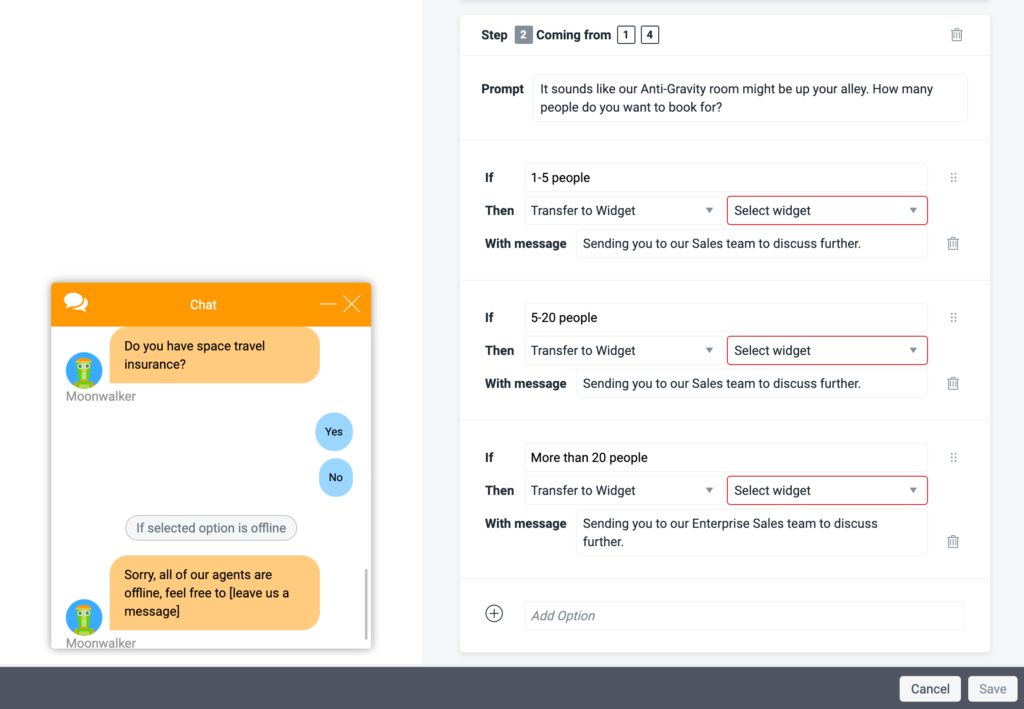
The first two options, “1-5 people” and “5-20 people” will both route to the Regular Sales widget. The second option “20+ people” will route to the Enterprise Sales widget. Be sure to select the correct widgets from the dropdown as highlighted in red above. You won’t be able to Save the Bot settings until you do!
Guide Bot – Step 3
The next step is prompted when the visitor clicks “I want to enter a space shuttle but I don’t have my astronaut license” from Step 1.
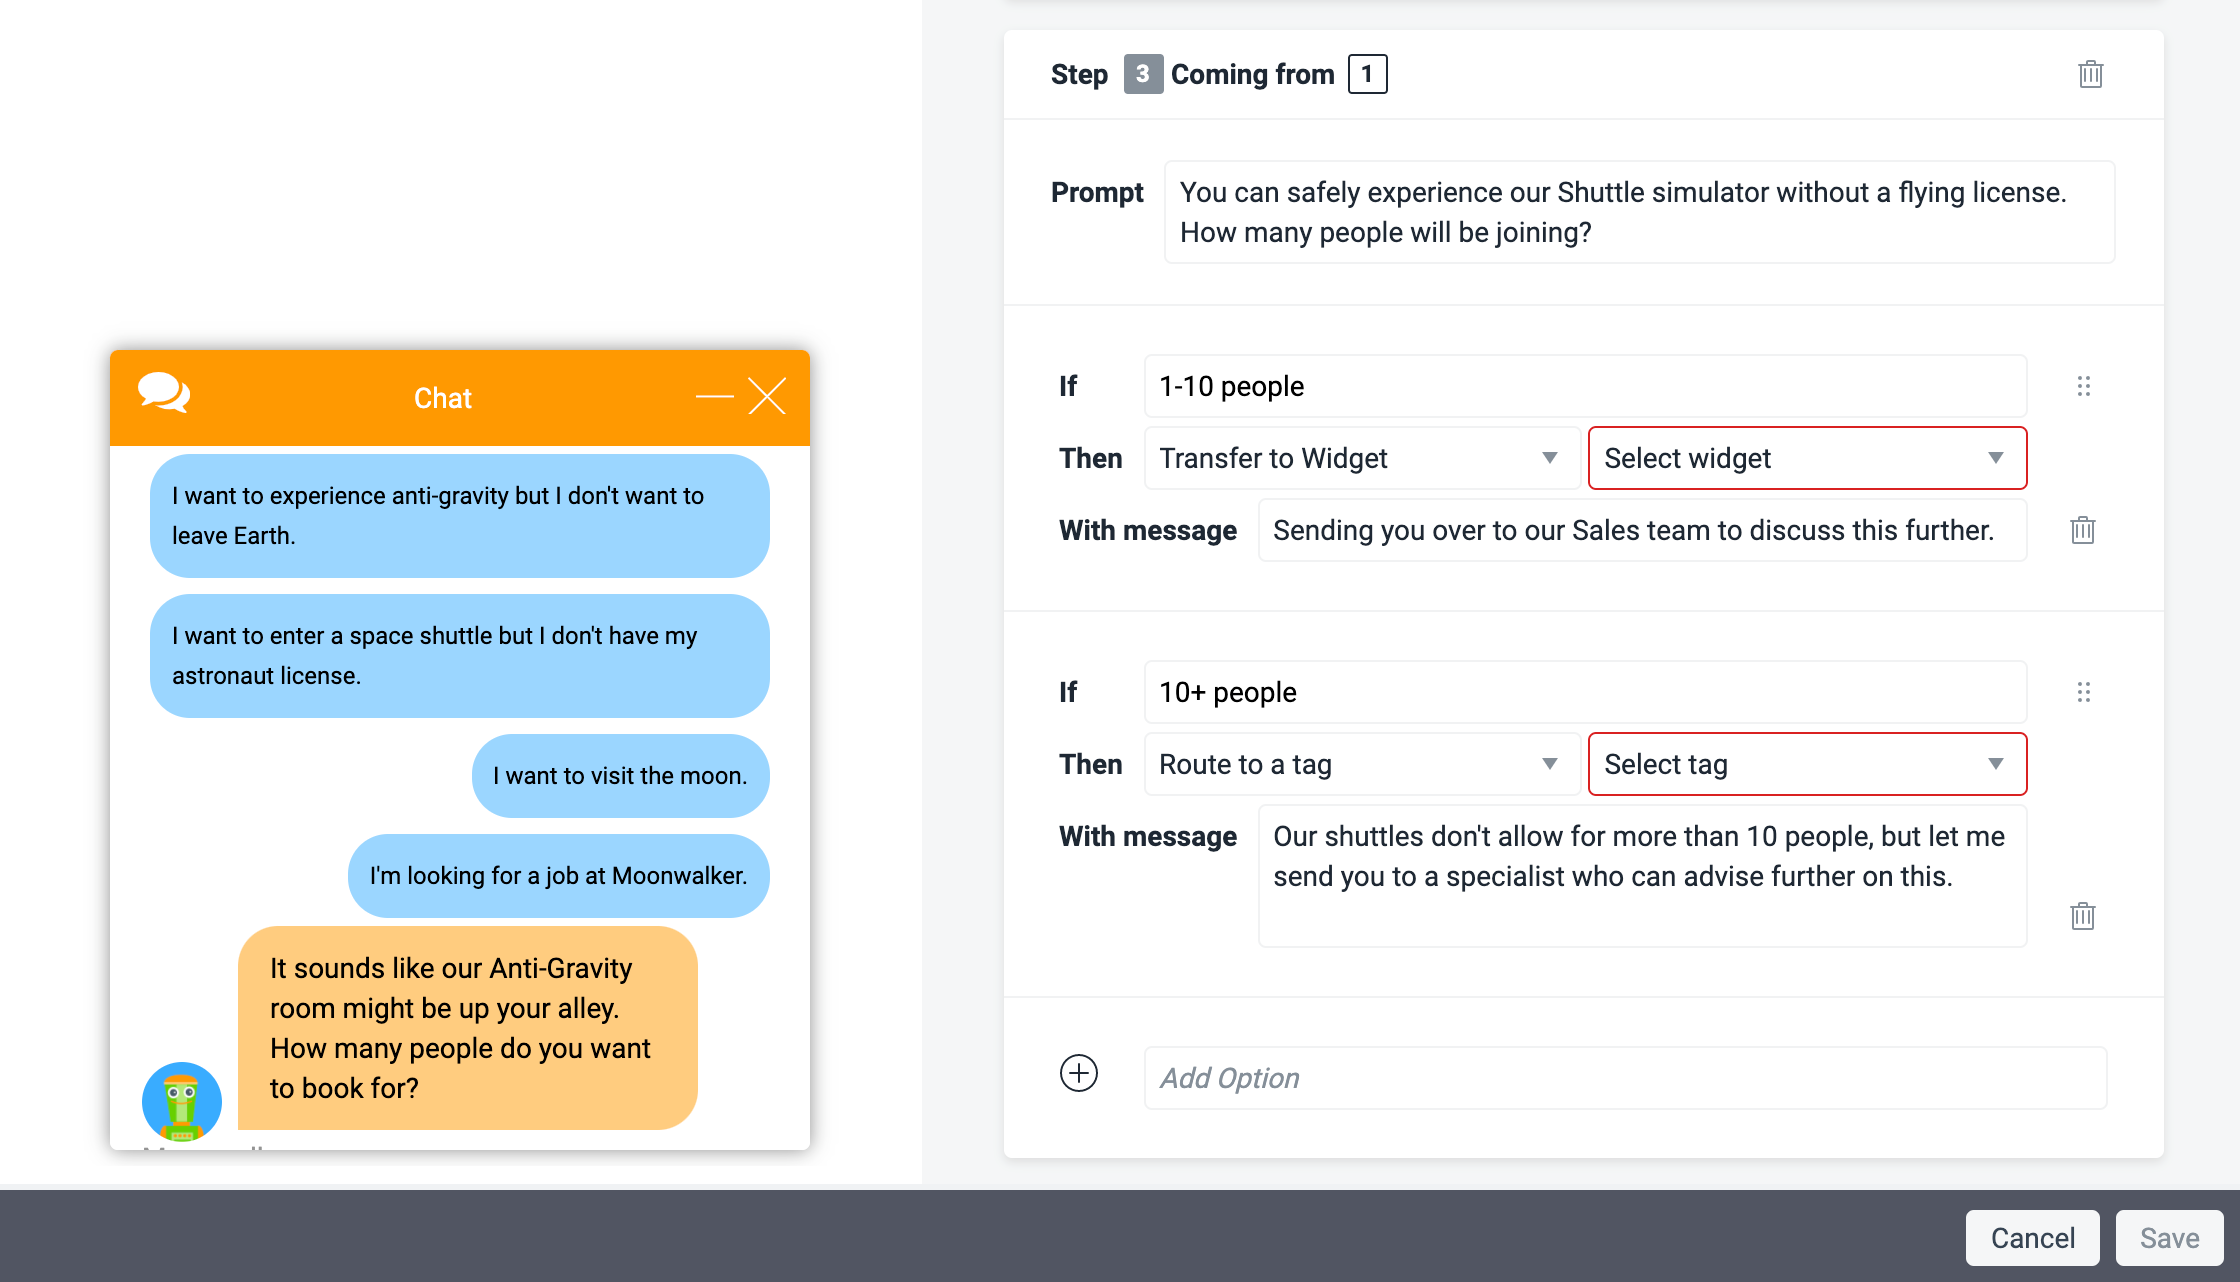
Similar to Step 2, Step 3 is based around the size of the group. However, while the first option will route to the Regular Sales team, we have set up the second option to route to a tag. This would be an agent on the same widget who has the tag “specialist”. The chat would then be routed to that agent once this option is clicked.
Once you have added the tag to at least one agent, you can select the tag from the dropdown menu, highlighted in red above.
Guide Bot – Step 4
This next step is prompted if the visitor selects “I want to visit the moon” from Step 1.

We want to add another qualifier here, as this question is a deal-breaker. The goal is to not waste a visitor’s time if this particular product is not suited to them. We ask the visitor if they suffer from motion sickness, as we know this product will not be the right fit if so.
If the visitor selects the “Yes” option, we will actually bring them back to Step 2, where they will be recommended a more suited product. They will begin the flow initiated in Step 2.
If the visitor selects no, we progress to Step 5, the final Step.
Guide Bot – Step 5
This step follows on from Step 4 above when the visitor clicks the “No” option.
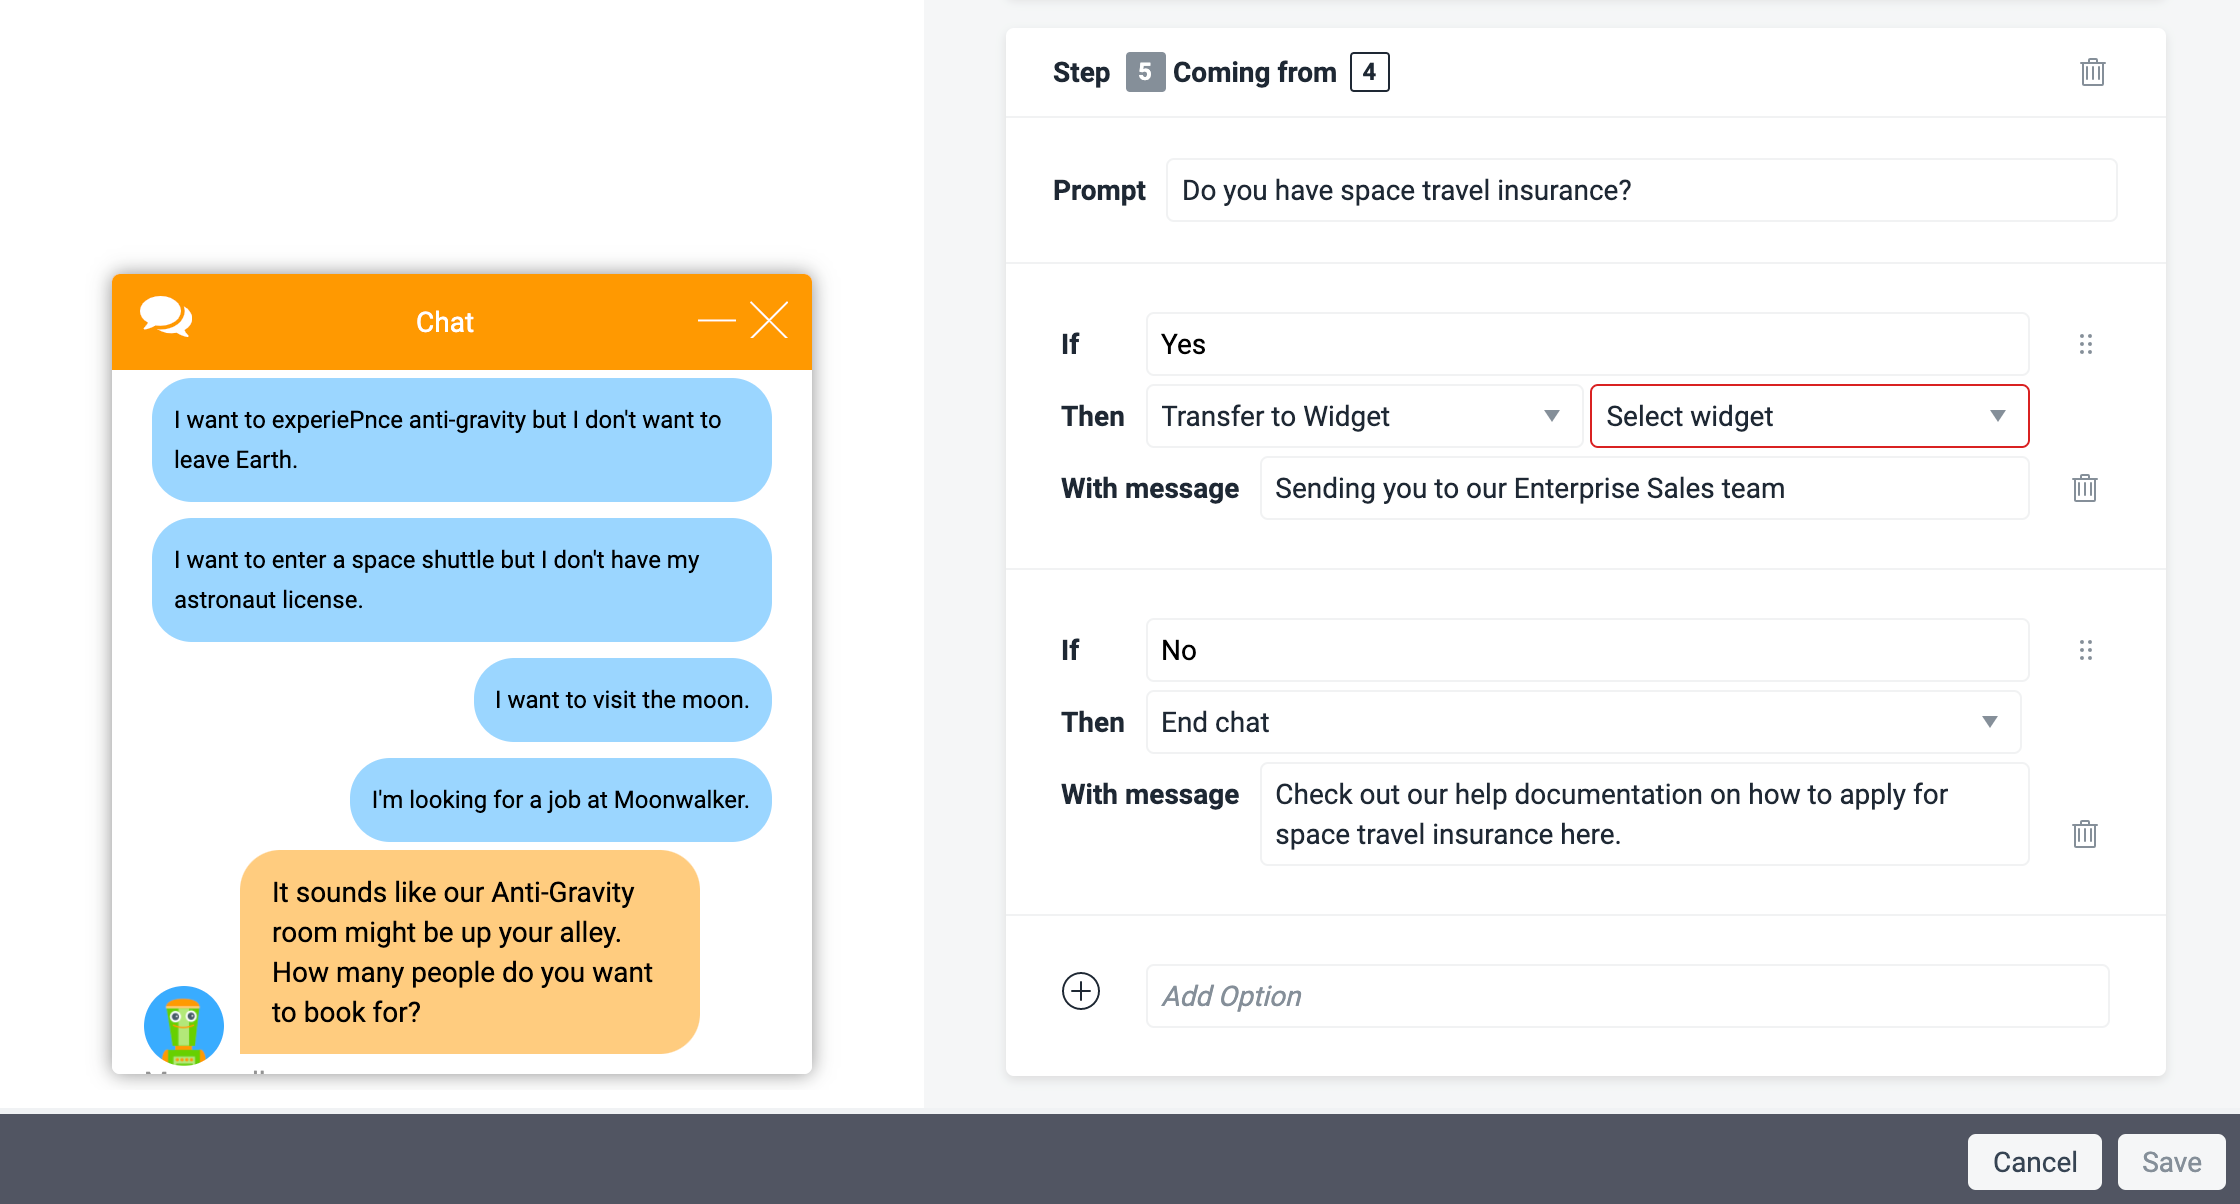
This is the last qualifier. We know already from the multiple steps that the visitor is interested in traveling to the Moon, and they do not get motion sickness, so the last question we need to ask is if they have insurance. If the visitor has gotten this far, they are a qualified lead, so we don’t use the Regular Sales transfer in this step.
If the visitor clicks on “Yes”, they are transferred to the Enterprise Sales team, and if they select “No”, the chat will end, and they will be sent to a page which details how to apply for insurance.
Step 4: Pre-chat Settings
Step 4 ensures that the Guide Bot is the first thing visitors see when they chat with you. This will control the prompt that appears in the chatbox.
To ensure that visitors are prompted with the general Guide Bot rather than the default message, navigate to (Settings > Design Studio) and look for Pre-Chat Form Settings. Set the Pre-Chat to “Open chat box with Guide Bot prompt”. This means that the widget will use the prompt you configured for the Guide Bot that appears in the lowest priority tier (Tier 1).
Step 5: Proactive Chat Settings
Step 5 allows you to use rules to proactively trigger the chatbox on your site and prompt site visitors to respond. Standard proactive chat displays a line of text and then assigns any response at all to your live agents. However, you can repurpose proactive message responses to be sent to your Guide Bot. The specific settings for this are described in Guide Bot Configuration.
In our example here, you will want to set at least 2 proactive rules. The first should be a general rule that applies to your entire site, except for the security page. When its conditions are met, set the rule to start the Guide Bot you created previously.
Learn more about using proactive chat rules.
Step 6: Widget Schedules
Last step! You must adjust your Settings to coincide with your chat agent sales schedule. Otherwise, bots work 24/7, rain or sleet or snow. The bot widget will happily take requests and route chats to your sales teams whether they are there or not, resulting in a poor after-hours visitor experience.
If your sales team is available 24/7, your recipe is complete. However, most sales teams do need to eat and sleep…unless it is the end of the quarter!
If your human sales teams are only available during certain hours, you will want to set a uniform schedule across all three of your widgets. This can be done by referring to the detailed instructions for setting a live chat schedule.
In this case, you should set all of your widgets to the same schedule.
That’s it! You’re done. You now have a simple lead generating campaign routing chats to two different sales teams.
Did you find this article helpful?
 (No Ratings Yet)
Published August 3, 2020