Home > I would like to offer chat with my support and sales teams, which are in 2 different SnapEngage widgets
Categories: JavaScript API
(Last Updated On: )
About This Article
The purpose of this article is to provide a comprehensive overview of how t0 offer 2 different SnapEngage widgets on the same page.
To allow multiple widgets on the same page, we assume you already have one widgets JavaScript code from the Get The Code tab installed on your website (if you are using the Proactive Chat mode then install the widget code of this one).
****Note : Be aware that the pre-chat form or offline form and chat box the visitor will see is the one for the widget installed on the page. What this does is redirect to another widget, but the interface of the installed widget will remain****
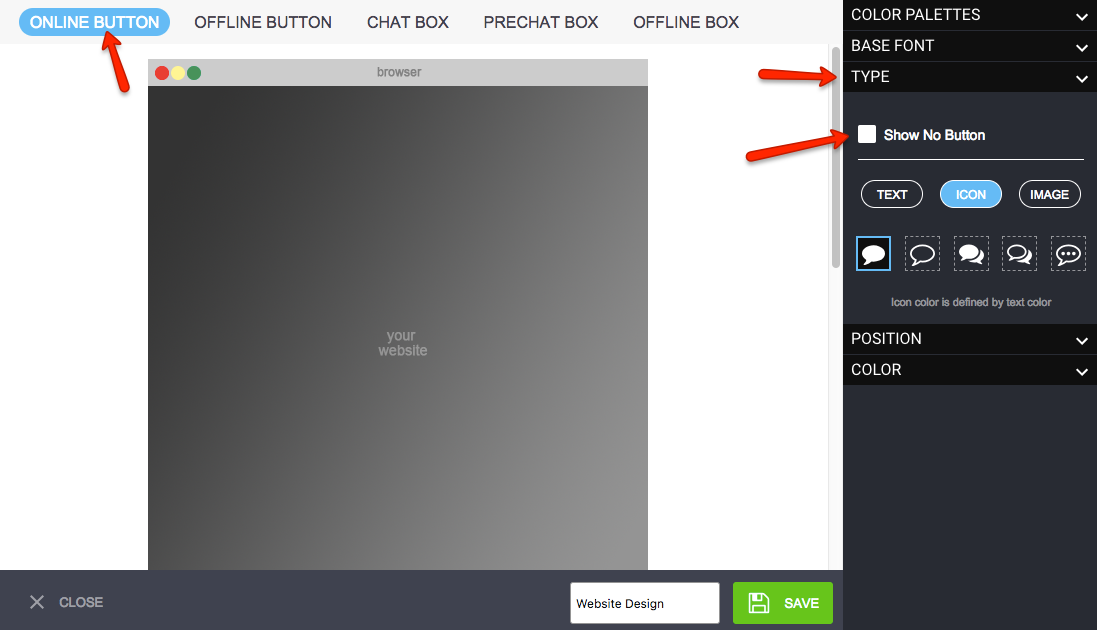
Because the floating chat button on the border of the page can only be connected to one widget we need to deactivate this button and set up individual inline buttons, so you will need to remove the button from the Design studio. These buttons can then be customized to say “chat with sales” or “chat with support“.
From the Design Studio, edit the design, go to online button, type, show no button. Repeat for offline button.

Then you would need your images to be uploaded onto your domain and they need to be https. Have the URLs handy for the two online images and the two offline images, assuming you want a button for chat for each widget, and a button for offline for each widget. Making sure your SnapEngage code is already installed, you will place the following code, on the part of the page where you want the images to be, making sure to replace the widget IDs to your widget IDs and the image URL with your own image URLs (see next point).
<a href="#" onclick="SnapEngage.switchWidget('b9341ff4-xxxxxxx-802e-031ecf5391cf'); return SnapEngage.startLink();">
<img src="https://www.snapengage.com/statusImage?w=b9341ff4-xxxxxxxx802e-031ecf5391cf&on=https://theurlforyouronlinechatphoto1.jpg&off=https://theurlforyourofflineemailphoto1.jpg"
width="150"
height="50"
border="0"
/>
</a>

<a href="#" onclick="SnapEngage.switchWidget('16e00c3e-d5cc-xxxxxxa1-6c033381f39f'); return SnapEngage.startLink();">
<img src="https://www.snapengage.com/statusImage?w=16e00c3e-d5cc-xxxxxxxx-6c033381f39f&on=https://theurlforyouronlinechatphoto2.jpg&off=https://theurlforyourofflineemailphoto2.jpg"
width="150"
height="50"
border="0"
/>
</a>
Now, let’s have a closer look at what we’ve done and the tweaks you need to make. On the above code, the first part is image one, and the second part is image two :

1 – This is the Switch widget ID function, which selects the widget the chat/email should be sent to.
2 – Here, we are telling the website to check the status of the widget online/offline and to determine which picture to use, if on (online) –> this picture, if off (offline) –> this picture.
so you would need to add statusImage?w= the ID of the widget to check the status then &on= the picture for online (chat) &off= The picture for offline (email)
Published January 12, 2012


 (6 votes, average: 3.83 out of 5)