Home > Chat Agent Actions: Transfer, Ban, and End Chat
Categories: Chat Agent Docs
(Last Updated On: )
About This Article
This article will cover the functionality of three major agent actions. Transfer, Ban, and Bye.
Transferring a Chat
To transfer a live chat to another team member, click on the Transfer button on the lower left hand side of the Conversations Hub during a live chat to open the Transfer Window
![]()
From the Transfer Window, you can transfer to another agent or another widget. Click on a name to send the chat to that person. Click the Arrow icon on the right side of the widget. If you are navigating between multiple widgets you may find it easier to click the disclosure or carrot icon on the left hand side of the widget name.
After transferring, you will no longer be able to interact with that chat. After a few moments, it will disappear from your hub.
![]()
Note: It is possible that the Transfer button will not show up if the administrator has disabled the transfer option within the Admin Dashboard
Additionally, when an agent does a widget transfer of a chat, the chat is now automatically “detached” from the transferring agent. This means that the chat is instantly no longer taking up a spot with the agent that initiated a transfer capacity of ongoing chats.
If transferred to a widget that is maxed out, the chat is disabled as expected and the transferring agent gets a system message that “The chat is in the queue and will be transferred when an agent becomes available.”
Ban User
To Ban a user click the Actions button on the upper right side of the chat dialogue box, then click Ban User. A dialogue box with require you to confirm the action.
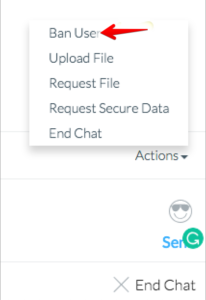
Note: This issue cannot be reversed.
End Chat
Click the End Chat button in the lower right corner of the chat window. Then you must click the Confirm (X) or Cancel (back arrow) after 10 seconds, the chat will close automatically.
Did you find this article helpful?

 (21 votes, average: 4.05 out of 5)
Published May 18, 2012