Home > Chatbot API – How to build it
Categories: Featured Article
(Last Updated On: )
About This Article
This article explains how to set up the Chat Bot api for third party bot usage.
Currently, our Chatbot API is only available on our Professional and Enterprise plans. Essentials plans do not include this feature. You will need to migrate to our new plans in order to utilize this feature.
In this article we will give you an example we’ve created that is hosted on Google Cloud platform, and how to connect it.
The technical documentation is available here. For the Chatbot API to work, you will need to be on the Design Studio.
The below is just an example on how to configure our example of code, but the possibilities are endless!
In this article, we will show you how to make a customizable chat bot that can fulfill many of your needs, how to host the code on Google and use the bot with SnapEngage.
We will give you an example we’ve created that is hosted on Google Cloud platform, and how to connect it. The Bot will then be able to take your clients chats, and you can configure the responses, and provide the visitor with different options in text or buttons view, with options to transfer to a group of agents, to a widget, to a specific agent, changing the widget as well as closing the chat.
The bot will also be able to ban a visitor, ban their IP, or even direct them to a website using the go to command.
On our example, we are going to host the code on Google Cloud Platform, and this will be our endpoint. At the time this article was written, Google was offering a year for free, but check if this is still the case, as there may be a cost involved.
You may be able to use other options for this.
- Head over to https://console.cloud.google.com/ and create a new account if you don’t have one already.
- Then head over to Cloud Functions (1)

- From the next page’s menu, create a new function, and from the following page give it a name. You will also choose “Node.js 8” (2) under runtime, and type “processJSON” (4) under function to execute. Also copy the URL (3) onto your clipboard.
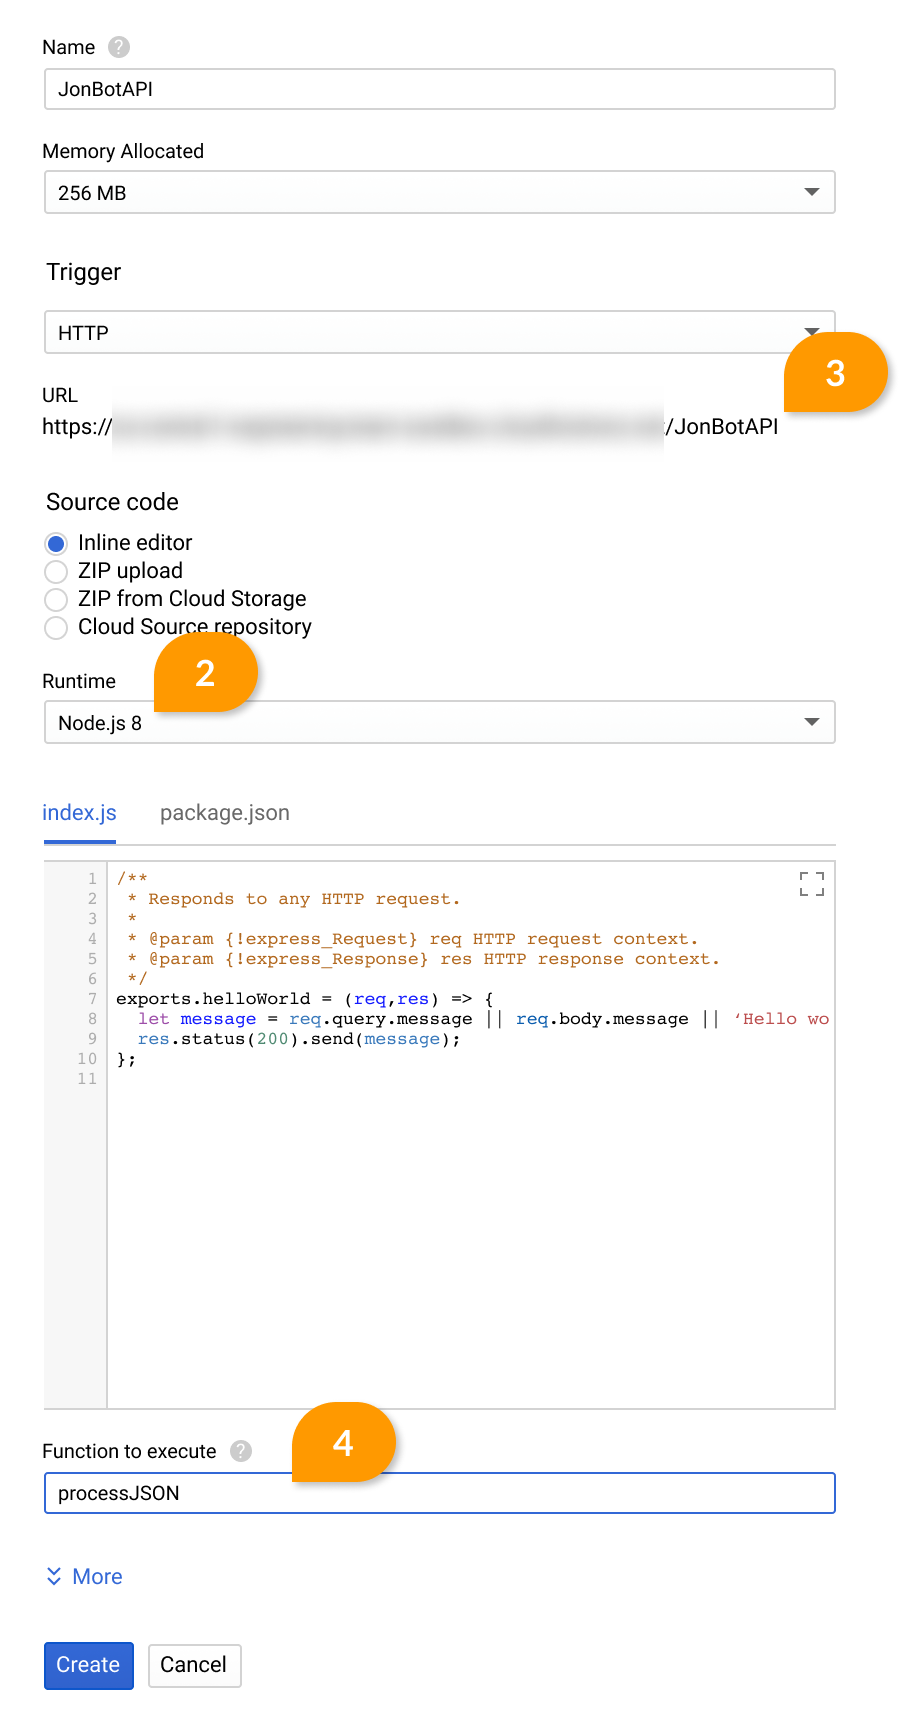
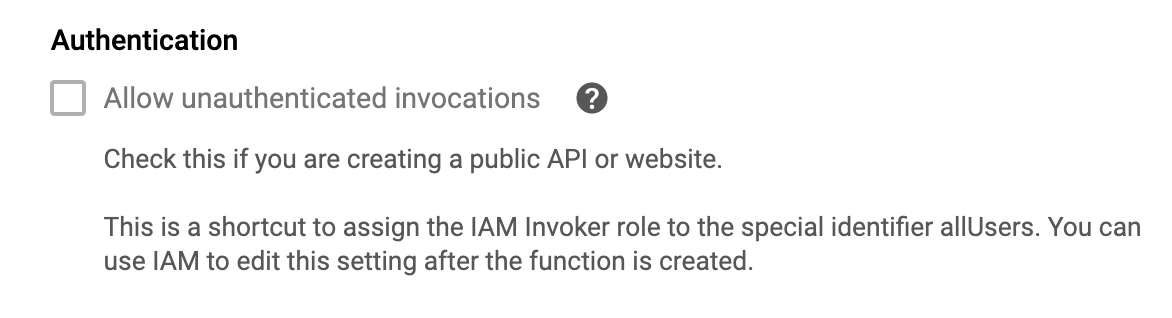
- Check the box to allow unauthenticated invocations
- You will then paste the code on the box, and hit create. (we will go through our code example later on this article).
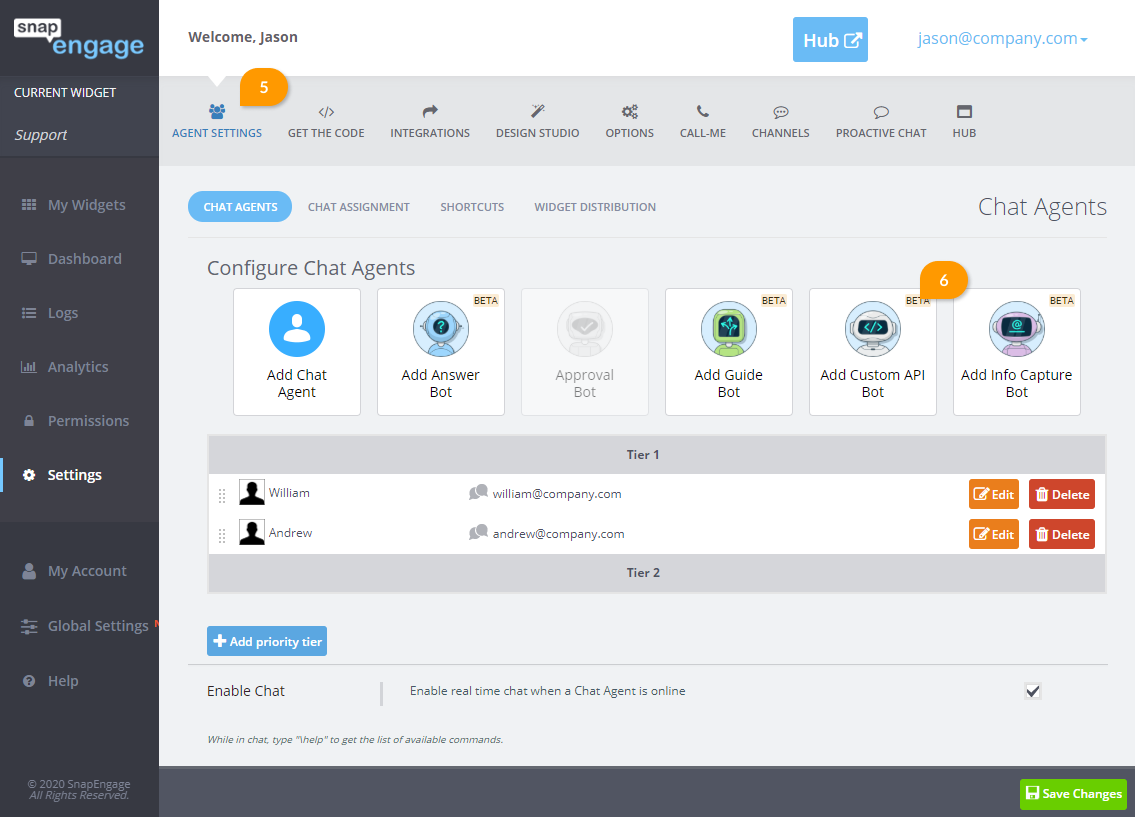
- Then head over to the SnapEngage Admin Dashboard, go to Settings -> Agent Settings (5) and click the button to Add Custom API Bot (6).
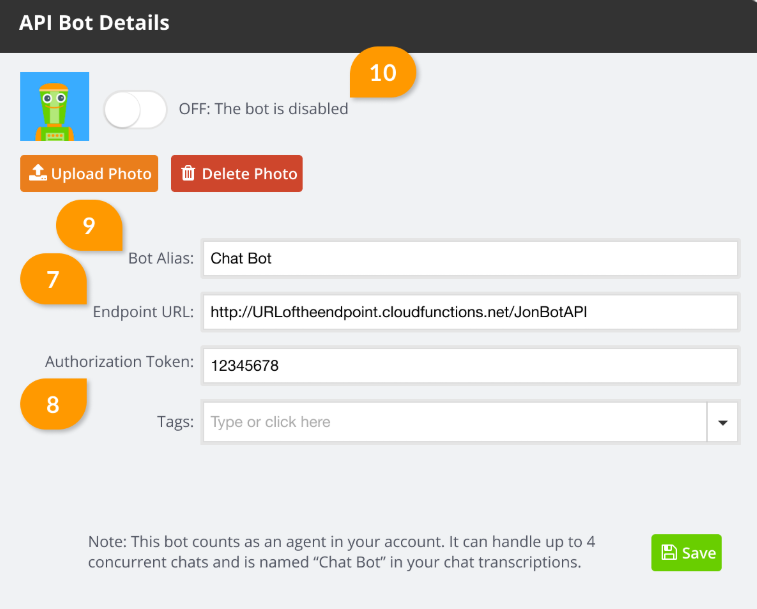
- Then enter the endpoint (which is the URL you’ve previously copied onto your dashboard from Google Cloud) (7), make sure there are no spaces the end of the URL, as you may have copied a space from Google Console, add the authorization token (8) which is on your code (we will also go through that later on this article) and give it a name (9). Also notice the button which allows you to turn it on or off (10). The bot will able to handle an unlimited amount of chats.
Now download our template here if you want to work with it and make changes. And below, we will analyse the code a little further. Please be aware that this template is just an example, and it will not work on your website, unless your developer rewrites the code.
In the next part of the code you will determine what response the bot should give depending on the question. Here, if you type anything, you will be presented with 5 buttons (see line 4)
Let’s just imagine a travel agency specialised in holidays in Spain wants to use a bot. Each of those buttons will take a different action. For example, if the client types any of these words : “summer”, “holiday”, “villa”, “appartment” or “vacation”, the response would be “We can help you with your holiday accommodation, let me put you in touch with my colleague, please hold” and it would transfer you to an agent (you could also choose the widget). If you typed any of the following words “conference”, “event”, “fair”, “work trip” or “retreat”, the bot would respond “Unfortunately we do not organise work events, or conferences, and we are not able to assist”, and would close the chat. Additionally, if the visitor types “Spain”, the bot would ask which specific area they are looking for, and they would be presented with 4 buttons, “Costa del Sol”, “Balearic Islands”, “Basque Country” and “Galicia”. The first 3 options would transfer the chat to a specialised agent, whereas the 4th option would close the chat, as Galicia is an area in which they do not work. Any other word would also direct to an agent, as specified in the last } else { Again, this is an example to showcase the capabilities of the bot API.
if (message.indexOf('summer') !== -1
        || message.indexOf('holiday') !== -1
        || message.indexOf('villa') !== -1
        || message.indexOf('appartment') !== -1
        || message.indexOf('vacation') !== -1) {
      respondToSnapEngage(req, res, 'We can help with your holiday accommodation, let me put you in touch with my colleague, please hold.', 'HUMAN_TRANSFER');
    } else if (message.indexOf('conference') !== -1
               || message.indexOf('event') !== -1
               || message.indexOf('fair') !== -1
               || message.indexOf('work trip') !== -1
               || message.indexOf('retreat') !== -1) {
      respondToSnapEngage(req, res, 'Unfortunately we do not organise work events, or conferences, and we are not able to assist.', 'BYE');
    } else if (message.indexOf('spain') !== -1) {
      respondToSnapEngage(req, res, 'We can help with your holiday in Spain, which specific area were you thinking of?', '', '', [{
        "text": "Costa del sol"
      }, {
        "text": "Balearic Islands"
      }, {
        "text": "Basque Country"
      }, {
        "text": "Galicia"
      }]);
    } else if (message.indexOf('costa') !== -1
               || message.indexOf('balearic') !== -1
               || message.indexOf('basque') !== -1) {
      respondToSnapEngage(req, res, 'We can help with that, let me transfer you to a specialist!', 'HUMAN_TRANSFER');
    } else if (message.indexOf('galicia') !== -1) {
      respondToSnapEngage(req, res, 'Unfortunately, we do not have any holiday homes in Galicia, and we cannot assist.', 'BYE', '');
    } else if (message.indexOf('done') !== -1) {
      respondToSnapEngage(req, res, 'Good-bye!', 'LABEL', '[{\'Status\': [\'Closed\']}]');
    } else {
      // temporary logging
      console.log('We are in the else -- no keyword matched');

      // Anything else goes to a human transfer
      respondToSnapEngage(req, res, 'Let me transfer you to a human colleague', 'HUMAN_TRANSFER');
    }
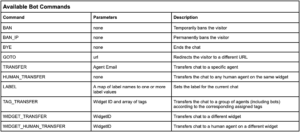
These are the commands that the bot can handle details here. :
If for example the visitor typed France or Belgium and this agency doesn’t work with those countries, they may want to redirect it to a partner, in that case, they would use the goto command as follows :
} else if (message.indexOf('france') !== -1 || message.indexOf('belgium') !== -1) {
      respondToSnapEngage(req, res, 'Feel free to check our European partner', 'GOTO','https://europeanholidaypartner.com', '');
What we showed above was the example we worked with, and something you can use as a template, but if you would like to start from scratch, here is some technical information :
On the admin dashboard :
– Bot Alias: Bot name showed to visitors – Endpoint URL: Internet facing endpoint hosted on the client web services, receiving a HTTP POST request from SnapEngage – Authorization Token: Token that is included in the https header as “authorization” – Tags: Optional, standard SnapEngage routing by tag feature
Payload :
On each message routed to the chat bot, SnapEngage makes a call to the webhook with the following information: – the chat widget ID: to uniquely identifying the chat widget on the SnapEngage side – this is a String in UUID format – the chat session ID: to uniquely identify the chat session, and to allow the logic at the webhook receiver to keep the context
– the event type: this field specifies the type of message, i.e. visitor message, system message (page change, end of chat, etc.) [chatStarted, chatClosed, message] – the message content: can be text sent by the visitor or a system message information Other information to pass through as well:
– if the chat was a proactive chat, the proactive prompt needs to be passed to the API for providing the bot the relevant context
Chat started :
{
  "widget_id": "XXX-XXX-XXX-XXX",
  "case_id": "XXX-XXX-XXX-XXX",
  "timestamp": 123,
  "event": "chatStarted",
  "email": "...",
  "proactive_message": "...",
  "description": "...",
  "tags": "...",
  "geo": {
    "city": "...",
    "region": "...",
    "country_code": "..."
  },
  "user_agent": "...",
  "entry_url": "...",
  "referrer_url": "...",
  "page_url": "...",
  "ip_address": "...",
  "variables": "..."
}
Note: The “proactiveMessage” is the message that was displayed to the visitor as part of the proactive prompt. If it was a non-proactive chat then the element would not be included.
Chat Ended :
{
  "widget_id": "XXX-XXX-XXX-XXX",
  "case_id": "XXX-XXX-XXX-XXX",
  "timestamp": 123,
  "event": "chatClosed"
}
Chat Message :
{
  "widget_id": "XXX-XXX-XXX-XXX",
  "case_id": "XXX-XXX-XXX-XXX",
  "timestamp": 123,
  "event": "message",
  "from": "visitor"|"system",
  "text": "..."
}
Response payload :
{
  "widget_id":"XXX-XXX-XXX-XXX",
  "case_id":"XXX-XXX-XXX-XXX",
  "content":[
    {
      "type":"command",
"operation":"BYE"|"GOTO"|"TRANSFER"|"WIDGET_TRANSFER"|"SWITCH_WIDGET"|"BAN"|"BAN_IP"|"WIDGET_HUMAN_TRANSFER"
      "parameters":"..."
    },
    {
      "type":"message",
      "text":"...",
      "display_responses":[
        {
          "text":"Yes"
        },
        {
          "text":"No"
        }
      ]
    }
  ]
}
The “parameters” element would be used in conjunction with certain operations such as GOTO, TRANSFER, or SWITCH_WIDGET You will also find our video webinar here https://youtu.be/bGioCDQn18k
Did you find this article helpful?
 (2 votes, average: 5.00 out of 5)
Published October 30, 2019