Home > SnapEngage Data for Integration Custom Mappings
Categories: Integrations & Plugins
(Last Updated On: )
About This Article
The purpose of this article is to provide a comprehensive overview of how to add SnapEngage Data for Integration Custom Mappings. How to send data from SnapEngage to your CRM.
In this document, you’ll find descriptions for each field available in your Integration’s Custom Mappings under the “SnapEngage” Source Type, and how to use them:

Browser = Which browser is the visitor using
Browser Abbreviated = Which browser is the visitor using minus version number
Browser Data (User agent) = Which browser the agent is using
Chat Agent Alias = The alias name for the agent configured with edit agent settings
Chat Agent IM ID = Chat agent email address
Chat Duration = The length of the chat (in seconds)
Chat End Date = Date the chat ended
Chat Ended By = Who ended the chat (agent, visitor, idled out)
Chat Responded = True or False was the chat responded to
Chat Start Date = The date the chat started
Chat Transcript = The transcript of the chat
Chat Wait Time = How long a visitor waited before an agent responded to the chat for the first time
City = The city from where the visitor chatted in from
Contact Phone = Visitors phone number (if available)
Country = The country from where the visitor chatted in from
Country Code = The code of the country from where the visitor chatted in from
Description = The visitors first message
Entry URL = This is the first page on your website where a visitor landed
Flash = Whether or not the visitor has Flash enabled. True or False
Full Geolocation = The full geolocation of the visitor
IP Address = The IP address for the visitor
ISP = The visitor’s Internet Service Provider
Java =Whether or not the visitor has Java enabled (True or False)
Languages = The visitor’s language
Latitude = The latitude of the visitor’s location
Link to case = A URL link for the transcript
Longitude = The longitude of the visitor’s location
Operating System = The operating system of the visitor
OS Abreviated =Abreviated info about the operating system of the visitor
Phonenumber = The visitor’s phone number if found during social discovery lookup.
Plugins = Any plugins the visitor has on their browser
Referrer Decoded = Displays the search term a visitor used to find your website. Only shows if visitor used a search engine to find you. (Only works with Bing as Google now encrypts searches)
Referrer URL = This is the URL from which a visitor arrived on your site. Also shown as “Coming from” on chat transcripts
Requester email = The visitor’s email address
Set Language Code = The language code (en,sp,fr, ect.)
Source Type = Will add following text “Message” for offline and Live_chat for online chats
State = The state from where the visitor chatted in from
Website URL = The page the visitor started the chat on
Survey Score = The score given to the agent post chat by the visitor (only visible if the Post Chat Survey is enabled – see below)
Survey Comment = The comment (if any) sent from the visitor attached to the survey (only visible if Post Chat Survey is enabled – see below)
*The agent integration ID field is available in the SnapEngage section for integrations that all custom mappings. This can be used to map for example in Zendesk to override the submitter ID You can read more here after #4.
SnapEngage allows you to map different types of data to different fields and objects in your CRM/Help Desk. This document will show you how Custom Mappings work, and how to add them to improve the functionality of your Integration!
The Custom Mappings feature is available in the following integrations: Salesforce, Zendesk, Desk.com, Hubspot, UserVoice, MS Dynamics Cloud and Jira.
If you’re just looking for an explanation of the SnapEngage data that
is available to you, see the list here!
Post Chat Survey Score and Comments
There are two new additions to the list of available custom mappings – Post Chat Survey Score, and Post Chat Survey Comment. You can map these variables as shown below:

For these mappings to be visible as mappable options, you will first need to enable the Post Chat Survey. This can be switched on by going to Settings -> Options, and enabling the following:
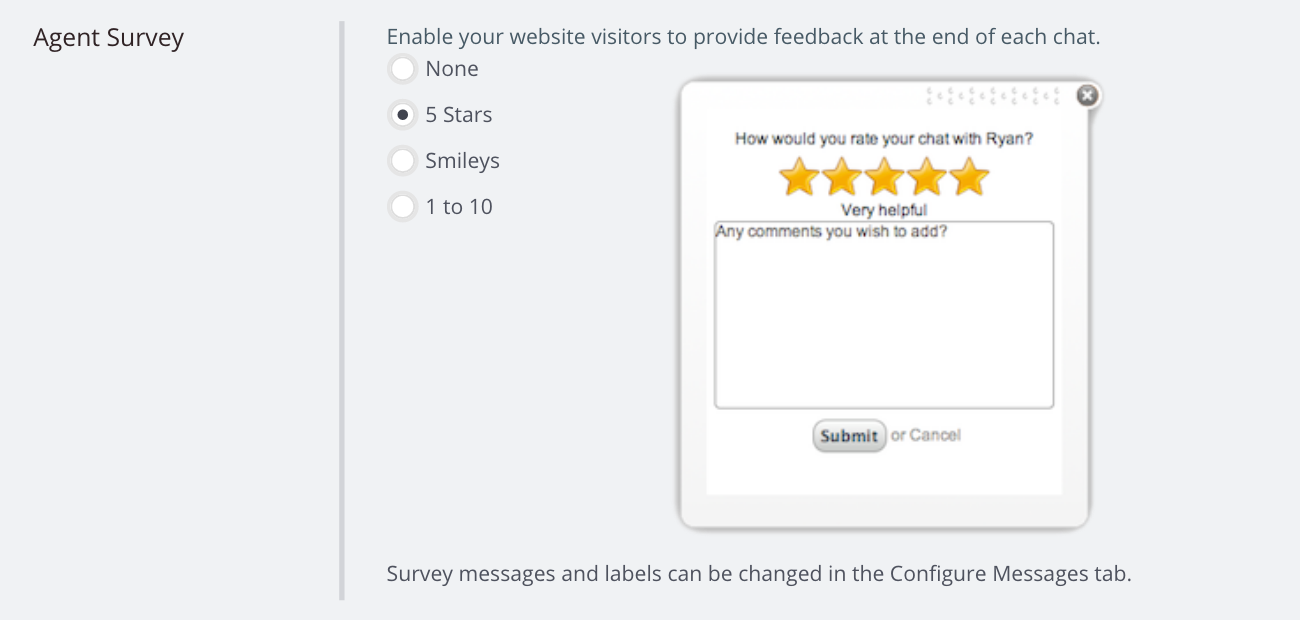
You can read about our Post Chat Survey here.
Let’s add some Custom Mappings!
Adding Custom mappings is quite simple. First, login to your SnapEngage Admin Dashboard and go to -> Integrations.
If the integration you are using supports mapping, for example SalesForce or Zendesk, then scroll to down to the bottom of the window.
On the left side is the data from SnapEngage that you want to pass to your Integration.
On the right side is the Object specific field in your integration system that you want the data to be mapped to.
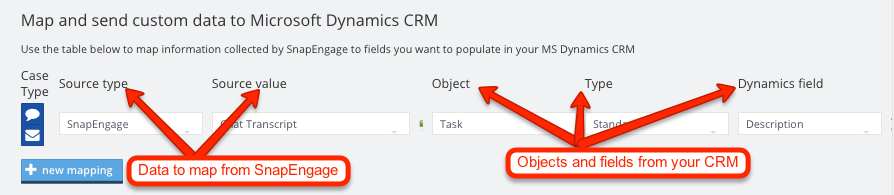
Data to be mapped: Source Type, Source Value and chat/offline buttons
We have 4 available Source types to map:
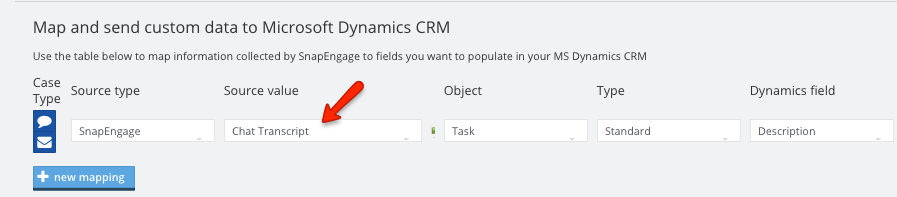
- SnapEngage – Select this option if you want to map data that SnapEngage collects in the beginning of every chat or every offline message. In the Source Value you can see all the different types of data SnapEngage provides. Take a look here to see all the explanation about every Source Value. In this example the Source type is SnapEngage and we are selecting ‘Chat transcript’ as the Source value.
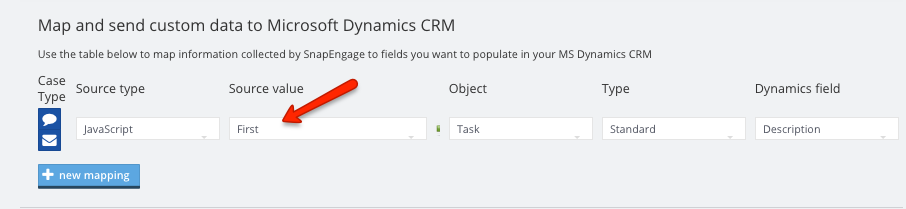
- JavaScript – Select this option if you want to pass your JavaScript Variables to a field in your integration. To use this option, please follow first the steps in this article. After adding the JS variables to the Options tab you will be able to select the variables from the Source Value. In the next example we want to map ‘First’ (a custom JavaScript variable that holds the first name of the web visitor) to a field in our integration.
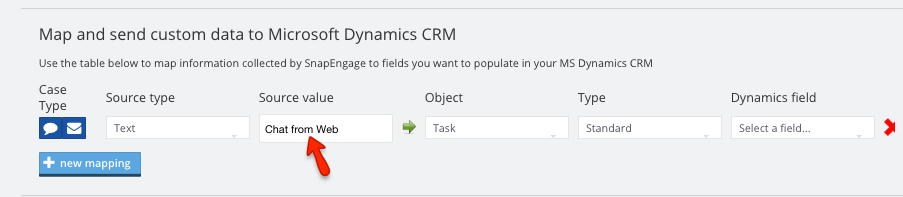
- Text – Select this option if you want to pass a simple text to a field in your integration. You can enter any text you want in the Source Value and this text will be added to the selected field on the right side. In the next example we will enter the Text ‘Live chat’ to the field Subject.
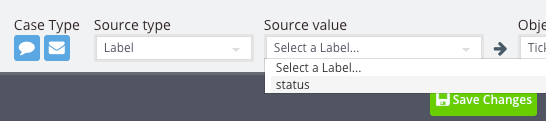
- Labels – Select this option if you want to add any data that the agent added on the fly during the live chat. You can read here on how to use the Labels during the chat and after a chat has ended. The Source Value will be the name of the Label you are going to use to assign values during the chat. You can easily select the Labels you need from the Source Value dropdown menu.
To the left of the mapping item you can see two buttons. These decide if the this Custom Mapping item will be only for Chat transcripts or only for Offline cases or for both.
Custom Mapping item will be available for Chat transcript and Offline Message ![]() .
.
Custom Mapping item will be available only for Chat transcript ![]() .
.
Custom Mapping item will be available only for Offline message ![]() .
.
Objects and Fields from your CRM/Help Desk
On the right side if the Custom Mapping Item you can select the destination of the data you selected on the left side.
Object – the available objects for the selected integration (different for each integration). In most of the case one of the objects is the User (Customer/Contact/Account) and the second object will be where is the chat transcript is usually sent to (Ticket/Case/Issue and more). Select the object you want to map the data to.
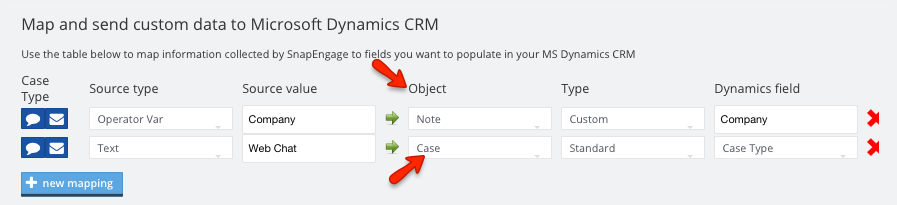
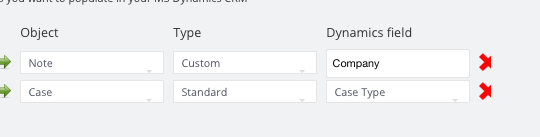
Type – the Object will have two different types of fields: Standard fields and Custom fields. The standard fields will appear in every Object of your integration. The custom fields are created by you in your selected CRM/Help Desk. In the next example you will see 2 different mappings types, one for Standard type field Company in Customer object and the second is Custom type field Brand in Case object.
Fields – the last part are the available fields which are the destination of your mapped data.
*Note: Mapping data to the same field more than once, will add all the Custom Mapping items to the field with a space ‘ ‘ between each value.
Did you find this article helpful?

 (3 votes, average: 4.67 out of 5)
Published October 2, 2013