Home > Track Messaging & Live Chat Events with GA4
Categories: Integrations & Plugins | Customization | JavaScript API
(Last Updated On: )
Google Analytics is a tool that identifies trends in the visitor’s interaction with the chat application on a given website. Analytics uses a tracking property to measure events or interactions like opening and minimizing the chat box. Our event tracking code corresponds to Google Analytic’s three tracking properties (gtag, ga, and _gaq).
However, Google will fully migrate from the Universal Analytics (UA) property to the Google Analytics 4 (GA4) property by July 1st, 2023. GA4 is supposed to be more comprehensive and flexible than its predecessor. Overall, this means that only the latest version of our event code (gtag) will work; the UA code (ga and gaq) will stop working once the migration is complete. Accordingly, the following situations might apply to clients:
- I am new to tracking SnapEngage Events with Google Analytics
- I currently use the UA property to track SnapEngage Events
- I use Google Tag Manager to track SnapEngage events
Note: At the end of the document, you will find the list of code snippets for all the Messaging & Live Chat events that you can track
I am new to tracking SnapEngage Events with Google Analytics
You either have no experience using Google Analytics with Messaging & Live Chat, or you want to start tracking data under a new account. As Google Analytics discontinues the UA property, we recommend using the GA4 property. The process takes place in 4 steps.
- Create the GA4 Account and your first tracking property.
- Retrieve the GA4 Code.
- Add the GA4 Code to your Messaging & Live Chat code
- Check that GA4 is working.
This section assumes that you already have a Google Analytics Account. If not, then please visit this page for instructions.
1. Creating a GA4 Account and your first GA4 tracking property.
You can create up to 100 Accounts to store and organise your GA4 tags. Please skip to the next step if you already have an account.
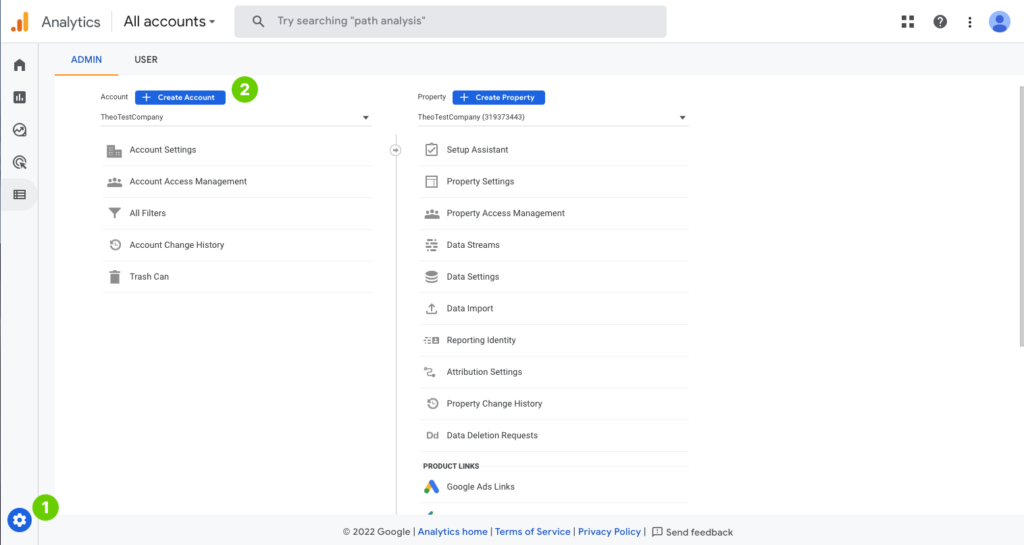
- Once logged into Google Analytics, click on the admin settings to start creating a new account to store the new GA4 property.
- Click on “Create Account.”
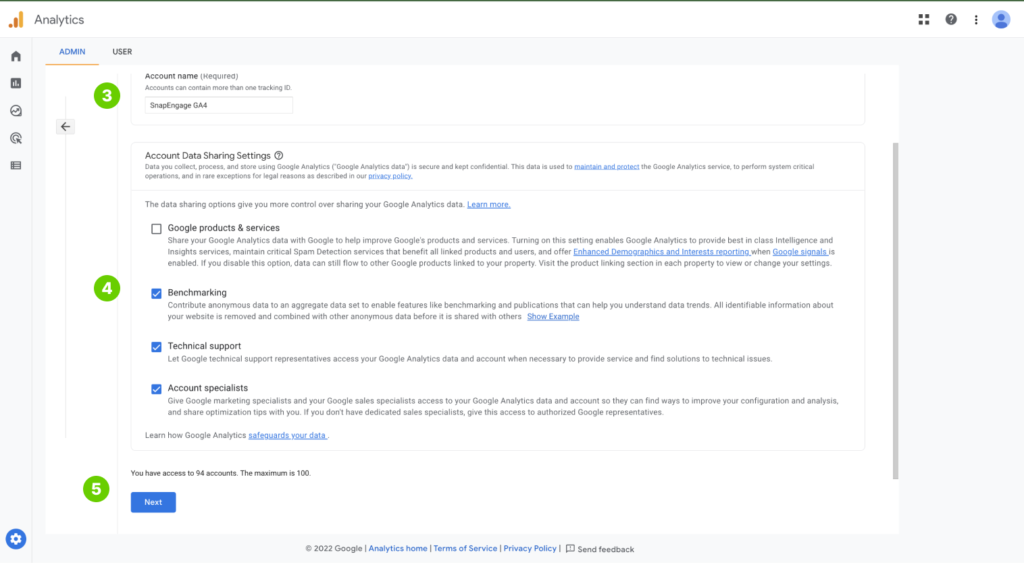
- Give the account a title
- Select the appropriate Data Sharing permissions
- Click “Next” to start creating your first GA4 property for this account.
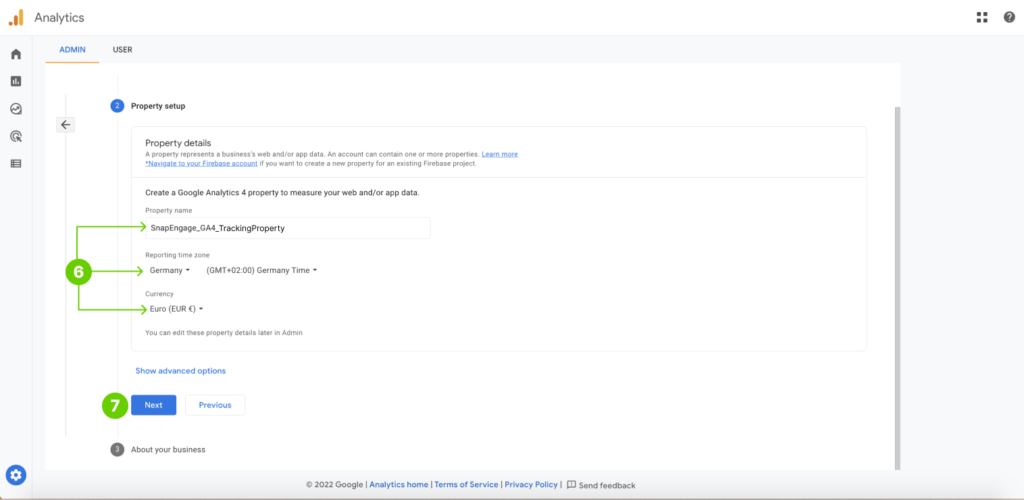
- Complete the property details by giving the GA4 property a name, reporting time-zone, and currency.
- Hit next to proceed to “About your business.”
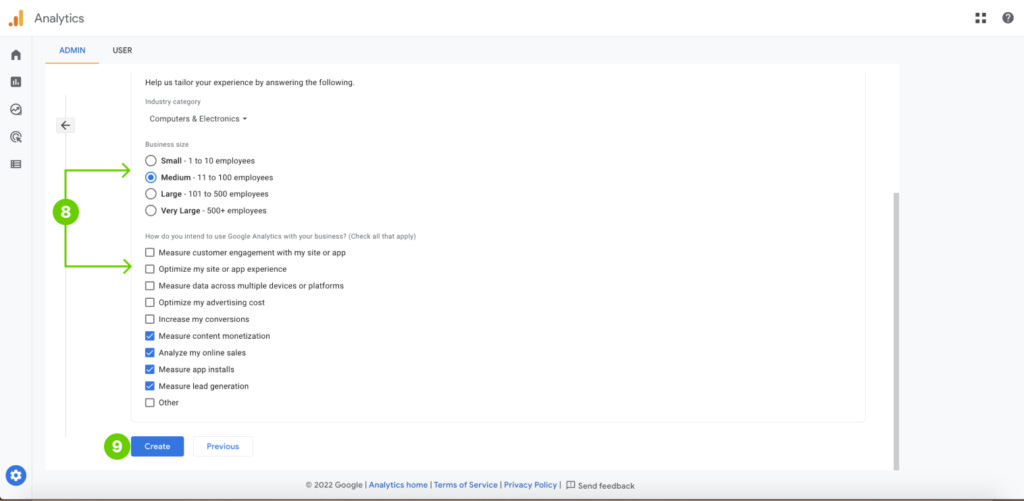
- Select the appropriate options that describe your Google Analytics account.
- Hit “Create” to create the Account and GA4 property within.
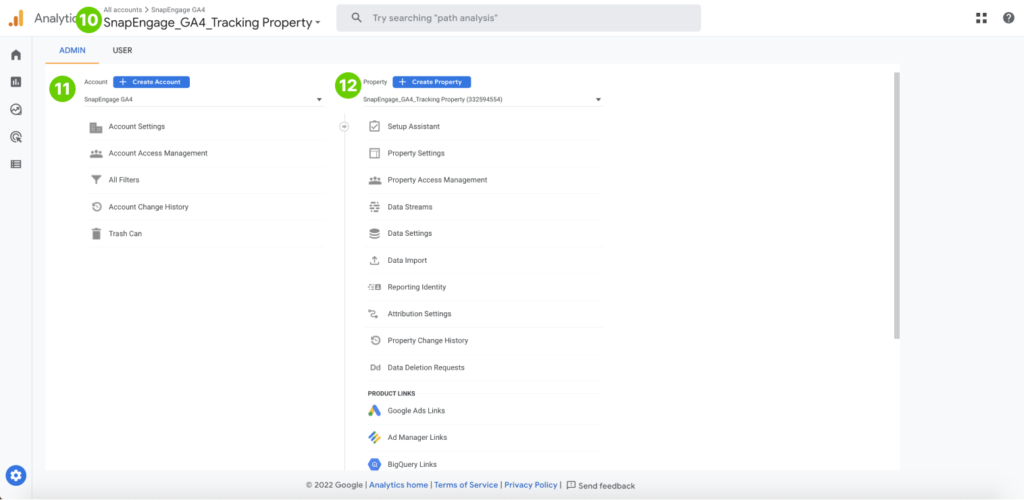
- The breadcrumb navigation is there to help you know your location in Google Analytics. The GA4 tracking property is in the larger bold text with the account name just before it.
- Here are the account settings. For instance, you would go here if you wanted to change the account name and data sharing settings.
- Here are the GA4 Property Settings. One can see that its a GA4 property because the 9 digit number is within parenthesis.
2. Retrieving the GA4 code
Naturally, you must place the google analytics tracking code on your websites HTML to start tracking.
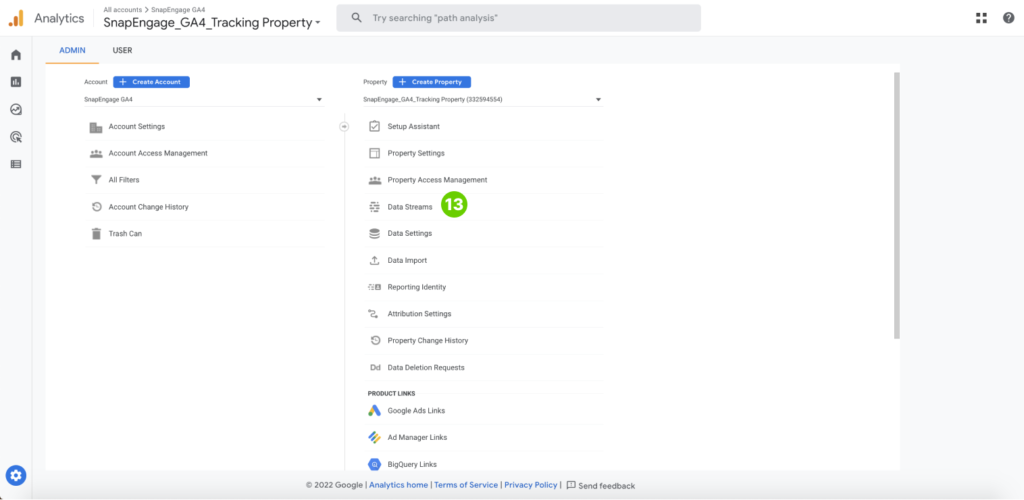
- Click on “Data Streams” to get started.
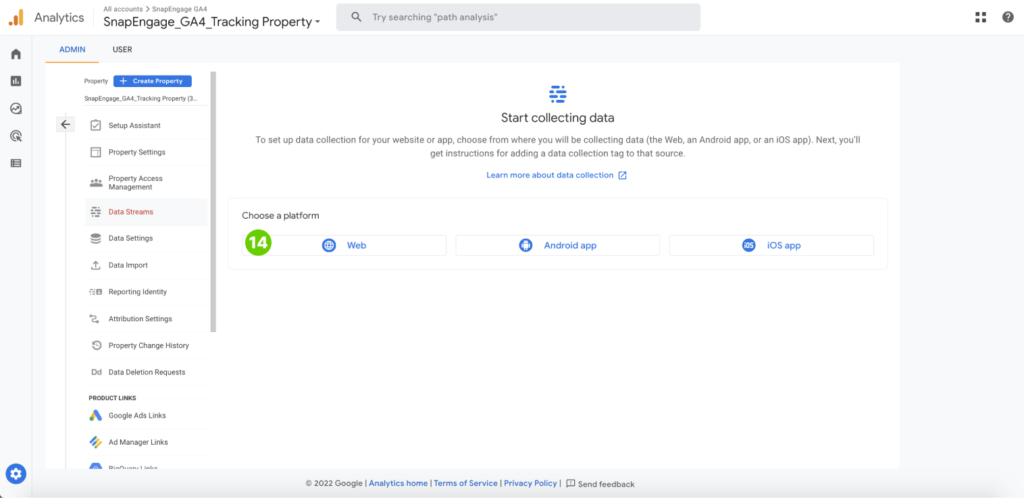
- Click on “Web” as the chat application is normally on a webpage.
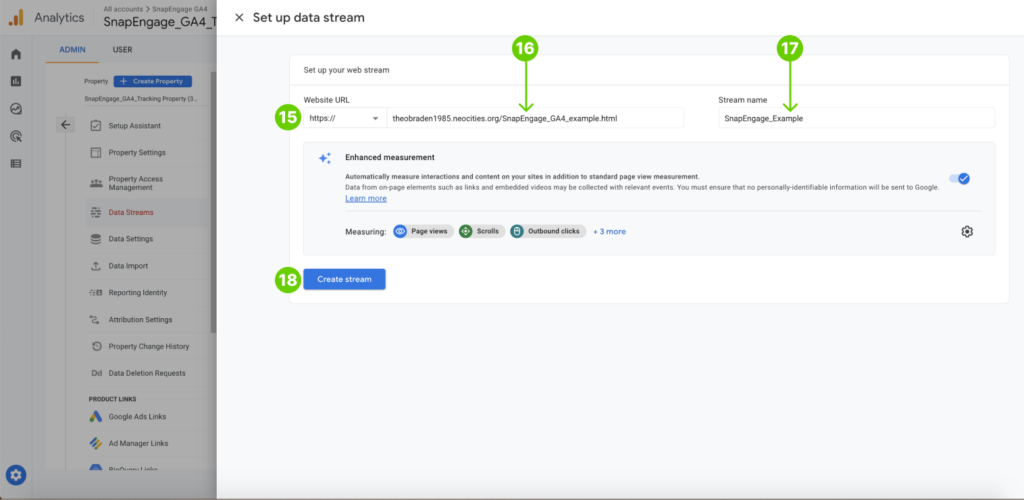
- Select with the website is “http” or “https”
- Enter the URL without the “http/s”
- Name the Stream
- Click “Create Stream”
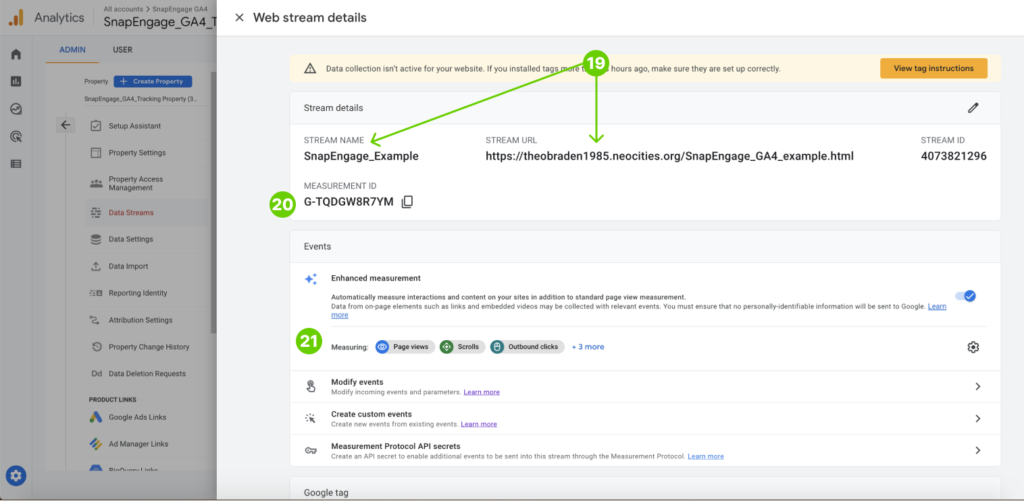
- You should notice that these are the stream details that you entered in steps 16 and 17 (e.g., stream name and URL)
- This is the measurement ID; this is the number that you will see in the code. But more on that later.
- A benefit to using GA4 is that it has automatic tracking (e.g., page views, scrolls, clicks). Toggle the switch to turn this feature off or click on +3 more to add more automatic tracking. This will not interfere with Messaging & Live Chat event tracking.
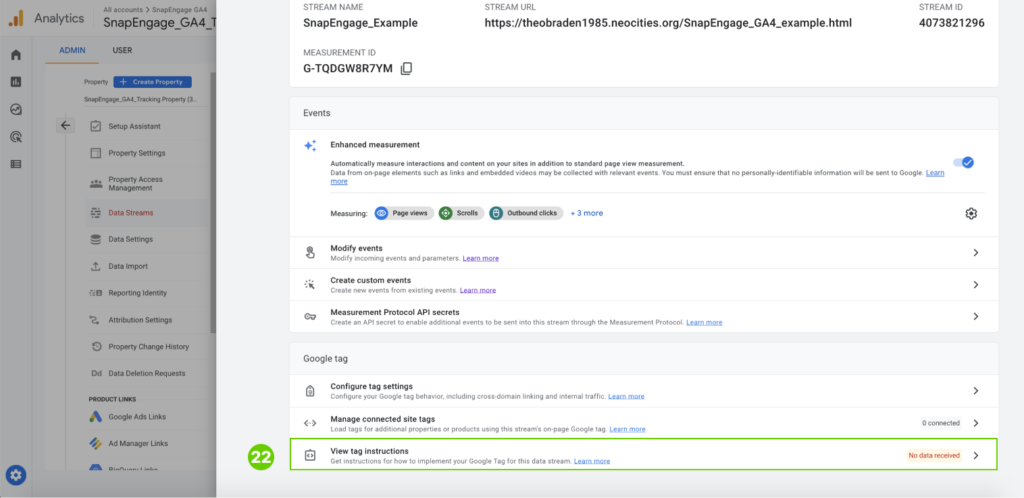
- Click on “View Tag Instructions” to retrieve the code that we will link to both the Messaging & Live Chat widget and the event code.
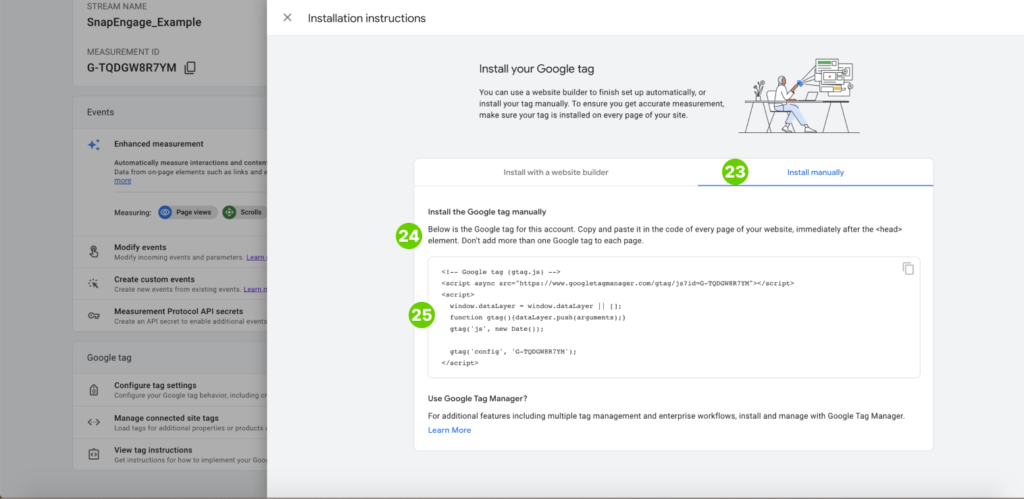
- Click on “Install Manually” to see the GA4 Tracking code.
- Place the GA4 code high within the <head> tag.
- Copy the Code. In the next step, we will post the GA4 tracking code within the SnapEngage Code.
3. Combining GA4, SnapEngage and event code
This section assumes that you have the Messaging & Live Chat widget code posted on your website’s HTML. Please check here if you need instructions.
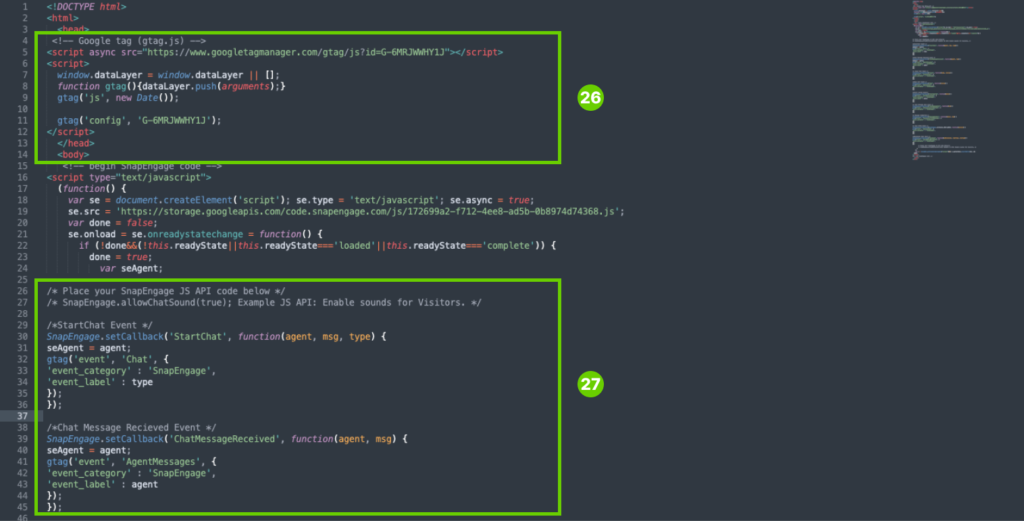
- Placing the GA4 code on the HTML: Place the GA4 code high in the first <head> tag on your website’s html.
- Placing the Event Code within Widget Code: Place the gtag SnapEngage event code within the JS API code space, after “/*Place your SnapEngage JS API code below*/”. At the end of this article, you will find the code snippets for each one of the chat events that you can track. If you have been working with Google Analytics for a long time, you might know that there are different versions of codes. When you use GA4, please make sure that you use the gtag (gtag.js) version. For example, if you want to track the StartChat event, use the following code:
StartChatvar seAgent;
SnapEngage.setCallback('StartChat', function(agent, msg, type) {
seAgent = agent;
gtag('event', 'Chat', {
'event_category' : 'SnapEngage',
'event_label' : type
});
});
4. Testing GA4 tracking property
- It can take up to a day for the GA4 tracking code to start working. Otherwise, the above screen means you are ready to test the GA4 tracking code. We will trigger the events on the website and then check Analytics’ Realtime Dashboard.
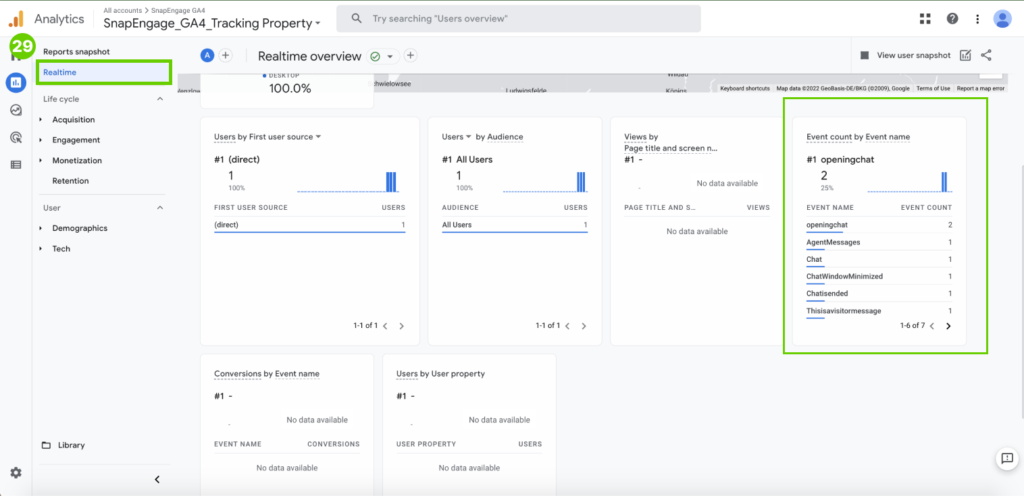
- After triggering events on your website with the tracking code (e.g., opening and minimizing the chat box to capture the ChatWindowMinimized and openingChat events), click on “Realtime” reports. Please keep scrolling until you see the “event count by event name.” Please note that it can take some time for analytics to appear.
Events
StartChat
var seAgent;

SnapEngage.setCallback('StartChat', function(agent, msg, type) {

seAgent = agent;

gtag('event', 'Chat', {

'event_category' : 'SnapEngage',

'event_label' : type

});

});Button Event
SnapEngage.setCallback(‘InlineButtonClicked’, function(options) {
gtag(‘event’, ‘InlineButtonClicked’, {
‘event_category’ : ‘SnapEngage’,
‘event_label’ : options.buttonLabel
});
});
OpenProactive
SnapEngage.setCallback('OpenProactive', function(agent, msg) {

seAgent = agent;

gtag('event', 'ProactiveChat', {

'event_category' : 'SnapEngage',

'event_label' : agent

});

});
ChatMessageReceived
SnapEngage.setCallback('ChatMessageReceived', function(agent, msg) {

seAgent = agent;

gtag('event', 'AgentMessages', {

'event_category' : 'SnapEngage',

'event_label' : agent

});

});
Close
SnapEngage.setCallback('Close', function(type, status) {

gtag('event', 'closingchat', {

'event_category' : 'SnapEngage',

});

});
Open
SnapEngage.setCallback('Open', function(status) {

gtag('event', 'openingchat', {

'event_category' : 'SnapEngage',

});

});
StartCallme
SnapEngage.setCallback('StartCallme', function(phone) {

gtag('event', 'CallMeInitiated', {

'event_category' : 'SnapEngage',

'event_label' : phone

});

});
ChatMessageSent
SnapEngage.setCallback('ChatMessageSent', function(msg) {

gtag('event', 'Thisisavisitormessage', {

'event_category' : 'SnapEngage',

});

});
MessageSubmit
SnapEngage.setCallback('MessageSubmit', function(email, msg) {

gtag('event', 'Thisisanofflinemessage', {

'event_category' : 'SnapEngage',

});

});
Minimize
SnapEngage.setCallback('Minimize', function(isMinimized, chatType, boxType) {

gtag('event', 'ChatWindowMinimized', {

'event_category' : 'SnapEngage',

});

});
ChatEnded
SnapEngage.setCallback(SnapEngage.callbacks.CHAT_ENDED, function(options) {

gtag('event', 'Chatisended', {

'event_category' : 'SnapEngage',

});

});
Resources
Example Website with Google Analytics
Did you find this article helpful?
 (2 votes, average: 5.00 out of 5)
Published September 30, 2022