Home > Setting Up a Post-Chat Survey Bot
Categories: Chatbot Docs | Featured Article
(Last Updated On: )
*This feature is available on Enterprise plans only. Chat with us if you want to find out more!*
About the Post-Chat Survey Bot
The Post-Chat Survey Bot is the next evolution of our Agent Survey feature. Admins can use this setting to set various end chat actions including creating a new Guide Bot to automatically gather invaluable feedback from their visitors. Use the Post-Chat Survey Bot to improve customer satisfaction and related metrics, optimize the customer feedback loop and generate deep insights quickly and easily.
This article covers the Post-Chat Action options and the basics of configuring a Guide Bot for visitor feedback.
Configure a Post-Chat Survey Bot
Note: There is an extra per month fee for bots (more details here).
A Post-Chat Survey Bot is configured using a Guide Bot, however there are some differences in capabilities between the two.
First create your survey Guide Bot
- Choose a widget where you want to set up a Post-Chat Survey Bot
- Click Settings on the left Navigation Bar
- Click Agent Settings on the top Navigation Bar
- Click the Add Guide Bot button.
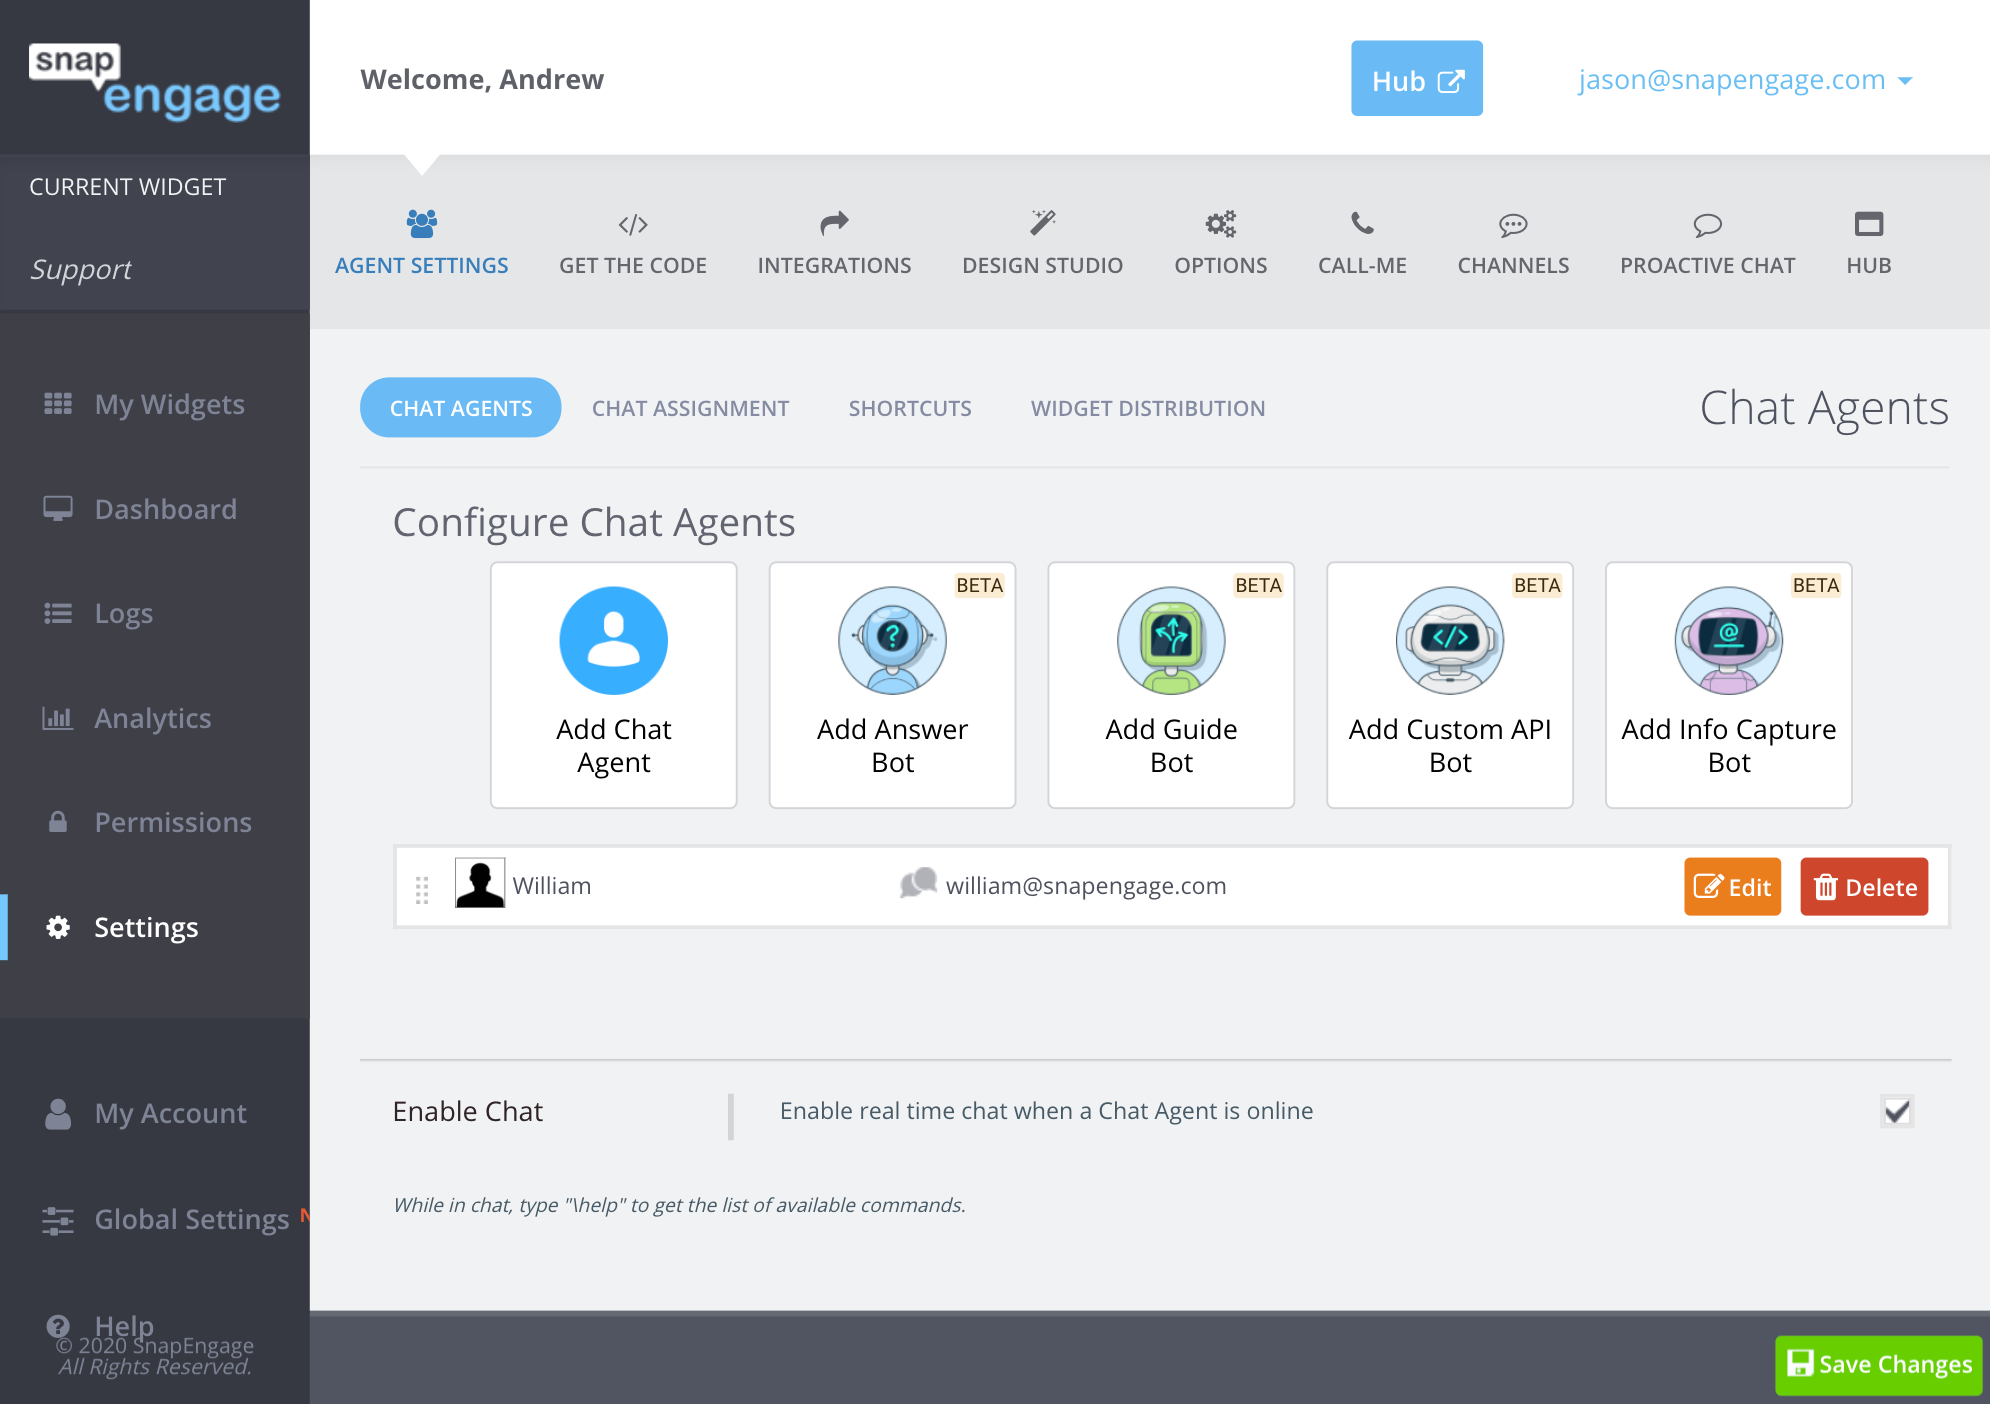
On the next screen click Start From Scratch.
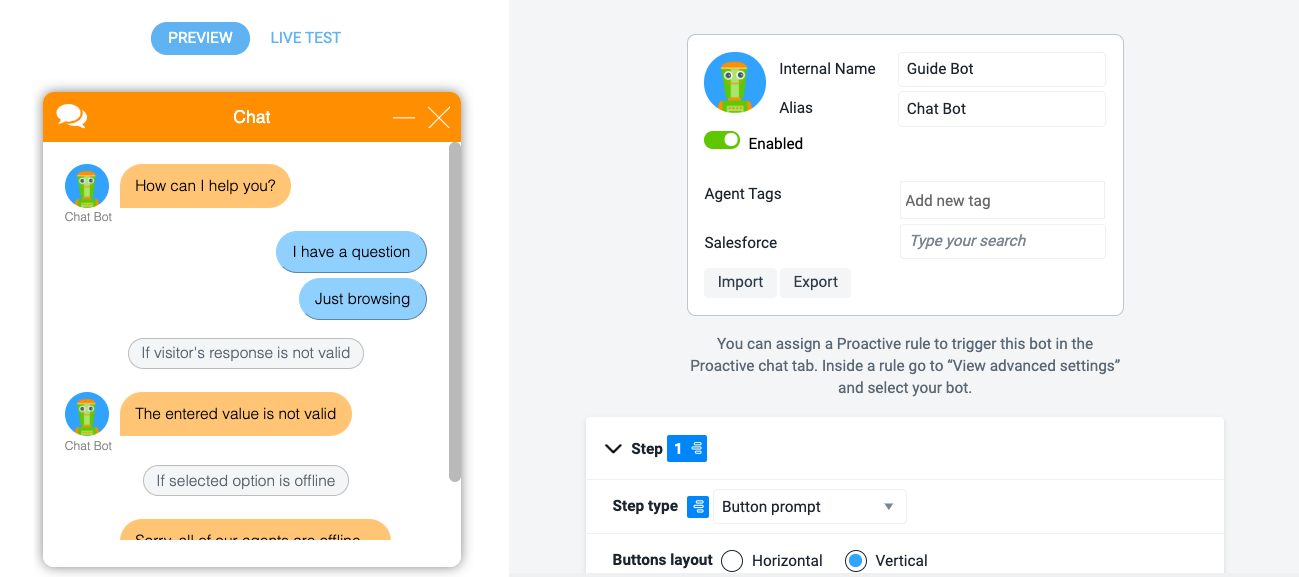
The right side of this screen allows you to configure chatbot dialog.
Guide Bot Settings
In the first box you can configure the primary bot settings.
Internal Name
This name will be viewable only within SnapEngage Admin.
Alias
This is the name that visitors will see when they interact with the bot.
Bot Image
If you would prefer an image other than our adorable little green robot, click on the image to upload a new one.
Enable/Disable
Click this slider to Enable or Disable your bot. It is recommended that you only enable the bot when you are ready for clients to interact with it.
Agent Tags
We do not recommend this for a post-chat survey bot.
Integration Mapping
We do not recommend this for a post-chat survey bot.
Show Advanced
Click Show Advanced to reveal two buttons.
Import: Import an existing bot configuration. Note: This overrides any existing configuration.
Export: Export your current bot configuration to import into a different bot.
As you add options on the right-hand side, you will see buttons appear on the left-hand side.
On the left-hand side, you can navigate between a preview and a live test. The preview shows you an example workflow and gives you an idea of how the steps will look. The live test allows you to test your workflow as a visitor:
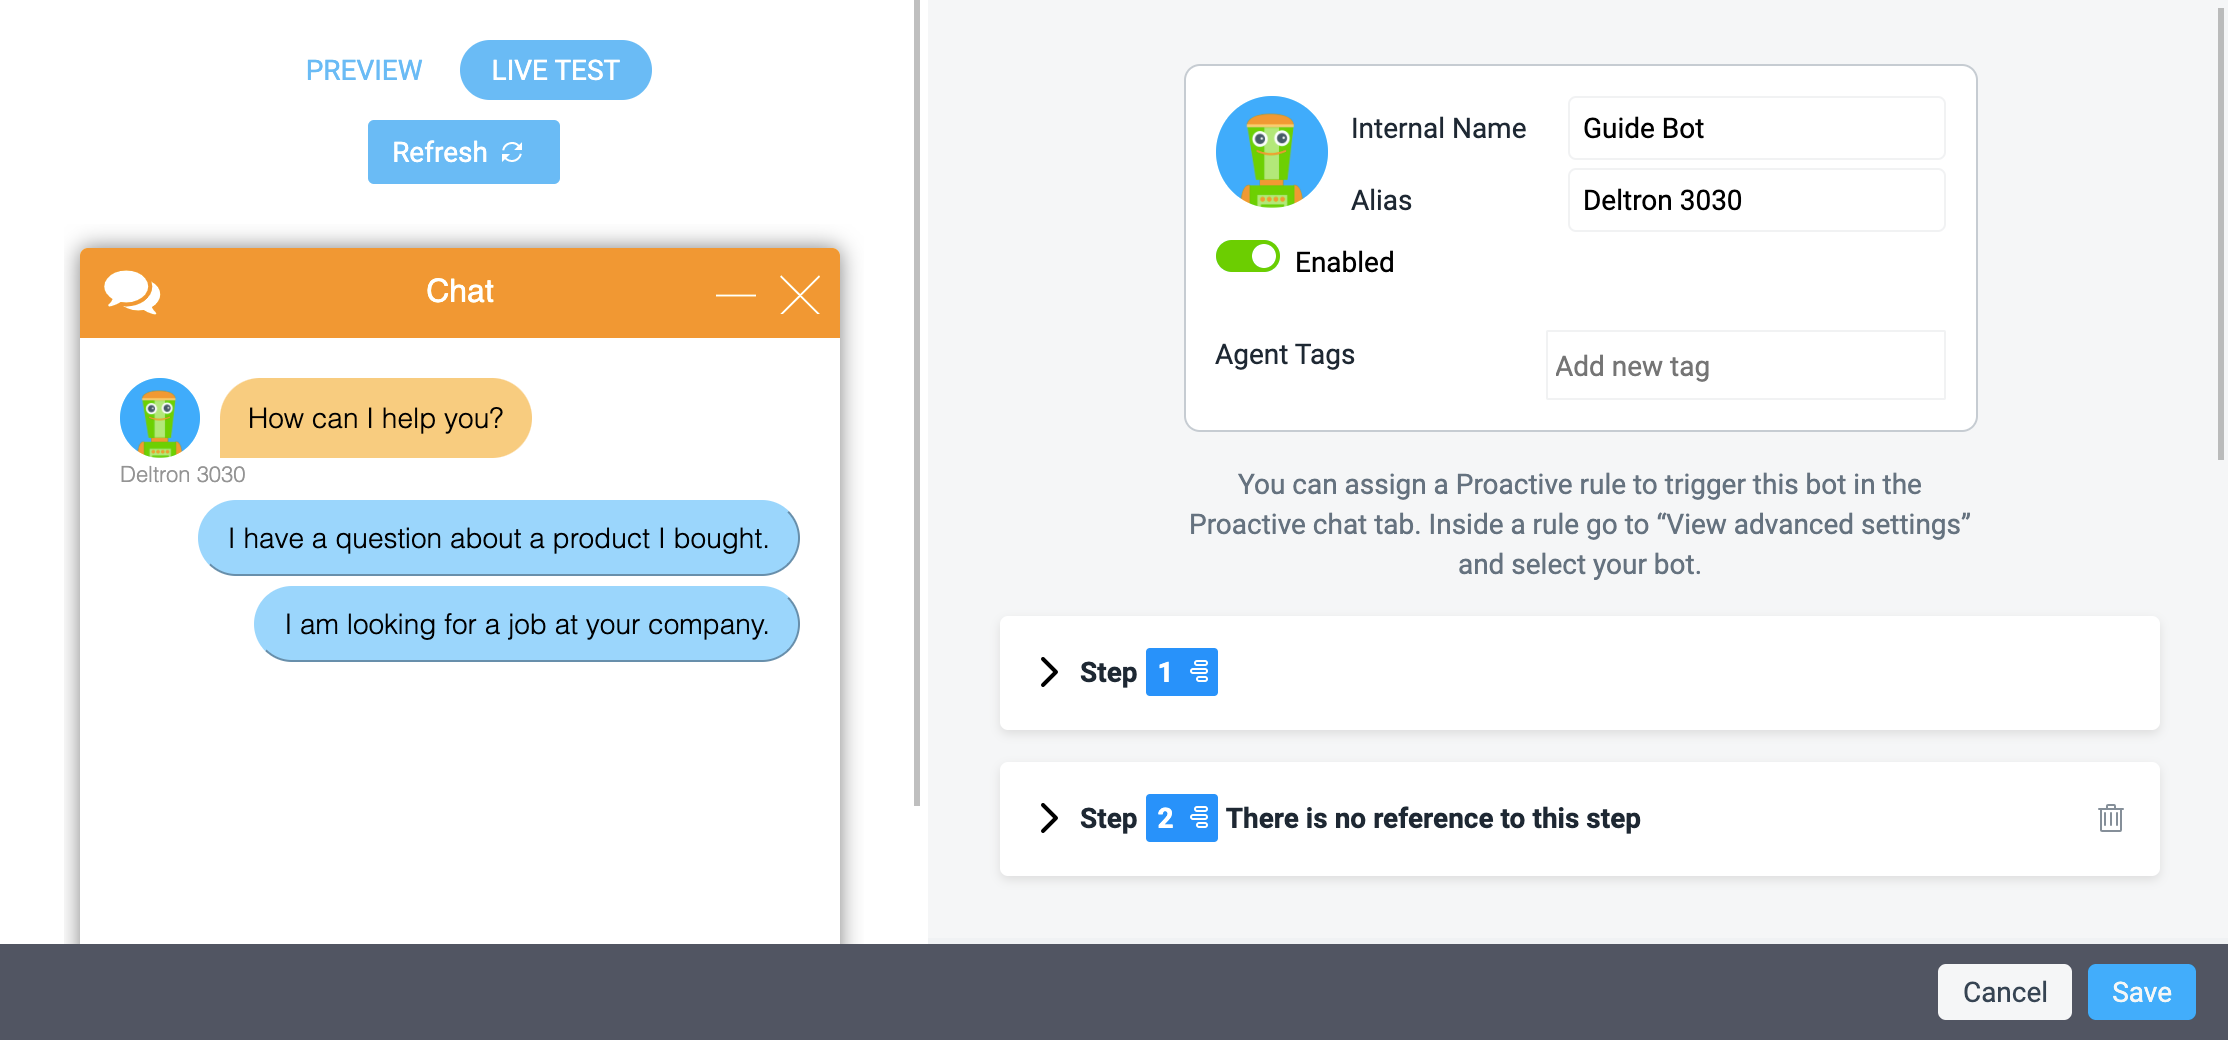
You will notice that one step is added by default, but you can add additional steps by clicking on “Add Step” underneath:

You can also add a message which is displayed to visitors when no agent in the routed widget is available:
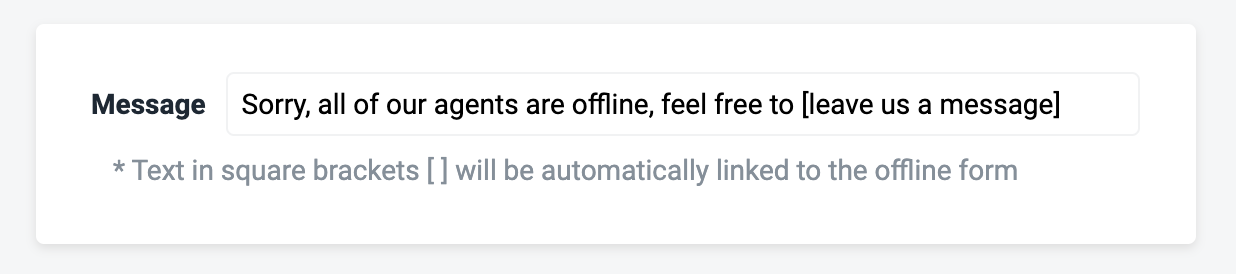
The text contained within the squared brackets can be clicked by the visitor to send an offline request to your team.
Create Your Dialog
You bot is essentially a series of Prompts that help you efficiently gather information and feedback from visitors.
Important Notes: A post-chat survey Guide Bot cannot have any transfer actions. You must also place the post-chat survey Guide Bot into the Reserve Tier before it will display as an available bot in the Post-chat actions.
Step Types
There are currently five different step types to choose from. If you would like to create a dedicated Post-Chat Survey Bot that only uses the Rating prompt, skip to #5 – Rating Prompt below. You can also include other step types described below to support additional use cases for gathering routine information after the chat ends.
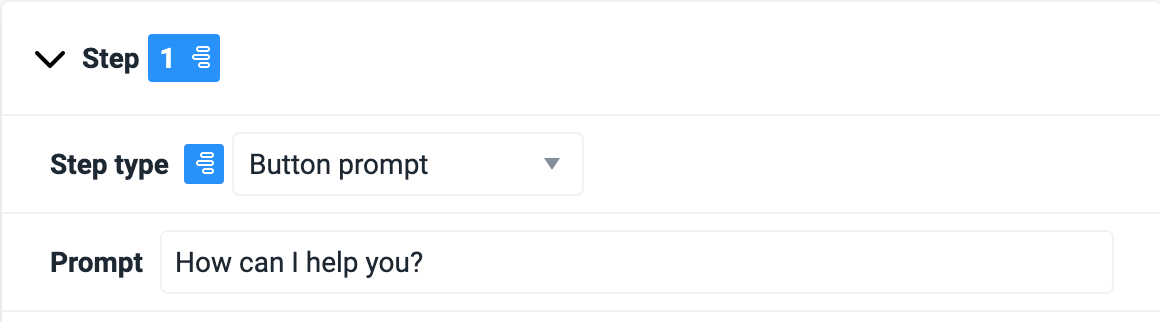
1. Button Prompt
This will display multiple buttons to the visitor which they can click to progress through the Guide Bot flow.
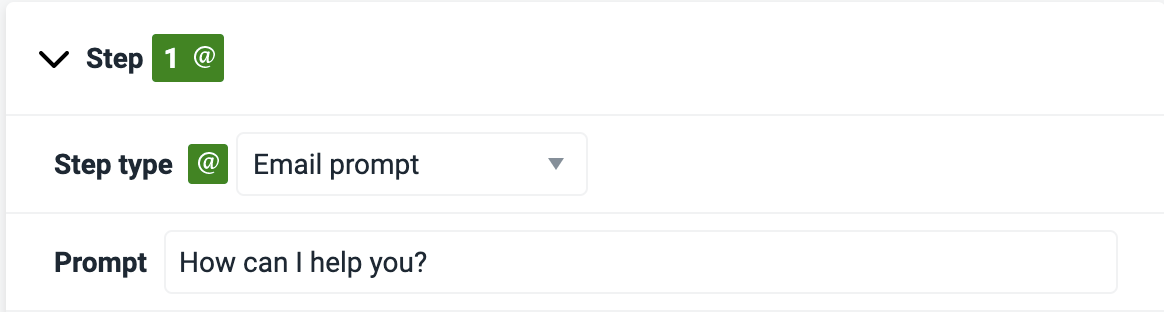
2. Email Prompt
This will prompt a text field to appear where the visitor can enter an email address. This will attach the email address to the chat.
The email input will validate if the visitor reply includes an email string (i.e. the format of an email – [email protected]). If it does not find one it will throw an error. The email can be extracted and assigned to a Label (see more below on adding Labels using the Guide Bot).
The contact assignment continues to work as it does now in a live chat: If the visitor was unknown the email will be assigned, if the email was known before it will not be assigned to the contact.
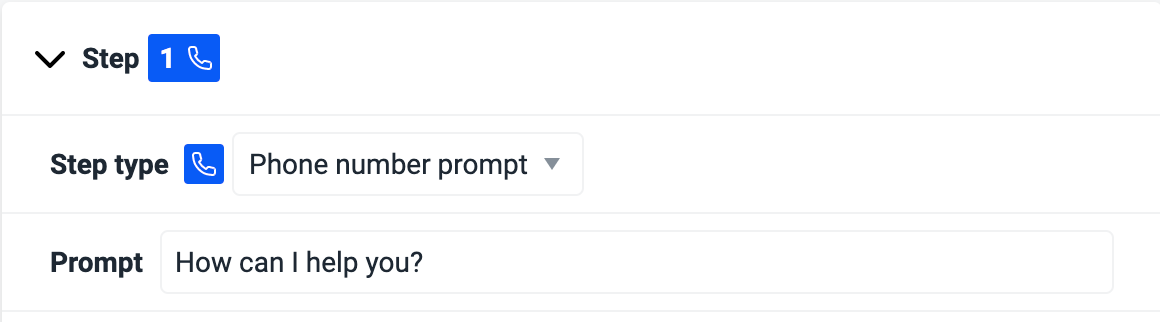
3. Phone Number Prompt
Similarly to the Email prompt, the Phone prompt will display a text field to the visitor so they can enter a phone number. This is captured and tied to the chat.
The Phone prompt will validate if it finds a number between 4 and 20 integers and will extract this to a Label, if one is set.
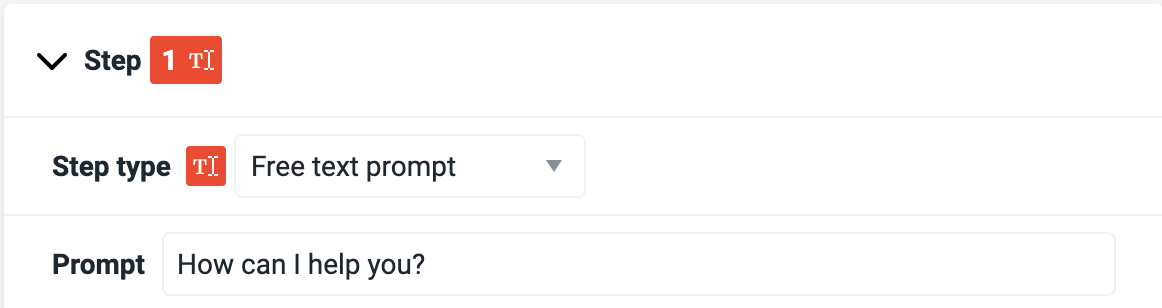
4. Free Text Prompt
This allows the visitor to enter free text. This is useful for cases where the visitor needs to enter a post code or address, or information about a product or the topic of interest. This is especially useful when you use the Guide Bot during offline hours as you can gather more information. It allows the visitor to respond freely to a prompt from the Guide Bot, enabling so many more workflow options.
The Free text prompt has a maximum of 1024 characters.
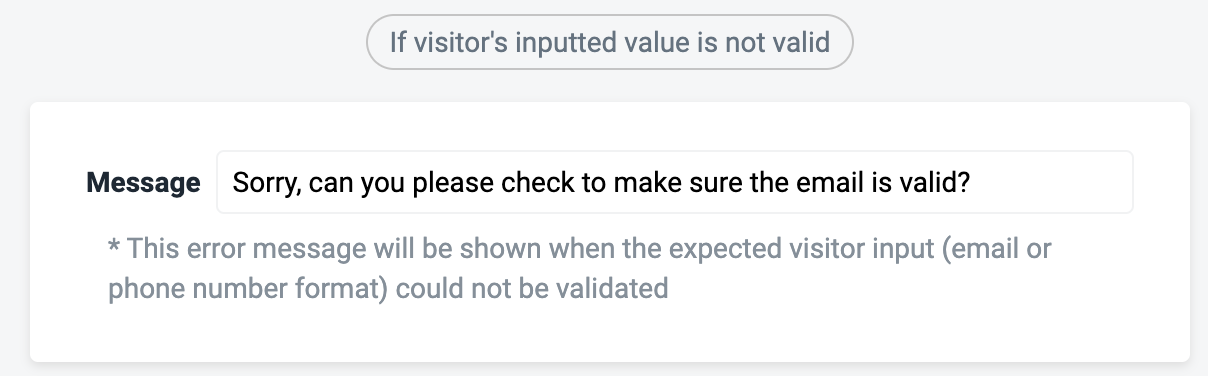
**Please be aware that the Email prompt and Phone number prompt require certain validation prior to being accepted. If the visitor sends an incorrect email format or phone format, you can program a prompt that is sent at the bottom of the Guide Bot configuration page:
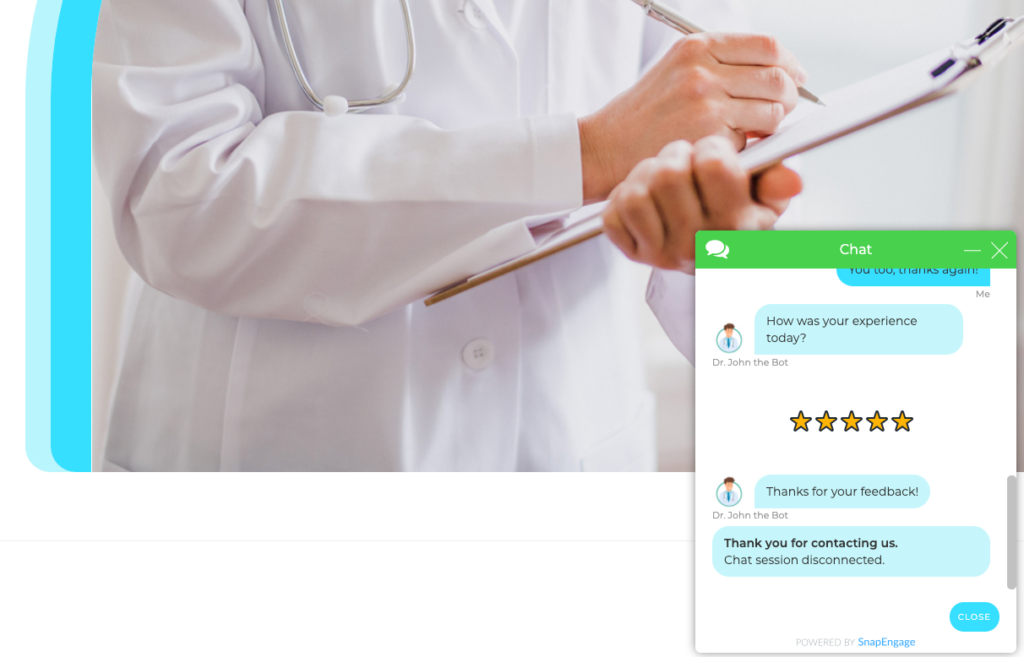
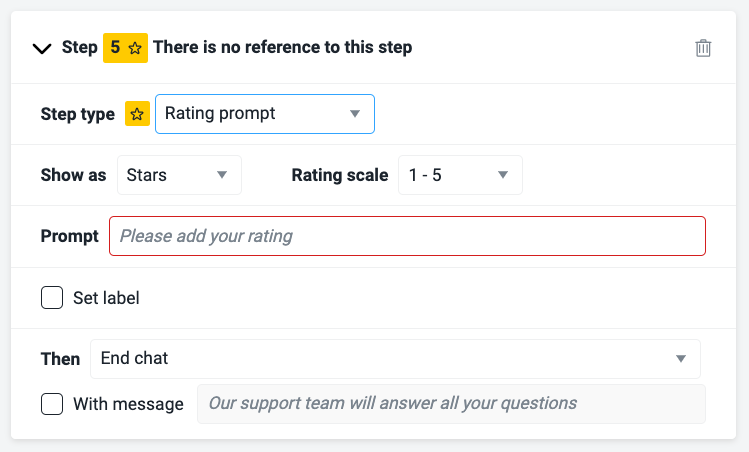
5. Rating Prompt
This option allows you to request a Star or Number rating from your visitor. This could be a way to gather feedback on a product, the website experience, the chatbot itself or anything else you might be seeking client feedback on. When you are creating a Post-Chat Survey Bot (or when creating a standard Survey Guide Bot) you have the freedom to include as many rating steps as you like to support both simple and complex, multi-question customer surveys.
Configure Messages
In addition to customizing the bot dialogue in the Guide Bot setup described above, admins have the ability to configure additional messages related to the Post-Chat Survey Bot.
Configure additional post-chat bot messages
- Navigate to Admin Dashboard > Settings
- Navigate to Design Studio > Configure Messages
- There are two message fields that you can customize: End chat dialog message when transferring to survey bot and Chat disconnected because of timeout: message when transferring to survey bot

Finish setting up a Post-Chat Survey Bot
- Log into your Admin Dashboard
- Ensure that the Guide Bot you would like to use is configured in the Reserve Tier (via Agent Settings)
- Click Settings on the left hand Navigation Bar
- Click Options on the top Navigation Bar
- Scroll down to Post-Chat Action (formerly Agent Survey)
There are three post-chat options you can choose from:
Agent Survey: Offer the client a simple end of chat survey with the options for a 5 star scale, smileys, or a 1 – 10 scale, as well as a dialogue box to provide comments on their experience
End Chat: This option immediately ends the chat with no opportunity for client feedback
Transfer to a Bot : This allows you to transfer to an existing bot in the Reserve Tier. Learn more about Reserve Tier here (available on Enterprise only). If the Guide Bot you intend to use for the post-chat survey is not yet in the Reserve Tier, it will not display as an available post-chat bot to select. - Select Transfer to a bot and then select the Guide Bot that you created previously. After the conversation ends, visitors will be automatically routed to this bot. Use this option to run custom surveys or collect routine information after a conversation ends.
Did you find this article helpful?

 (1 votes, average: 4.00 out of 5)
Published March 31, 2021