Home > How to: Integrate with SAP Sales and Service Clouds (Integration 2.0)
Categories: Integrations & Plugins | Featured Article
(Last Updated On: )
About This Article
The purpose of this article is to provide a comprehensive overview of how to Integrate with SAP Sales and Service Clouds (Integration 2.0).
Integrate SnapEngage with SAP Sales and Service Clouds (latest version 2.0)
SnapEngage has built a brand-new integration with SAP Sales and Service Clouds (formerly C4C) using SAP’s modern REST API. Automate and enhance downstream workflows, improve customer satisfaction, and reduce time to resolution and time to close with the latest SAP and SnapEngage integration. SnapEngage’s SAP Integration 2.0 integrates with SAP Sales Cloud and Service Cloud so that SnapEngage chat transcripts can be sent to your SAP account after a conversation ends for a 360° view of your customer engagement. Agents and bots can be mapped so they are assigned to counterpart users in SAP. You can also populate many fields in SAP from different entities using SnapEngage custom data mapping to eliminate data gaps and automate critical workflows in your business. *The new SAP integration is available on Enterprise accounts only. Please contact our Support Team or your Client Success Manager if you would like to upgrade. This integration is currently in BETA period.*
Note for legacy SAP integration users: If you’re still using our legacy SAP integration, this update is a huge enhancement and offers a completely revamped and more robust integration experience. You can upgrade to the new SAP 2.0 integration by clicking on Switch to another integration from the Admin Dashboard and selecting the SAP 2.0 integration. Please contact us if you need any assistance with switching to the new integration version!
In order to configure this integration, please follow the steps below. Before you get started, please make sure you’re an Administrator in both SAP and SnapEngage.
Communication system and arrangement
On SAP, head over to Administrator –> General Settings. Click on Communication systems 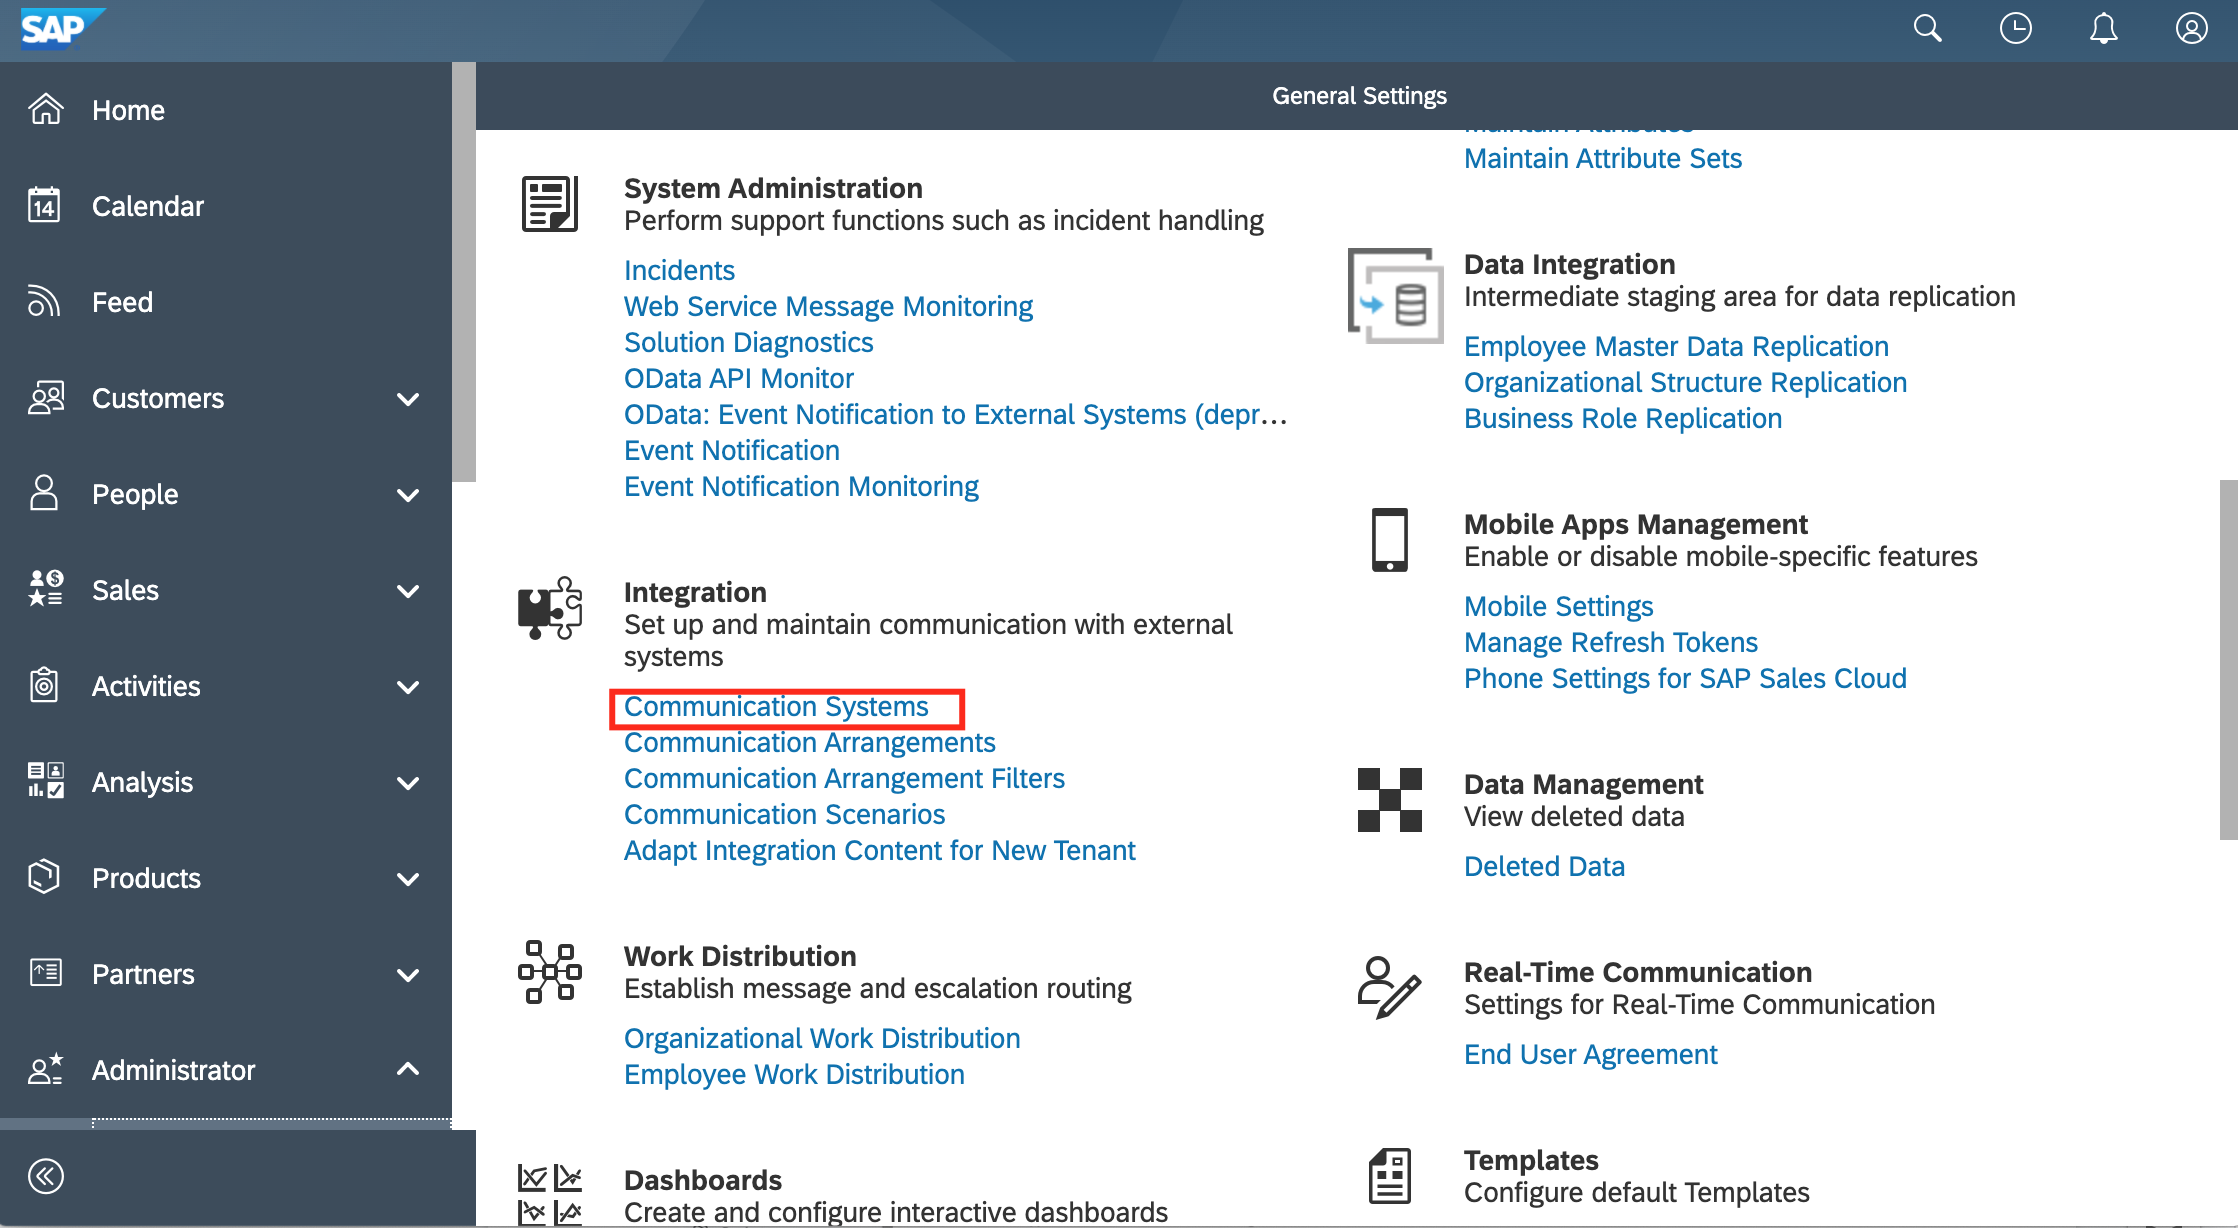 The next step is to create a communication system by clicking on New, and enter all the information needed. Please enter a HOST Name. The System access type needs to be Internet, and add a new system instance ID with a Preferred application protocol of XI.
 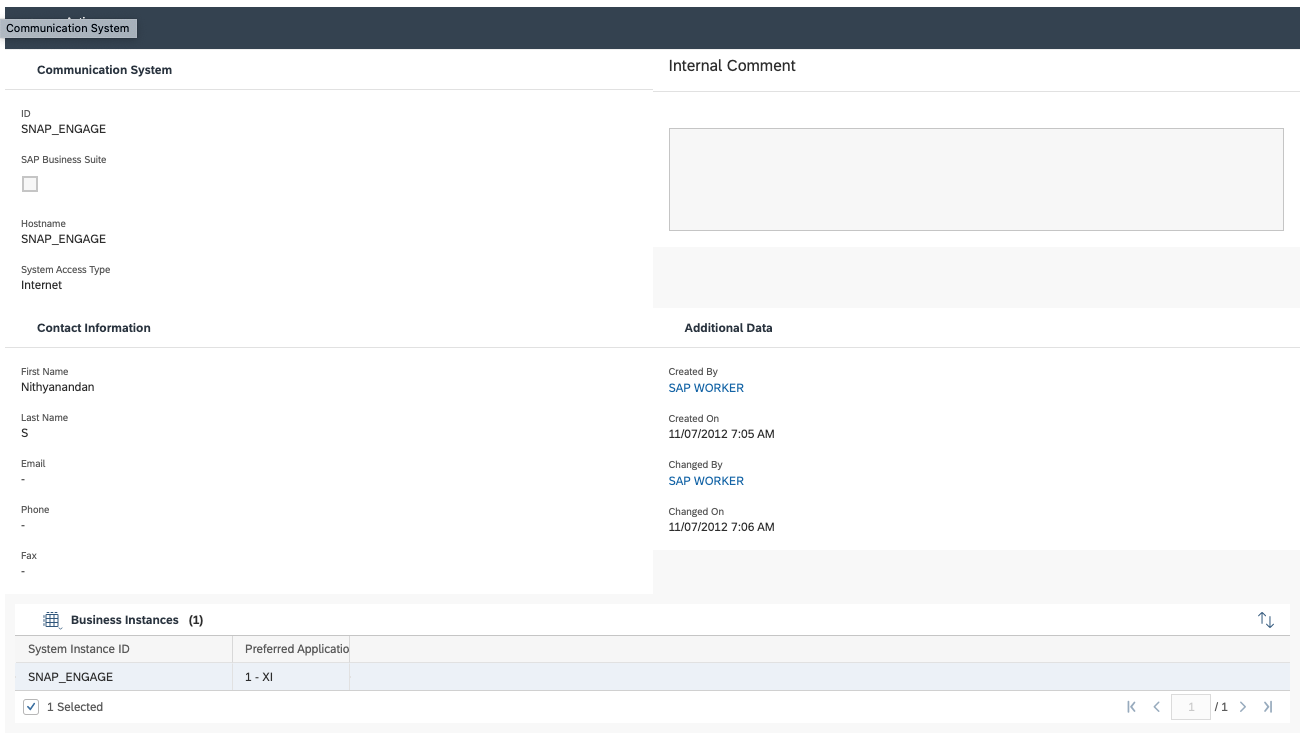 Then click on the refresh button of SAP, and under Communication systems, click on the system you’ve just created to open it. Click on edit, and click on actions –> Set to active and save. Then save and close. Then under General settings, go to Communication arrangements and click on New. Choose “OData Services for Business Objects” on page 5.
 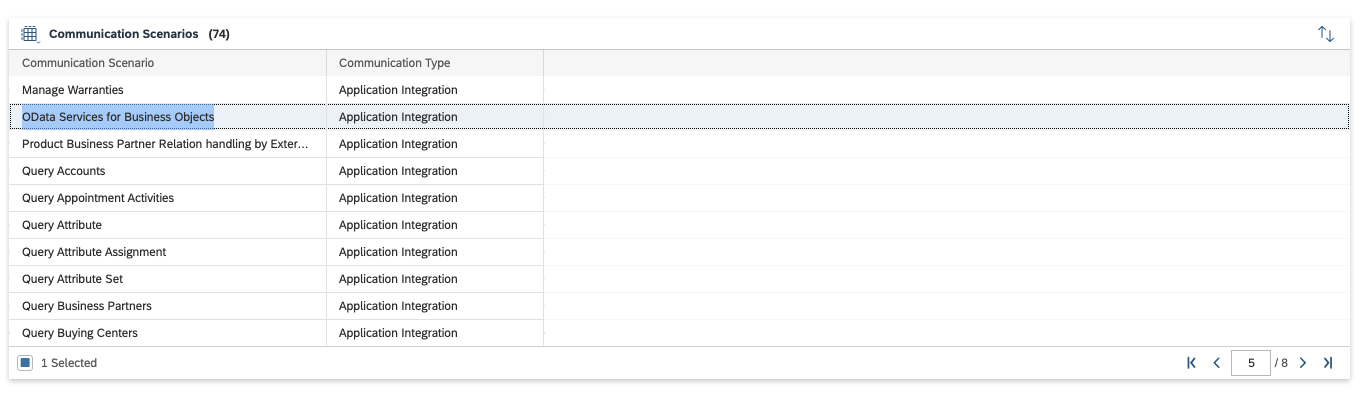 Click on next. When defining the business data, select the system instance id that you have just created when setting up a new communication system.
 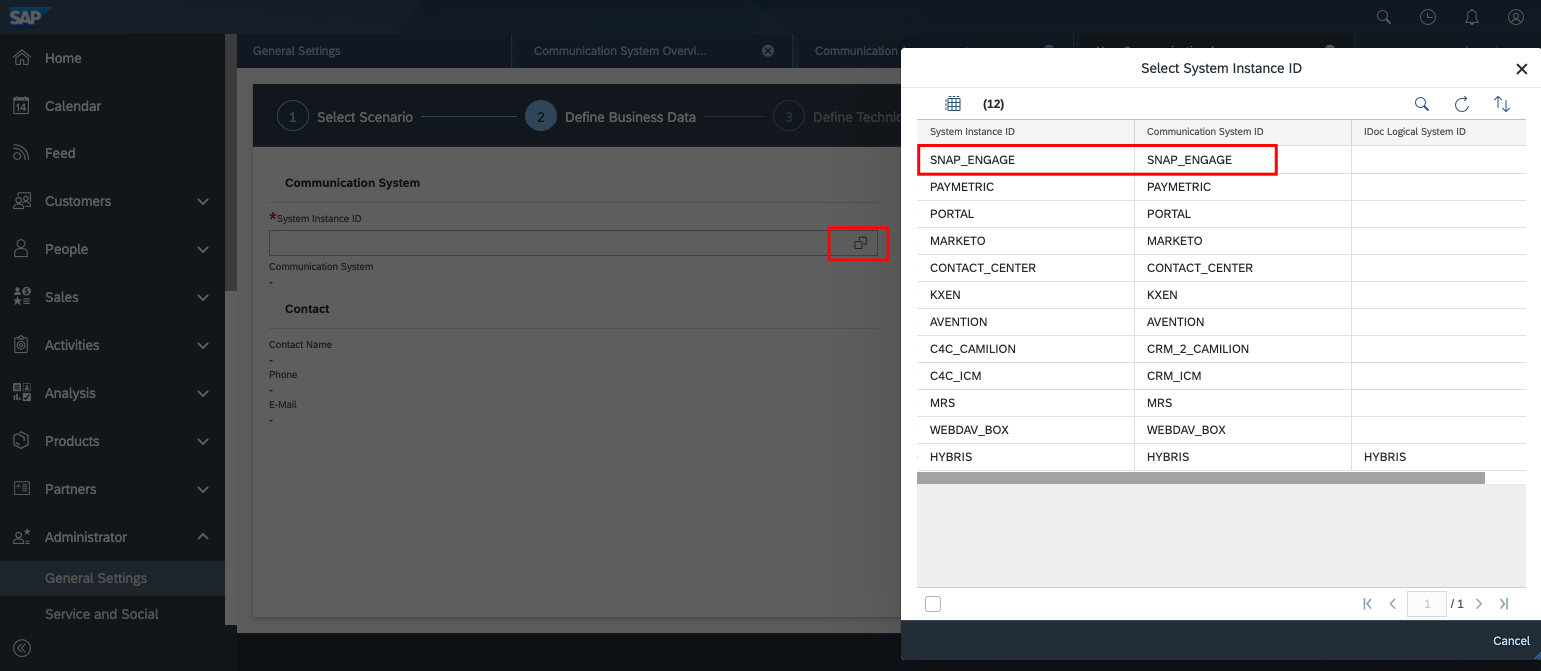 The next step is to define technical data where you need to check if the correct settings regarding the communication method and inbound communication are applied. It’s important to note that the user id is automatically generated by SAP, and it will be used in a later stage to set up the SnapEngage widget. Therefore, it is crucial to edit the credentials, and add a new password, as well as copying the user id (It must contain digits, capitals, and special characters). You will be using this ID and password to connect your SnapEngage account.
 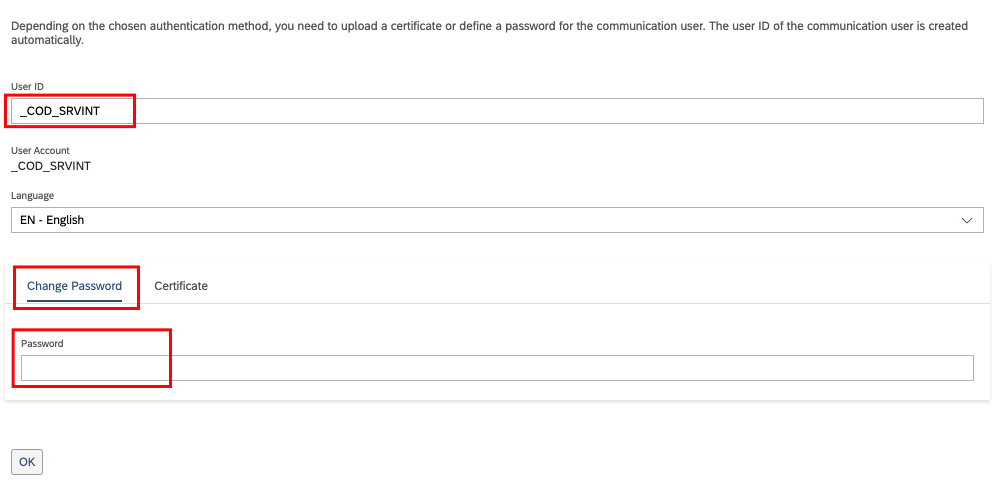 Under Services used, make sure you check the following boxes : activity contact employeebasicdata lead ticket customer chatactivity
 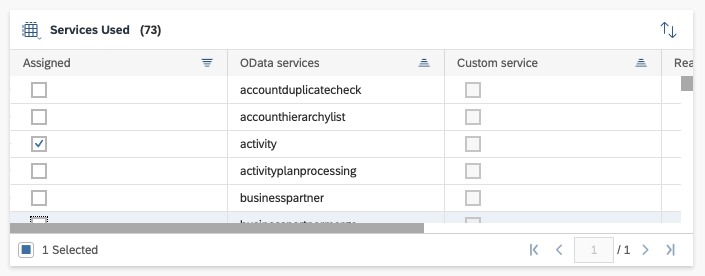 Review and finish your communication arrangement. Then close.
Connecting the SnapEngage integration
The next step is to connect SnapEngage to SAP, so head over to SnapEngage’s admin dashboard, click on Settings, Integrations and select SAP. Select the workflow you will be using (Service for Customer Support, Sales for Sales), and add the server address (this is the part of your URL between https:// and .crm. Set user and password (from the previous step on SAP). Then hit “Validate Connection” 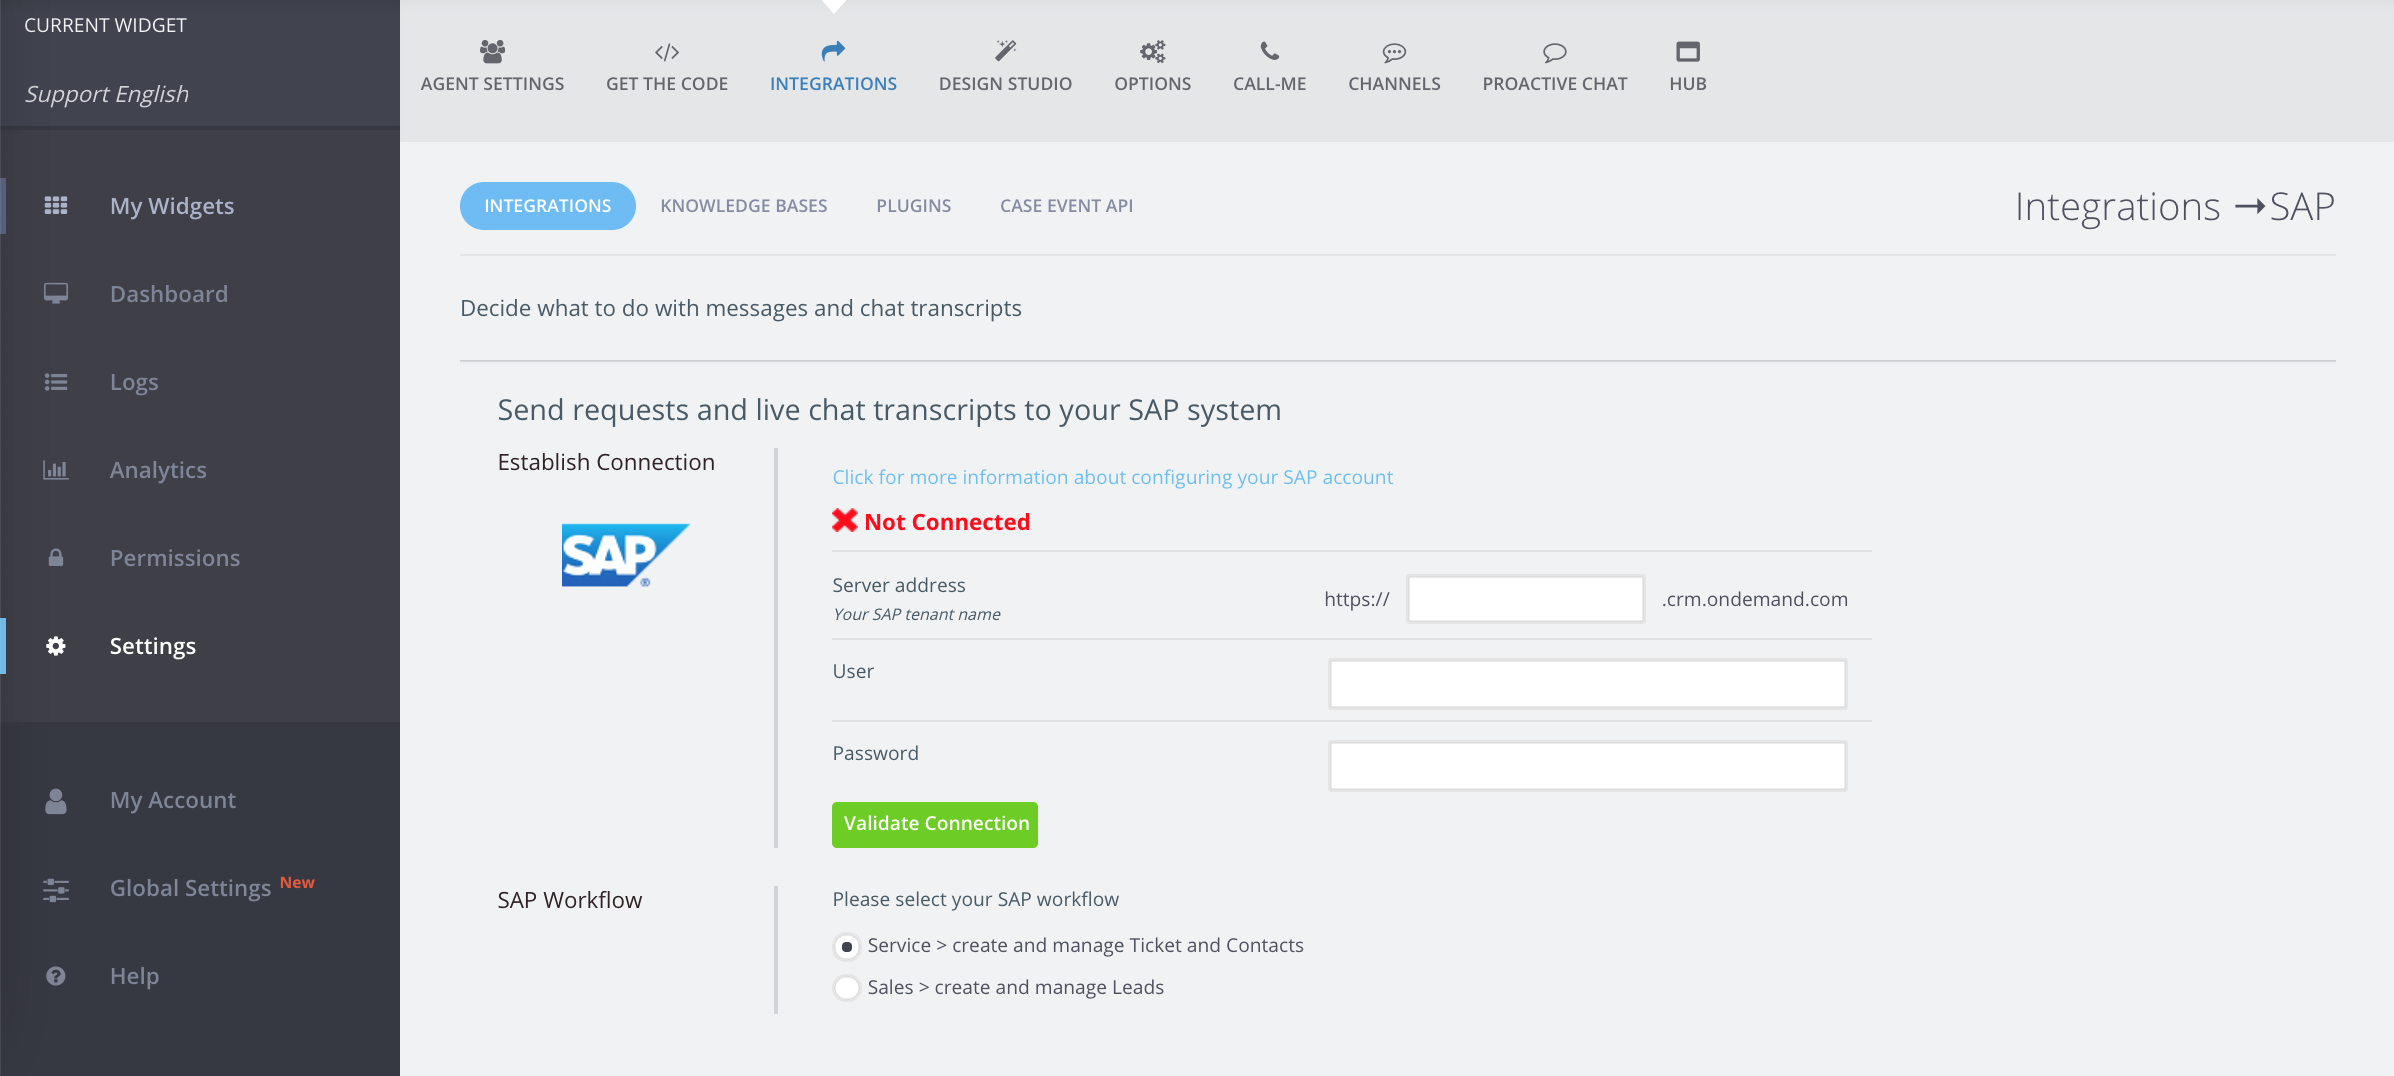 Your SAP account and SnapEngage should now be connected. If you use Single Sign on to log into your SAP, make sure to check this box :
Agent mapping
If you would like the leads or tickets created in SAP by SnapEngage to be owned by a specific user, or you want to match the chat agent with the SAP user, then head over to Settings –> Agent settings, and edit each agent. You will see an “Agent SAP account” field. You can start typing the name of the SAP user until it populates, then click on it and save. Your SnapEngage agent and your SAP user will now be mapped, so that the agents can have ownerships of tickets or leads on SAP. Bots can also be mapped to users on SAP. 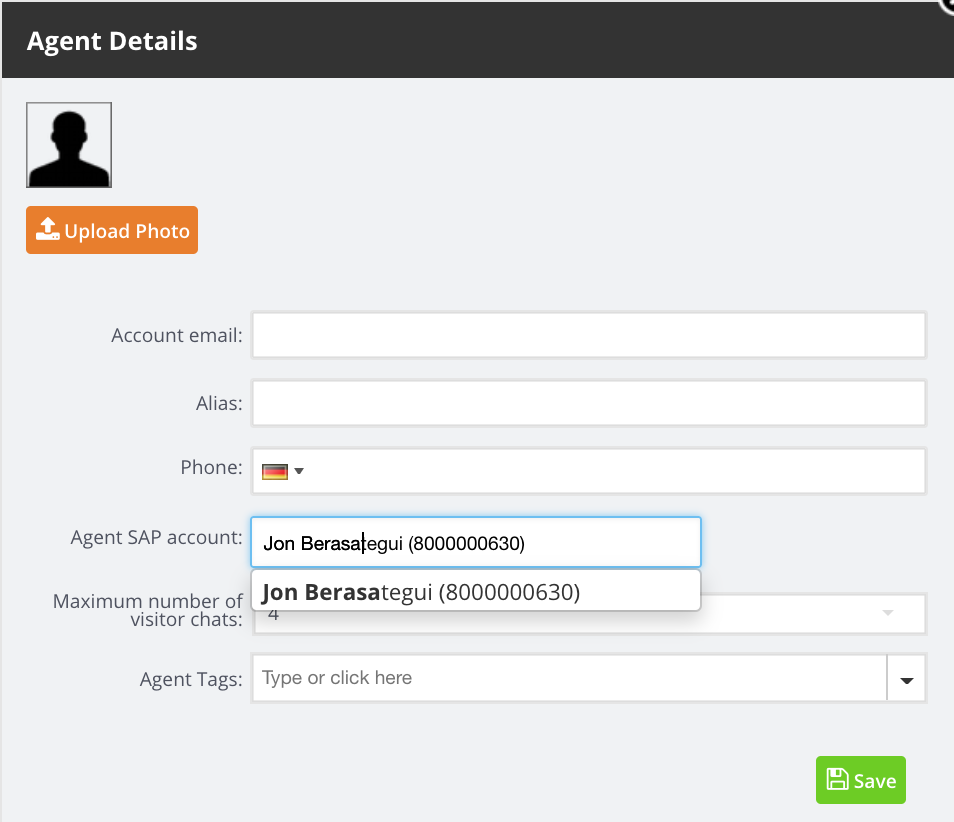
Connecting the Mashup service
This step is optional, but setting the mashup service will allow you the agents on SAP to respond to a ticket by sending a chat link to the customer. In order to do so, on SAP, navigate to Administrator –> Mashup Web Services. Click on the SnapEngage service, and click on Enter API keys. 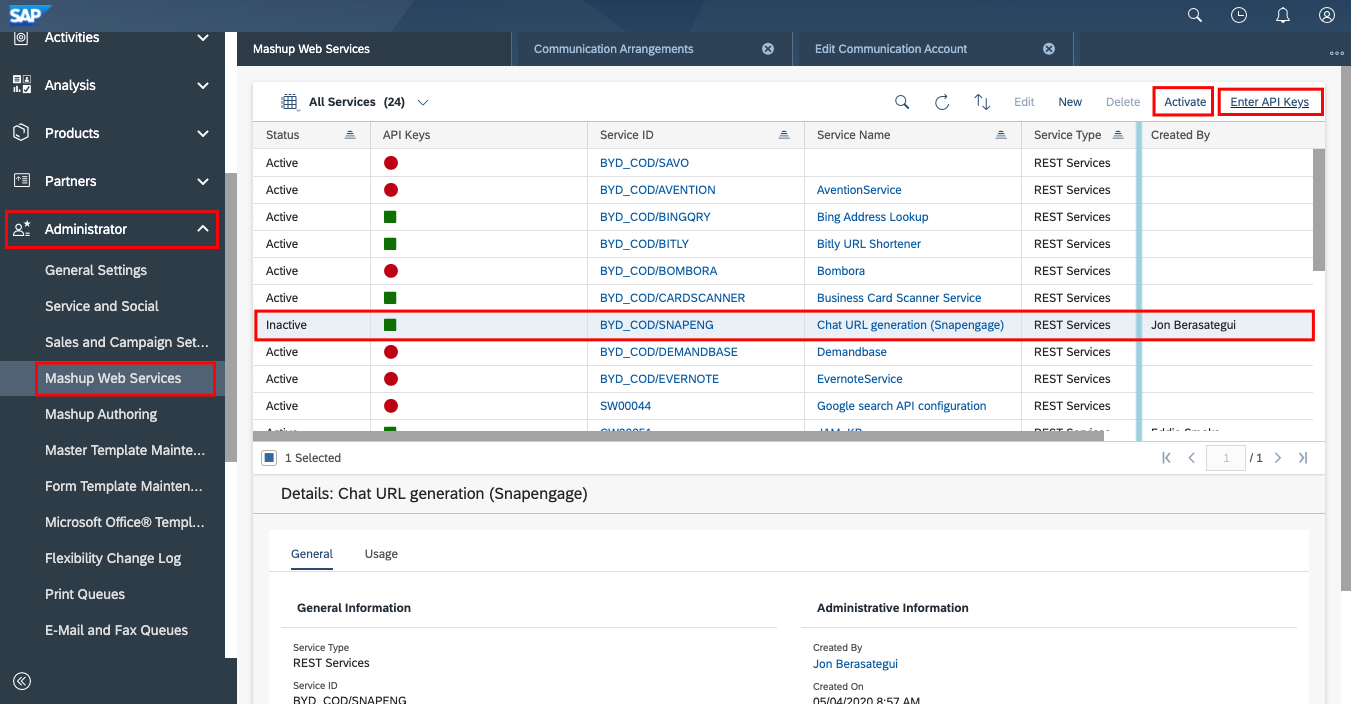 On SnapEngage’s Admin dashboard, go to Settings, get the code, scroll down to (Advanced) Widget ID, click on OK, and copy the ID. On SAP, on the W field, enter the widget ID you’ve just copied, and on the B field, enter the URL where visitors will start a chat. (You will need to click on Show API key to enter them)
 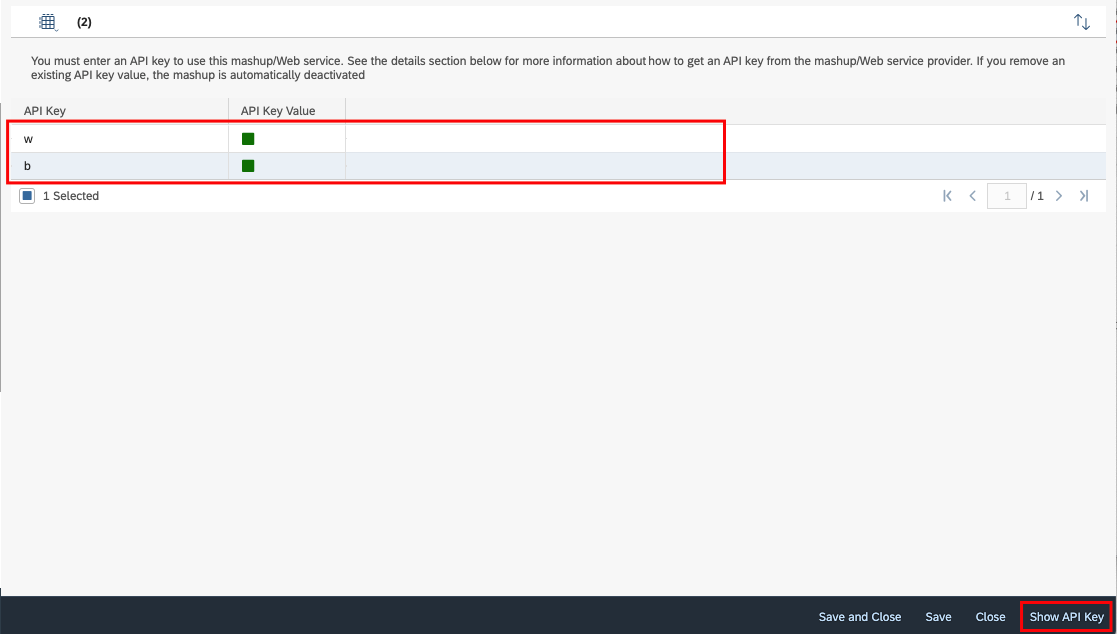 Close the screen and activate the service. That way, when responding to a ticket, the agent can send a URL to the visitor from SAP to start a chat. This will be found under “New interactions”, there will be a button called chat link.
Custom mapping
Depending on which workflow you choose, you will have access to different entities. The Sales workflow will give you access to Leads and Tasks entities, and the Service workflow will give you access to Ticket and Contact entities if you are using the Corporate accounts and contacts advanced option, or ticket and customers if you are using the Individual customers advanced option. The below is an example of custom mapping on the Service flow. 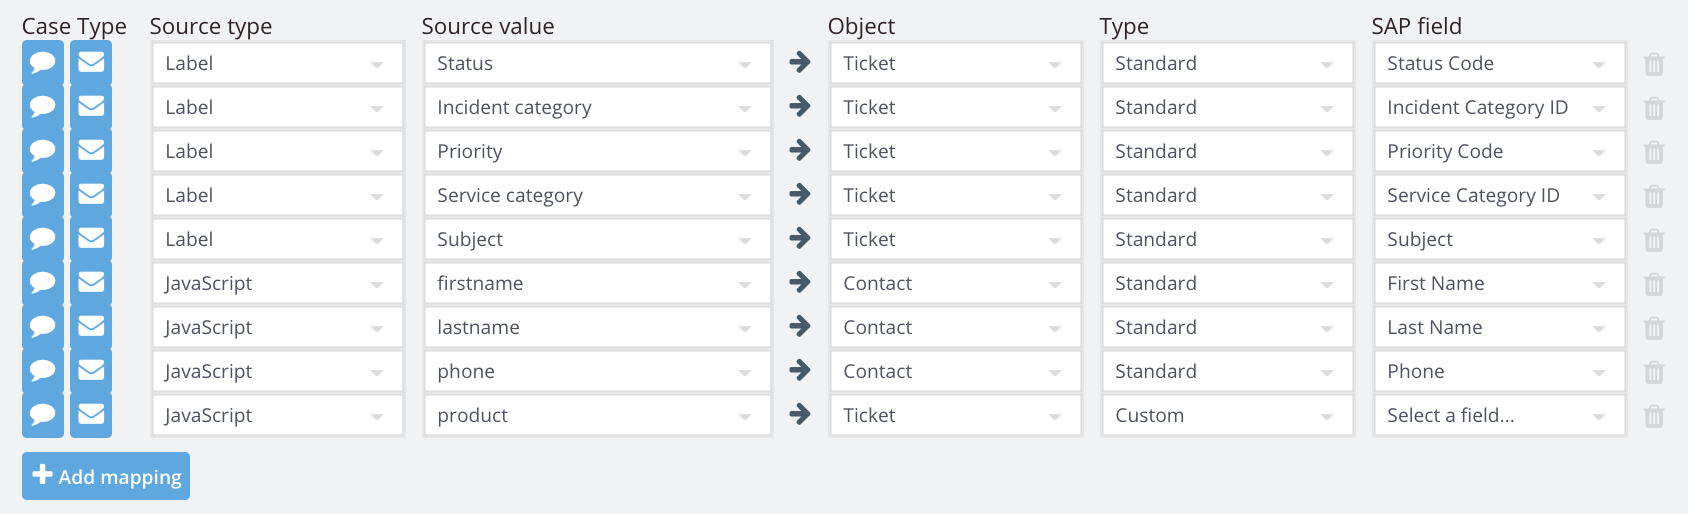 Source type : Where the information is coming from. It can be coming from :
- SnapEngage : information we capture, such as visitor location, browser, IP, chat duration etc…
- Javascript : information that is collected by your website or the pre-chat form. Make sure these variables are set on the Options tab.
- Labels : information your agents capture based on the configuration on the Admin dashboard.
- Text : text you may want to send to a specific field, for example Lead source : SnapEngage
Source value : This is the field within the source type you want to send to SAP Object : The entity in SAP you want to send data to Type : Whether it’s a standard field or a custom field on SAP SAP field : The field you want to send the value to In the example above, one line at a time, this is the information we are sending through to SAP : Line 1: I have a label called Status with numerical values, this is being sent to the field Status code on SAP, and sets the status of the ticket to whatever the agent sets it during the chat. Line 2: I have a label called Incident category, where the agent can choose the category of the incident they’re dealing with to set it in the ticket on SAP. Line 3: Also with a numerical value, and through a label, the agent can set the priority of the ticket to be created in SAP. Line 4: The agent can choose from a selection which service category the ticket should be created in SAP. Line 5: Via a label, the agent can choose the title (“Subject”) of the ticket to be created in SAP. This will also have a number provided by SAP. Line 6: I have a field called First name on the Pre-chat form, I’ve declared this value on the options tab, so if the visitor provides me with a first name before starting the chat, it will send it to SAP Line 7: Last name : Same as above Line 8: Same as above, for phone Line 9: Same as above, I asked the visitor what product their query is in regards to and I am sending this to a custom field on SAP.
OFFLINE VS CHAT
You can also determine whether you want to send some mapping for chat only, or for offline only  For example, if you want to map information to the Lead source field, you can choose to send the text SnapEngage_offline for offline requests, or SnapEngage_chat for chats. By highlighting and unhighlighting the chat bubble (chat) or envelope (bubble) you can control when these lines are sent.
Service flow
When using the Service flow, you can choose to work with “Corporate accounts & Contacts” which will give the mapping access to the ticket and contact entities (Contacts will be created and potentially updated based on your options) or “Individual customers” which will give the mapping access to the ticket and customers entities (Customers will be created and potentially updated based on your options).  When a visitor starts a chat, we will query SAP to see if the contact/customer exists. If it does, we will display a link to the contact/customer on the Hub, under Integrations.
 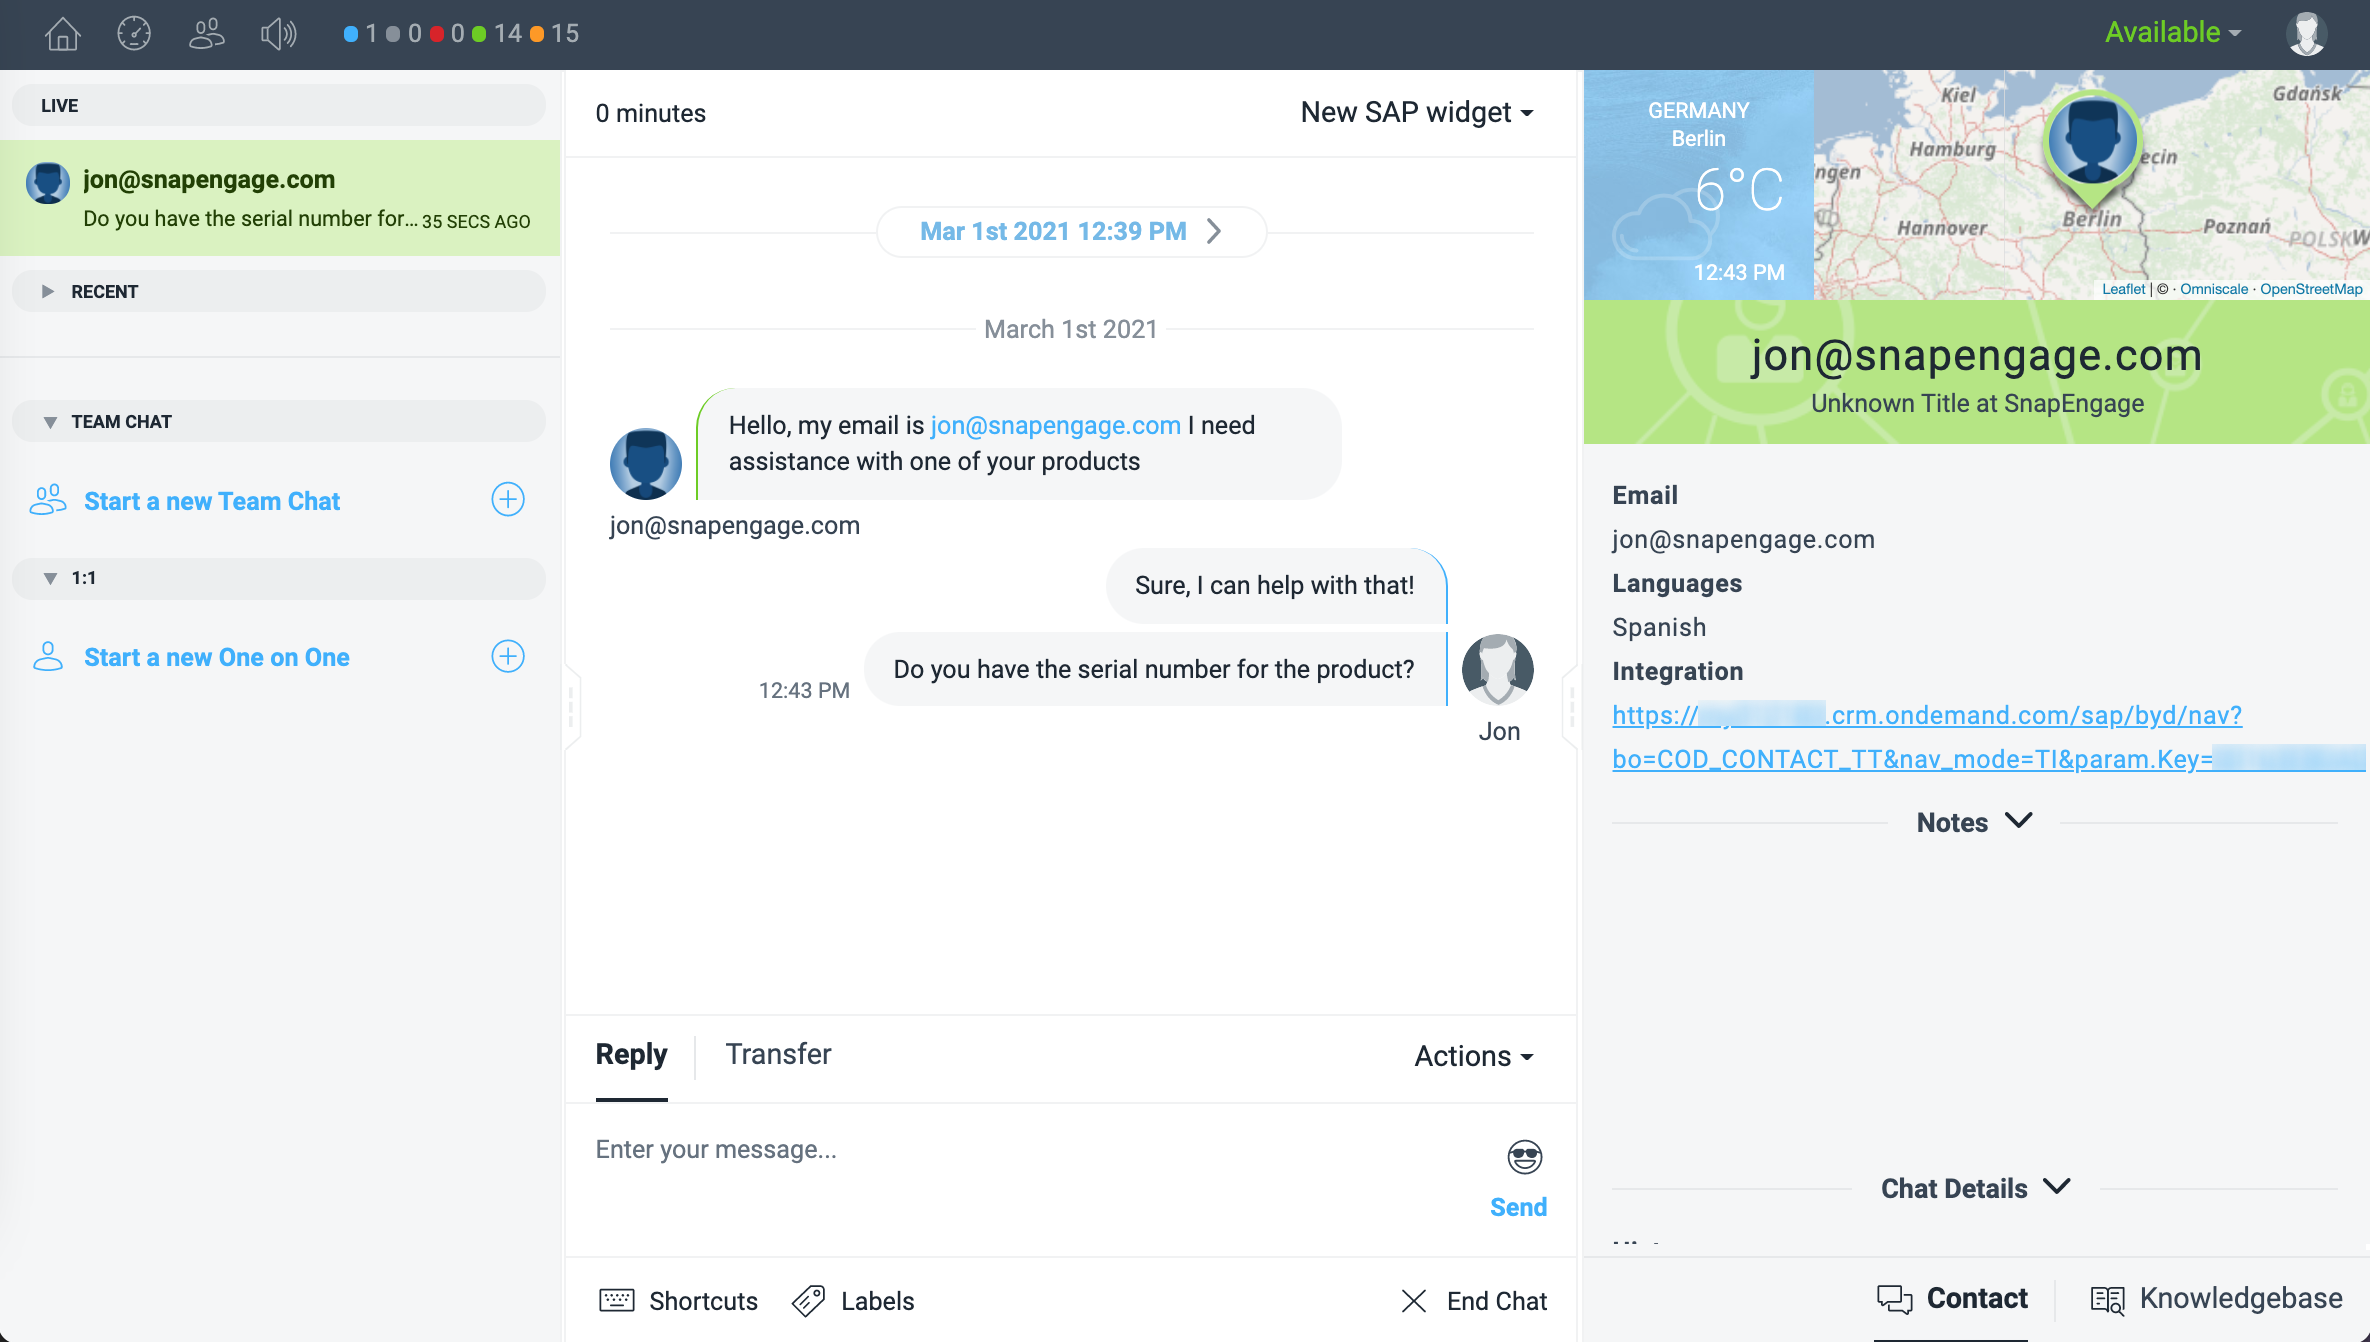 If a visitor chats in, and they are not a contact on your SAP system, we will always create a new contact/customer, and populate it with the data that we have. If we don’t have a name, we will try and populate it with a name based on the email they provide, for example Jon Unknown, which you can then edit manually on SAP. If a visitor chats in, and they already exist as a contact/customer on your SAP system, there are 3 ways to handle the data provided during the chat and through the custom mapping :
- Don’t update existing contacts/customers, only create new ones. This means that if the contact exists, we will not update with any information provided before or during the chat and based on your custom mapping.
- Update contacts/customers, overwriting any existing data. If the contact exists, we will update the data of the contact with the information provided before or during the chat, and based on your custom mapping. We will overwrite any existing data. For example, if the contact/customer has a phone number on SAP, and they provide a new one, and this is mapped, we will update it with the new phone number.
- Update contacts/customers, only append details from Live chat without overwriting existing data. If the contact exists, we will not update any data you have already (if the visitor has a phone number but provides a new one, and you have it mapped, we will not update it), but we will append new data (if they provide an address, and there is no address on SAP we will populate the field).
When creating a contact in SAP, this needs to be part of an account. In order to do this, we will query the domain of the email address to find a matching account, and assign it to it. If we don’t find one, we will create an account with the name of the domain of the email provided.
Sales flow
Similarly to the Service flow, when a visitor comes on chat and provides you with their email, we will check if this Lead exists on your SAP, and if so, display it on the Hub, along with a link. If the Lead doesn’t exist, we will always create a new one. If it exists, the behaviour for updating will be what you choose under the below menu : 
- Don’t update existing Leads, only create new ones. This means that if the lead exists, we will not update with any information provided before or during the chat and based on your custom mapping.
- Update Leads, overwriting any existing data. If the lead exists, we will update the data of the lead with the information provided before or during the chat, and based on your custom mapping. We will overwrite any existing data. For example, if the lead has a phone number on SAP, and they provide a new one, and this is mapped, we will update it with the new phone number.
- Update Leads, only append details from Live chat without overwriting existing data. If the lead exists, we will not update any data you have already (if the visitor has a phone number but provides a new one, and you have it mapped, we will not update it), but we will append new data (if they provide an address, and there is no address on SAP we will populate the field).
The Lead workflow has access to the lead and task entities as well as a few reference fields from other entities. Every chat will be created as a task, and assigned to the Lead that has been found or the one that has been created if no lead has been found. The transcript will be on the task. 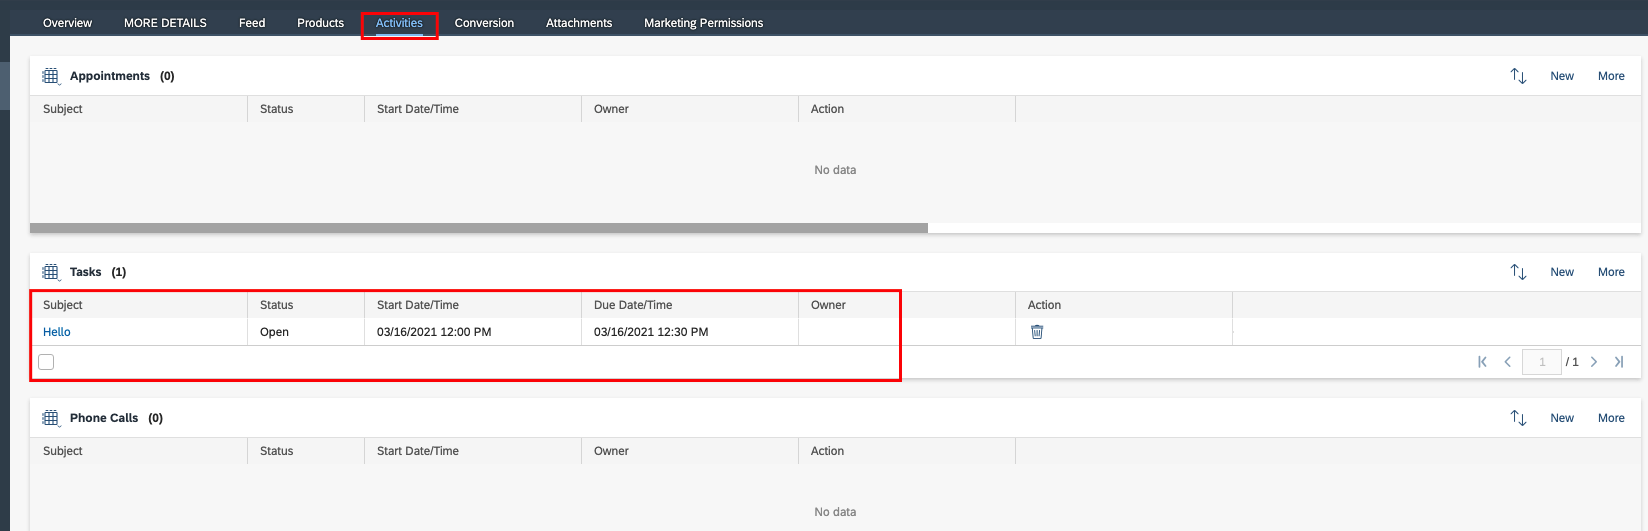 For leads to be created in SAP, a Name, Company and Contact Last name is required for a new record. If you are not setting these up during the chat, our system will guess based on the email, but if you want, you can use labels where the agent provides this information and map these to SAP for this to work. If you do this via required labels, this is what it will look like.
 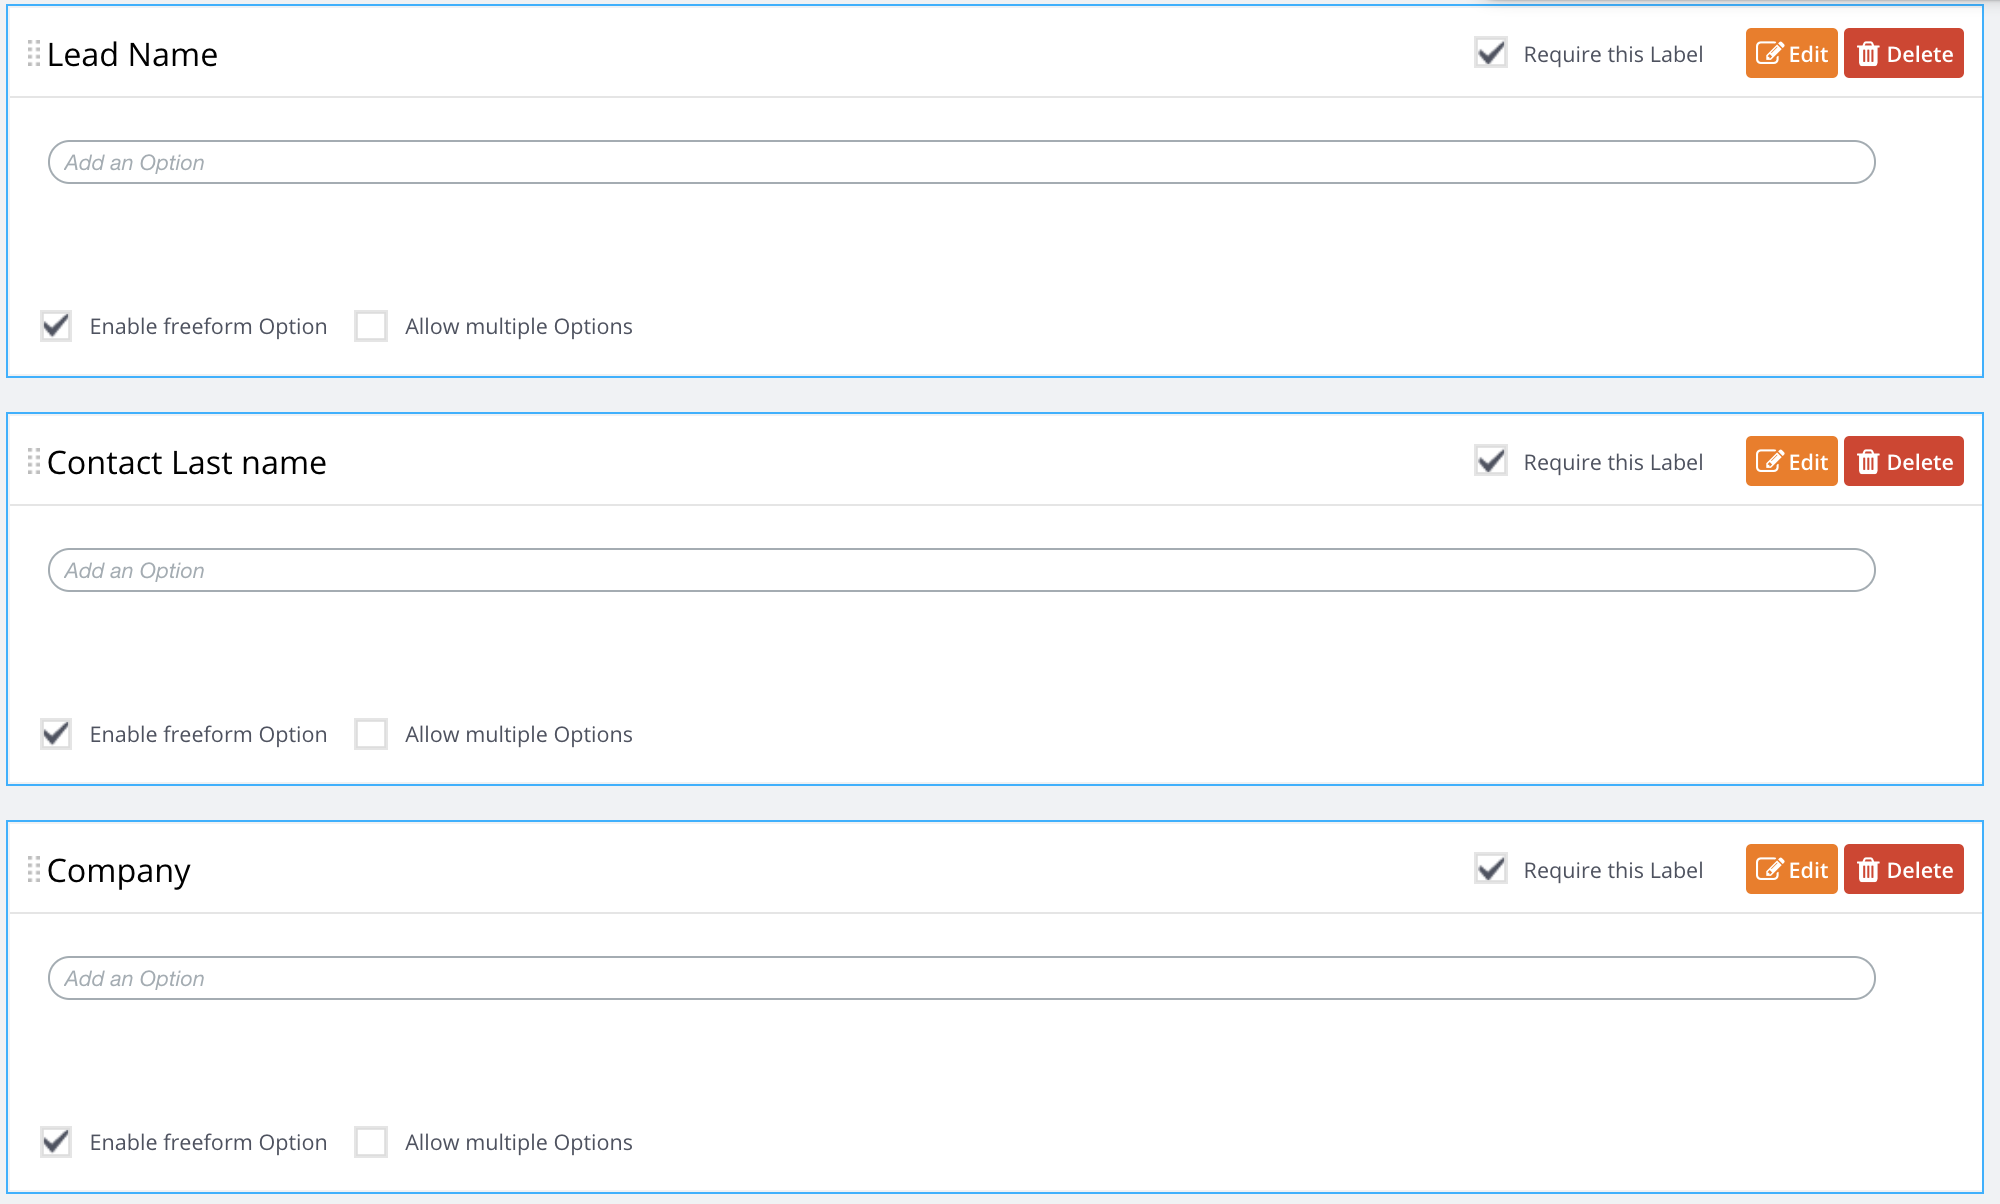 Below is what the mapping will look like :
Linking Chats to SAP tickets
Linking chats to existing SAP tickets enhances workflow efficiency by reducing agent handling time and eliminating the hassle of finding and manually adding tickets to client profiles in SAP. Agents no longer need to create tickets for the same issue with the same client, regardless of contact type. There are three ways to link chats to existing clients and tickets in SAP.
- Related Ticket Command
- Email Address
- Phone Number
Related Ticket Command
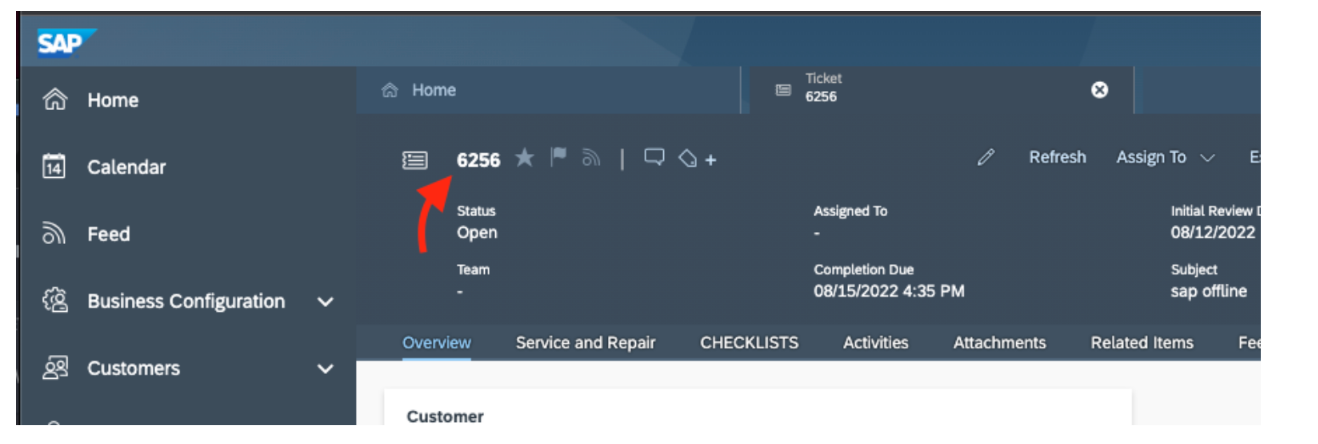
The “relatedticket” command is separate from the workflows. This command only requires having the widget configured in SAP. The agent only has to type the /relatedTicket=#### command at any time in the chat.
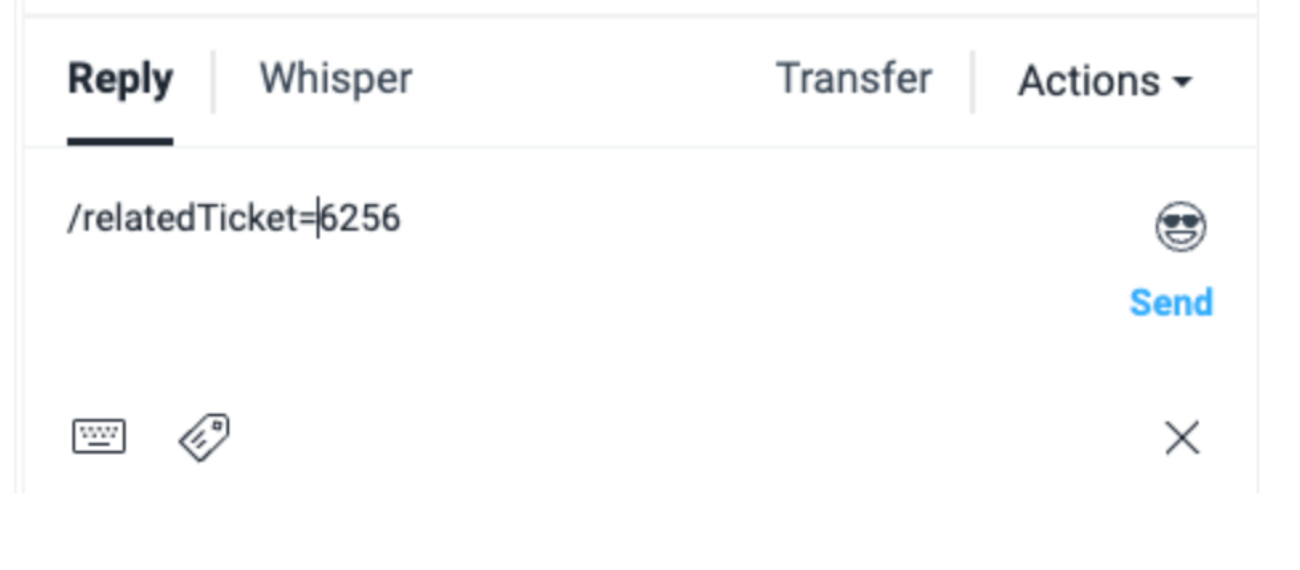
Next, the hub will query the matching ticket number from SAP. After the chat ends, the chat will be appended to the related ticket in SAP as a new note.
Things to Consider
- The system automatically creates a new ticket in SAP when the agent omits the relatedTicket command or when neither the phone nor email query triggers appear in the chat.
- “relatedTicket” is a reserved word and will neither work as a shortcut command nor a custom label.
- The relatedTicket is case sensitive; always include a capital “T”
- The relatedTicket command will no longer apply when transferring the chat to a widget not configured in SAP.
- In cases where the agent lists multiple ticket numbers, the system will always override previous ticket number entries and append them to the most recent.
Query by Visitor Email Address
The “query by visitor email” feature is compatible with both workflows. The difference between the service and sales workflows is that the service workflow labels the visitor as Contact/Customer while the sales flow treats visitors as Leads. Overall, the system will query SAP for the contact/customers or the lead’s email address when the chat starts. If the Contact/Customer or Lead exists in SAP, the visitor’s SAP profile will be updated per the selected “Update and Overwrite Setting” under the designated workflow. 
Otherwise, SAP will create a profile under the domain in the visitor’s email.
Steps to using the “Query and Append By Email” Feature
1. Select either a Sales or Service SAP Workflow

2. Select an Update & Overwrite Option. Below is an example of this appearing in the Sales Flow

Query by Visitor’s Phone Number
The “query by the visitor’s phone number” feature is only compatible with the Service Flow. You can still query by email address because this feature works with both workflows. However, this feature will not work if the visitor’s email registers in the chat. Regardless of how the visitor’s phone number enter into the chat, the system will automatically search for matching phone and mobile numbers in SAP. After the system has found a match after the chat has ended by either the agent or visitor, a ticket of the chat transcript will be created and attached to the given contact’s SAP record. If the system does not match the phone number, SAP will register the number and create a new contact. In the future, the system will find the newly registered number and append chats to the visitor’s SAP profile. Steps to using the “Query by Visitor Phone Number”
- Please configure (or ensure) the widget is configured to an SAP account.
- Under the SAP Workflow Setting, ensure that the Service > Create and Manage Tickets option is selected. Again, this feature will not work with the sales workflow.

- Select which list to query for phone number matches in SAP. For example, if the “Corporate Accounts & Contacts” option is selected, the system will query these lists in SAP for a phone number match. If the “Individual Customers” option is selected, the system will query the “Individuals Customers” list in SAP for a phone number match. When there is a phone match, a ticket of the chat will be attached to the respective contact’s profile in SAP, per your list selection. Otherwise, the system will create a new contact with the phone number under the appropriate list in SAP and a ticket for the new contact.
- Collect the phone number during the chat using one of the methods listed below.
- phone command=### command, the agent enters something like /phone=+49 12345678 during the chat.
- Pre-Chat Form: The visitor must also use the +49 12345678 phone number format within the phone number field on the pre-chat form. Otherwise, the query function will not work, and the system will create a new ticket in SAP each time.
- SMS-to Chat Session: Captures the visitor’s phone number automatically
- Call Me Session: Captures the visitor’s phone number automatically.

Did you find this article helpful?

 (6 votes, average: 4.33 out of 5)
Published January 19, 2021