Home > Guide Bot Recipe: Specialized Support Teams
Categories: Chatbot Docs
(Last Updated On: )
About This Article
This article explains a single “recipe” for using our Guide Bot in this case support teams.
This article describes a single “recipe” for using our Guide Bot. Each recipe is a strategic guide for deploying the Guide Bot. Please refer to our Guide Bot Introduction and the Guide Bot Configuration Guide for more general information. This recipe assumes basic familiarity with SnapEngage configuration and setup (widgets, agents, design studio, etc). You may need to refer to other support pages for help on these topics.
This recipe will work for SnapEngage accounts of type “Professional” or “Enterprise“. Legacy plans and the “Essentials” plan do not have Bots.
The Scenario
The scenario for this recipe is that your company has specialized teams for handling support cases of different types. The most common example of this might be a Billing/Accounts team, a Product Support team and a Technical Support team. When a customer visits your support site, you want to understand what type of problem they have and send them to the appropriate team so they get the fastest, most accurate response.
Note: you may have some agents who work across two specialized teams, or even all specialties. That is okay, this recipe can handle such a scenario.
Ingredients
To handle the simplest version of this scenario, you will use the following ingredients:
- A base / default support widget
- Additional support widgets for each of your specialized support teams
- A single Guide Bot
- Pre-chat settings (default message)
- Proactive chat (optional)
- Chat widget schedule for each widget OR 24/7 Agent Coverage
Solution Overview
This recipe will take incoming chats (reactive, proactive, or both), ask your visitor which type of help they need, and then route the chat to the right pool of support agents for that need.
Your default support widget will contain the Guide Bot. The Guide Bot will start things off by asking the visitor which type of help they need. Based on the visitor’s selection, the Guide Bot will route the chat to one of your specialized support widgets where it will be picked up by one of your live agents who answers the request.
If you are sending your chats to an integration (helpdesk, CRM), you can dispose of each in a different way depending on the type of question that was asked. Or, you could even send them to different integrations. Please note that this recipe describes the simplest approach to the scenario. There are many ways you could refine it. See “Improving the Recipe” below for details.
Setup Directions
Step 1: Base Support Widget
First, if you don’t already have one, you will want to create a new support widget. This widget will be the one you embed in your site or application, and it will determine the initial experience your visitors have when they encounter chat. This widget will contain your Guide Bot, and determine how that bot interacts with your site.
Note: This recipe will cover the widget configuration options specific to this recipe. There are many additional configuration options that are part of setting up a SnapEngage widget and they are covered elsewhere.
If you already have a support widget set up and installed, you can repurpose that one as your Base Support Widget. However, you will need to move your live human agents into your Specialized Support Team Widgets (described in Step 2).
Step 2: Specialized Support Team Widgets
In step 2, create a new widget to contain each of your specialized support teams. In our example for this recipe, we will have the following three specialized support widgets:
- Billing / Accounts
- Product Support
- Technical Support
Add your agents to each specialized widget, as needed. For each widget, you can set up priority tiers if you wish. Also, any individual agent can belong to more than one specialized widget. For example, some agents might be able to handle both billing and product issues (and belong to both of those widgets) but not be able to handle technical support (thus absent from that widget). How you construct your teams is incredibly flexible!
Step 3: Creating the Guide Bot
You are now ready to create your Guide Bot! This recipe will not cover all of the details of Guide Bot settings. To understand the configuration options, please read How to Configure Guide Bot.
For this recipe, you will want to configure a version of the following dialog:
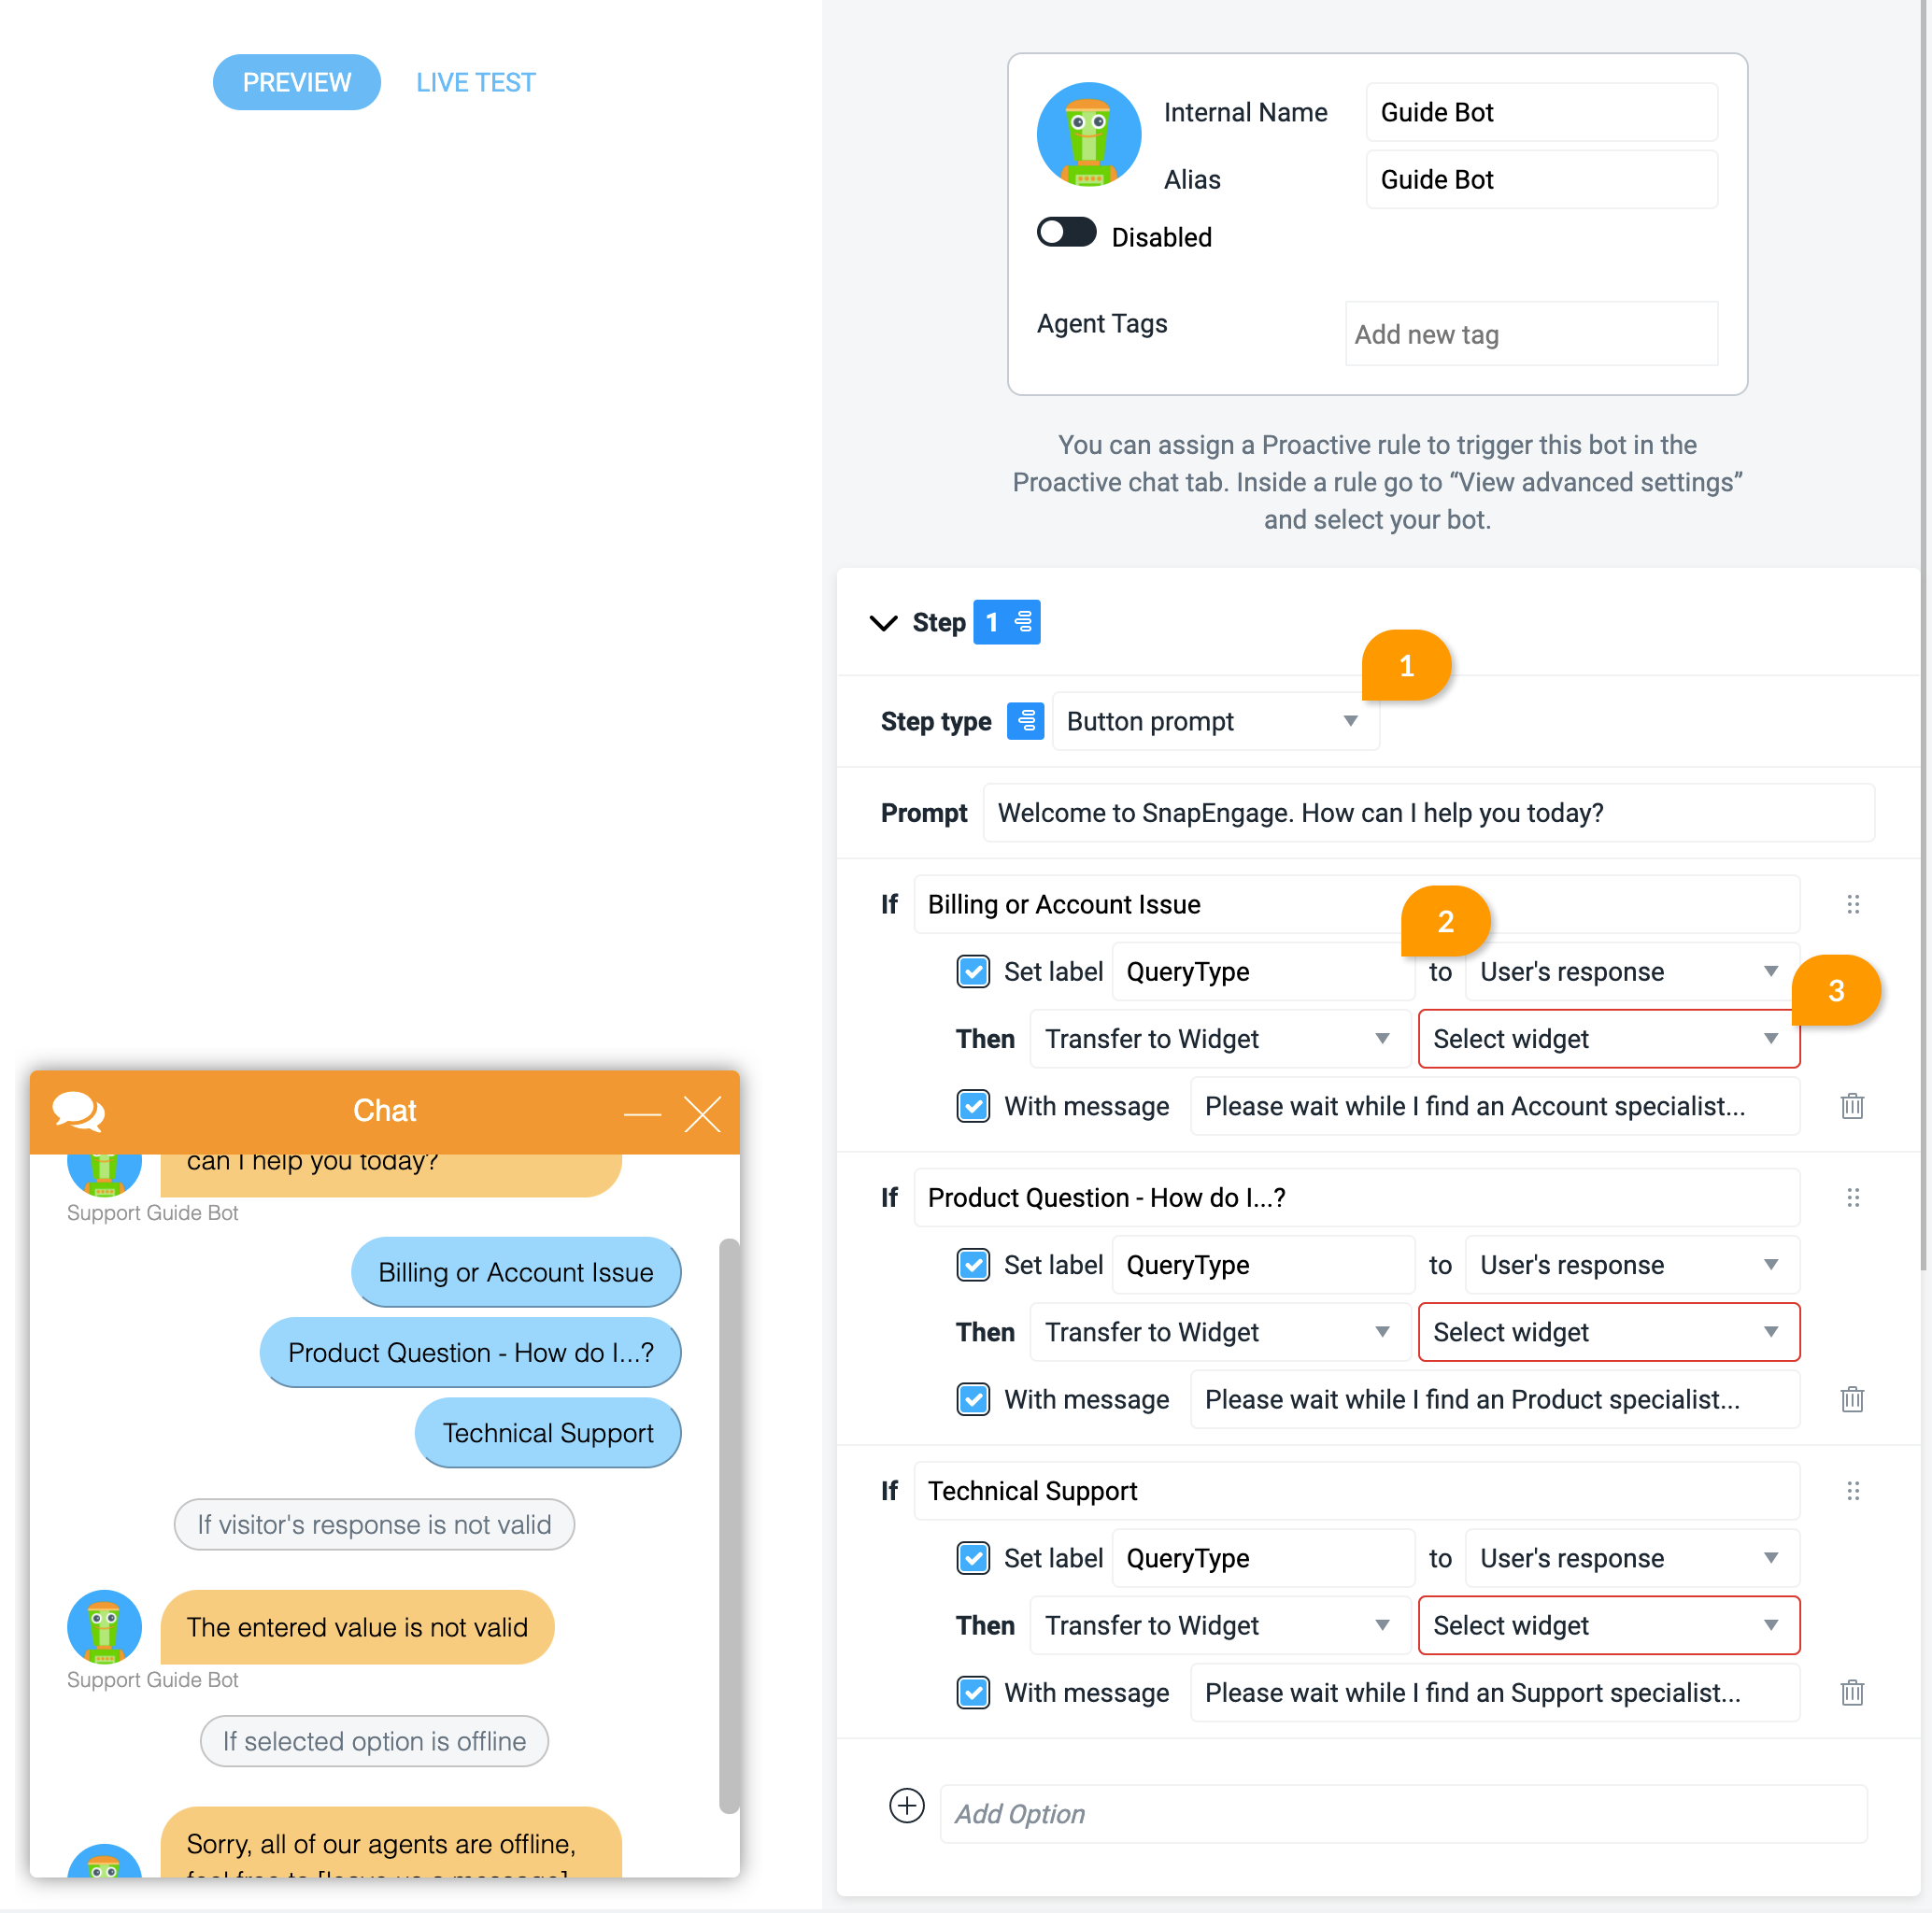
Each of these dialog options will transfer to one of your specialized support teams. The step will be a Button prompt (1). For each dialog option, set the the “Transfer to Widget” dropdown to the appropriate specialized support team widget that you created in Step 2 (3). We will also provide a Label called QueryType (2) which can be tracked separately, so that you can easily see what options the visitors are clicking, and what types of queries visitors generally have. This Label can be used in conjunction with the Labels report to improve reporting.
Don’t forget to “enable” the Guide Bot!
Step 4: Pre-chat Settings
Step 4 will ensure that your bot is the first thing your visitors see when they try to chat with you. This will control the prompt that appears in the chat box when they open it.
To ensure that they see the Guide Bot rather than the default message, navigate to (Settings > Design Studio) and look for Pre-Chat Form Settings. Set the Pre-Chat to “Open chat box with Guide Bot prompt”. This means that the widget will use the prompt you configured in your Guide Bot under step 3.
Step 5: Proactive Chat Settings (Optional)
Step 5 allows you use rules to proactively pop open the chat box on your site and prompt your visitors to respond. Standard proactive chat displays a specific line of text and then assigns any response at all to your live agents. However, you can repurpose proactive chat to start your Guide Bot. The specific settings for this are described in Guide Bot Configuration.
The most common support scenario for this might be: your visitor lands on your support site views the home page without taking any action for 30 seconds.
This step is entirely optional. You can use your Guide Bot entirely in reactive mode for this recipe.
Step 6: Widget Schedules
Last Step! You must adjust your settings depending on your live support schedule. Unless you set it otherwise – bots work 24/7, rain or sleet or snow. The bot widget will happily take requests and route chats to your specialized teams whether they are there or not.
If your support team is available 24/7, your recipe is complete. You can ignore this step.
If your live support teams are only available certain hours, then you will want to set a uniform schedule across all four of your widgets. This can be done by referring to the detailed instructions for setting a live chat schedule.
In this case, you should set all of your widgets to the same schedule.
Improving the Recipe
The recipe above provides the simplest implementation for the scenario described. But SnapEngage has tremendous flexibility and power! Here are a few ideas for improving the recipe to your needs.
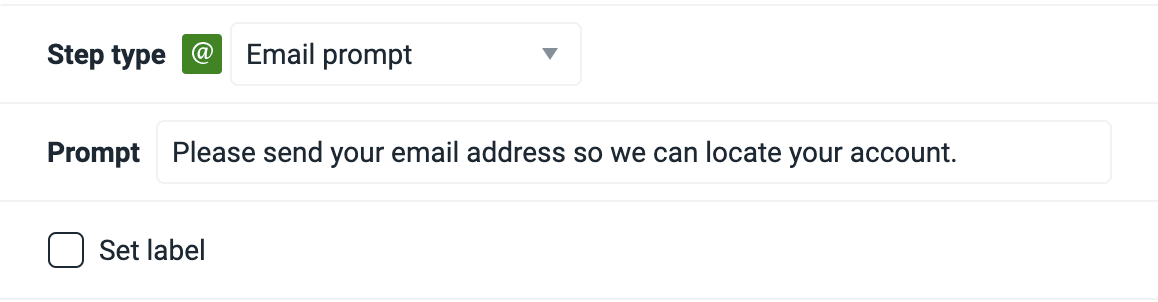
Add an Email capture step
You can set up the Guide Bot to capture email address, or phone number, using the different step types. You can read more about Guide Bot step types here. Essentially, you can create an additional step to capture the email address of the visitor prior to transferring to a widget, saving your agents some time and increasing efficiency.
Deflect visitors to documentation / self help
Many times, your customers are not even aware that self help documentation exists. They might need direction or coaxing. If they can solve their own problem, they will often get a faster answer and free up your support staff to answer more complex problems. Here’s how:
Add a 4th option to your Guide Bot dialog. This option should end the chat. You can redirect a visitor to a page on your site. Simply click on “Add another action”, check “Send visitor to page” and add the URL you would like to redirect them to :

Categorize Requests in your CRM/helpdesk
If you are using a CRM or helpdesk integration, you may also want to “dispose” of the chat in a different way depending on the type of request. For example – billing questions might need a review by your accounting team, while product questions can be closed without further review. These options and workflow would be handled by your CRM or helpdesk system. However, because you have routed the chat to a specialized team, you can “map” each scenario differently in your helpdesk. This is because each widget can have different integration mappings.
This process is described in more detail under Integrations and Plugins.
Enterprise Alternative using agent tags
This recipe described one approach to this scenario. If your account has the Enterprise plan, there is an alternative approach. You could accomplish the same recipe in a single widget using agent tags. The setup would be roughly the same as the approach outlined above, except that:
- Bot and agents would be in the same base widget
- Agents would be arranged in tiers as necessary within the widget
- Agents would be assigned skill tags for each of the specialties described in the recipe (e.g. Billing). Agents can have multiple tags. See the documentation on tags for more details.
- The Guide Bot dialog would be configured to “Route to Tag” rather than “Transfer to Widget”
Advantages: this approach is a bit cleaner in some ways. It avoids the need to set up multiple widgets, and synchronize settings across all of them. It avoids the need to configure agents for multiple widgets. Tags can be extremely powerful. Of course, if you want different settings depending on the team, this approach won’t work. There is no perfect solution – each has pros and cons.
Bot on select pages only
Suppose that you only want the Guide Bot to exist on certain pages in your site. On other pages, you want people to go directly to your live support team. For example – suppose that you have an Accounts and Billing page, and on that page you want any customer to go directly to that live team. In this case, you would do the following:
Selectively load your Base Support Widget or your Billing Widget using javascript. This is defined in detail here.
Add an “other” option for general support
Depending on your scenario, you might want to add an “other” option to your Guide Bot dialog. Sometimes, customers don’t know exactly what type of help they need. This gives them an “out” to request general help. To support this scenario, do the following:
- Add a 4th “Other” option to your Guide Bot dialog.
- Have the “Other” option transfer to a new 5th “General” support widget. OR, simply reuse one of the existing specialized teams, and let them manually transfer to the appropriate team if needed.
- If you have an Enterprise plan, you can accomplish this same goal using Tags (see above). This would avoid having to create another widget.
Did you find this article helpful?
 (1 votes, average: 5.00 out of 5)
Published January 20, 2020