Home > How to Configure Guide Bot
Categories: Chatbot Docs
(Last Updated On: )
Note: There is an extra per month fee for bots more details here.
About This Article
This article explains how to configure a Guide Bot.
The Guide Bot is an easy way to create complex routing flows to direct visitors to specific widgets and agents while displaying information. Using our Multi-Step system, you can create a tree of questions and ensure visitors are routed to the best-suited agent. You can also qualify leads by asking questions and directing them to the right person or team. Guide Bots can request email addresses, phone numbers, and additional text input enabling a significant amount of data to be captured with ease. The Guide Bot is used to organically converse with the visitor, offering a better user experience. For an example of how to set the Guide Bot in a way to aid your sales workflow, check out our tailored recipe here.
Configure your first Guide Bot
To configure the Guide Bot, follow these instructions:
- Choose a widget where you want to set up a Guide Bot
- Click Settings on the left Navigation Bar
- Click Agent Settings on the top Navigation Bar
- Click the Add Guide Bot button.
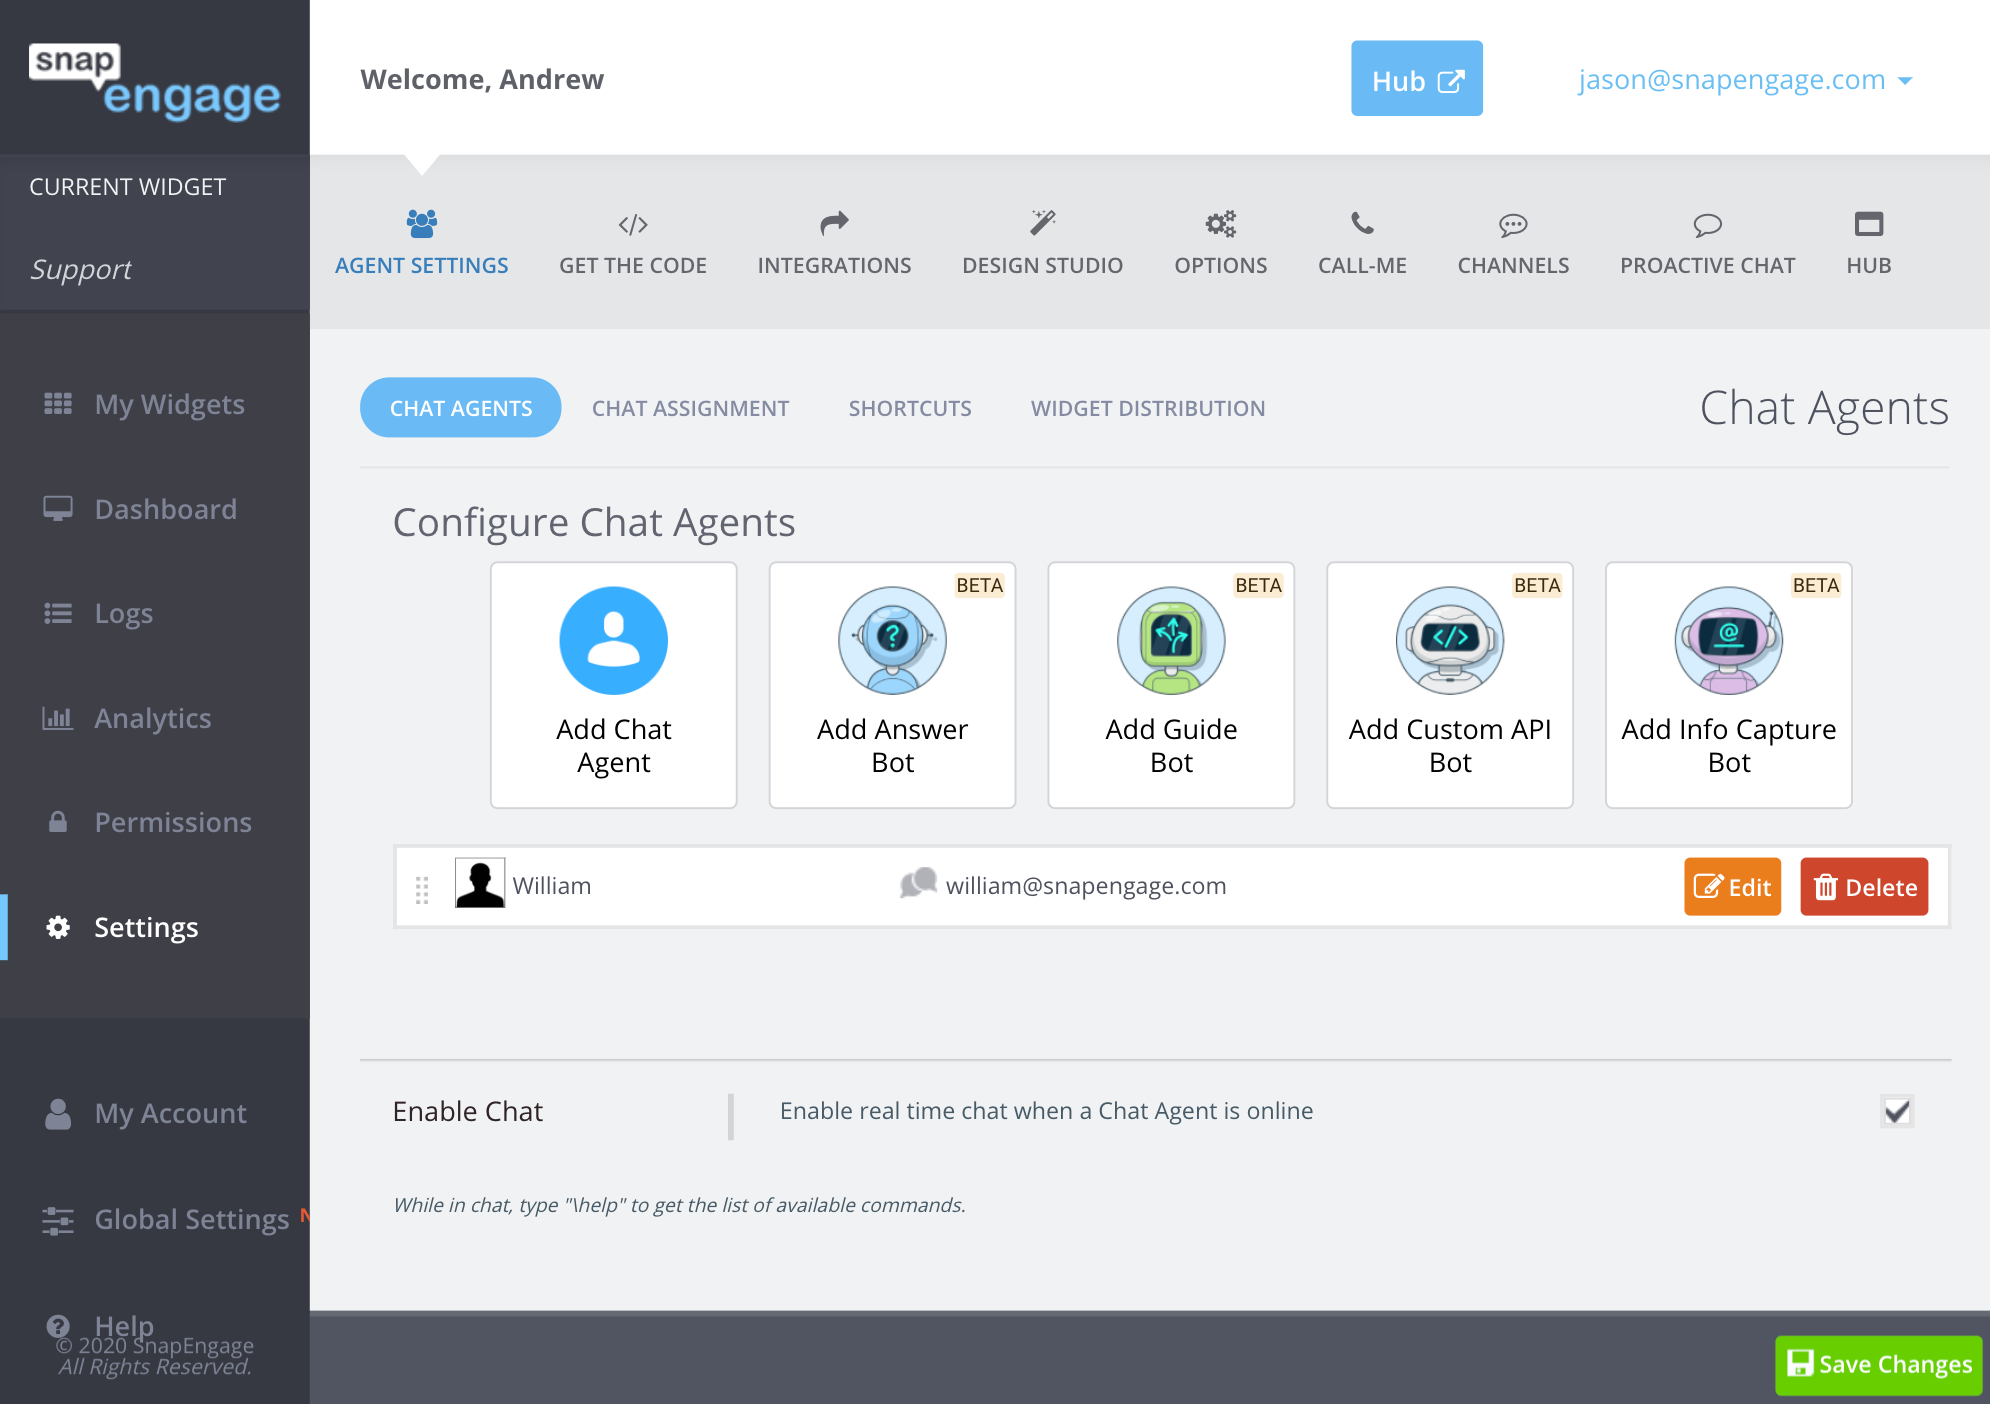
A new window will appear.
From here, you can either choose to create a Guide Bot from scratch or select a template. Templates are out of the box solutions covering common chatbot strategies, including appointment scheduling, sales qualification, and routine information gathering. To read more about templates, check out our documentation here.
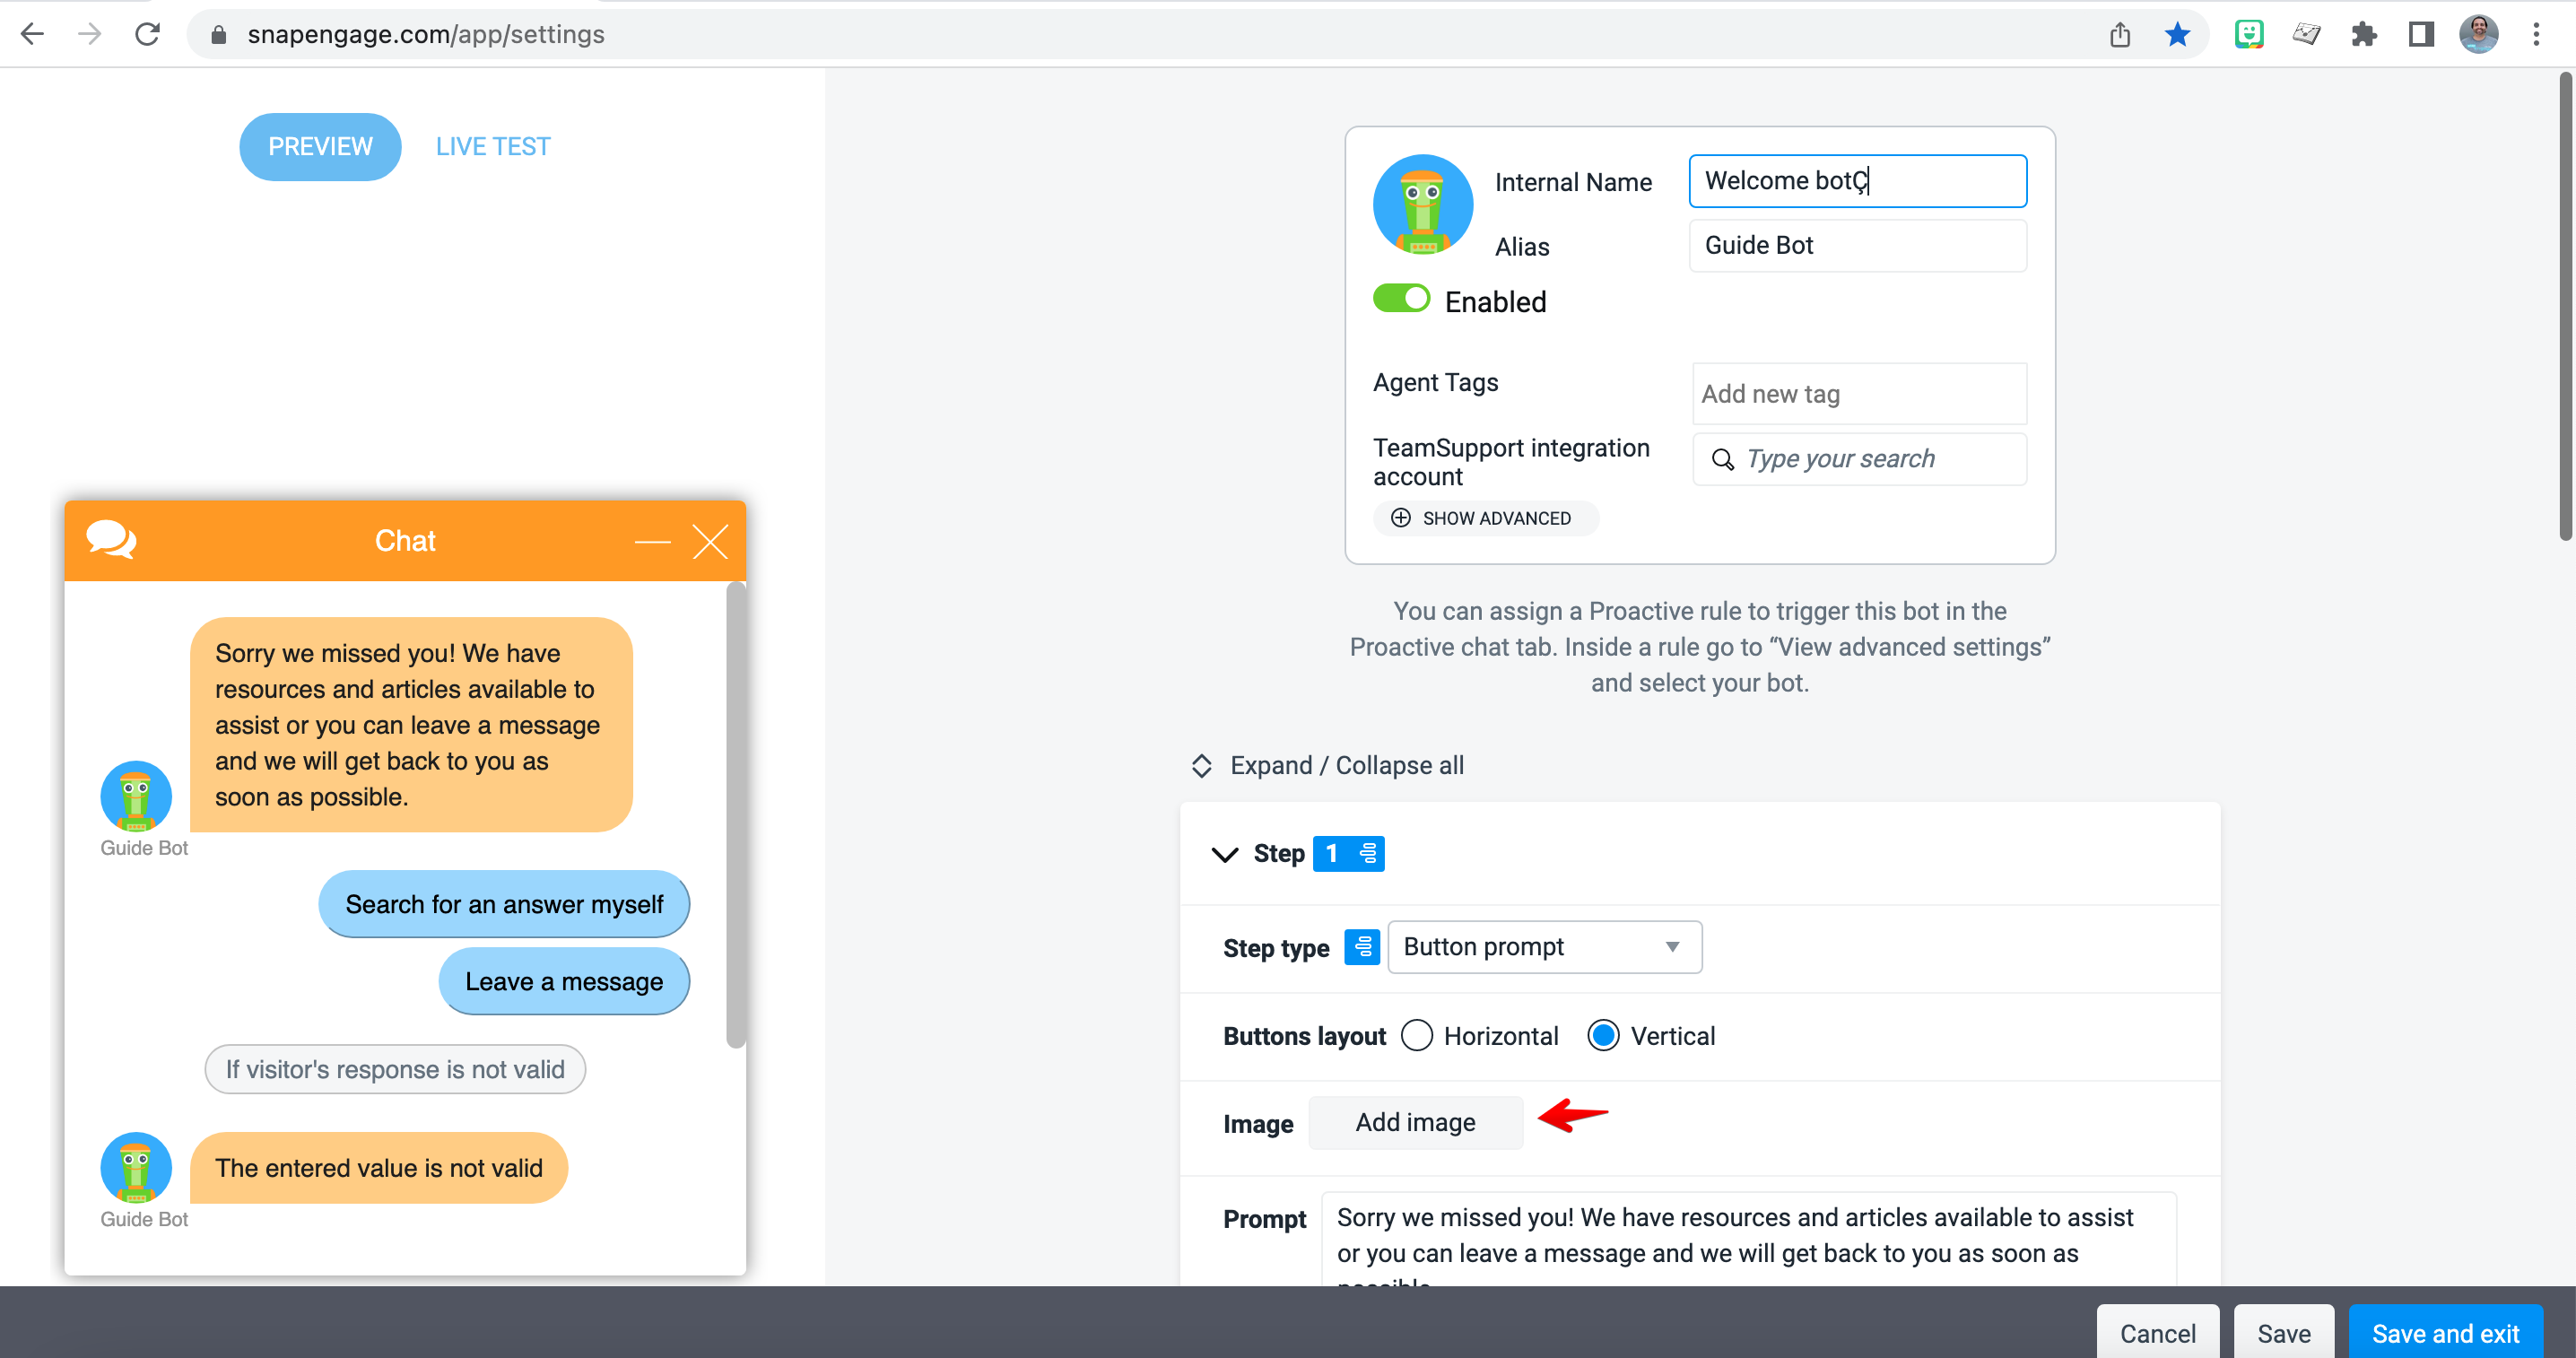
Below, we will discuss creating a Guide Bot from scratch. Once you select “Start from scratch”, but Guide Bot configuration page will open, as below:
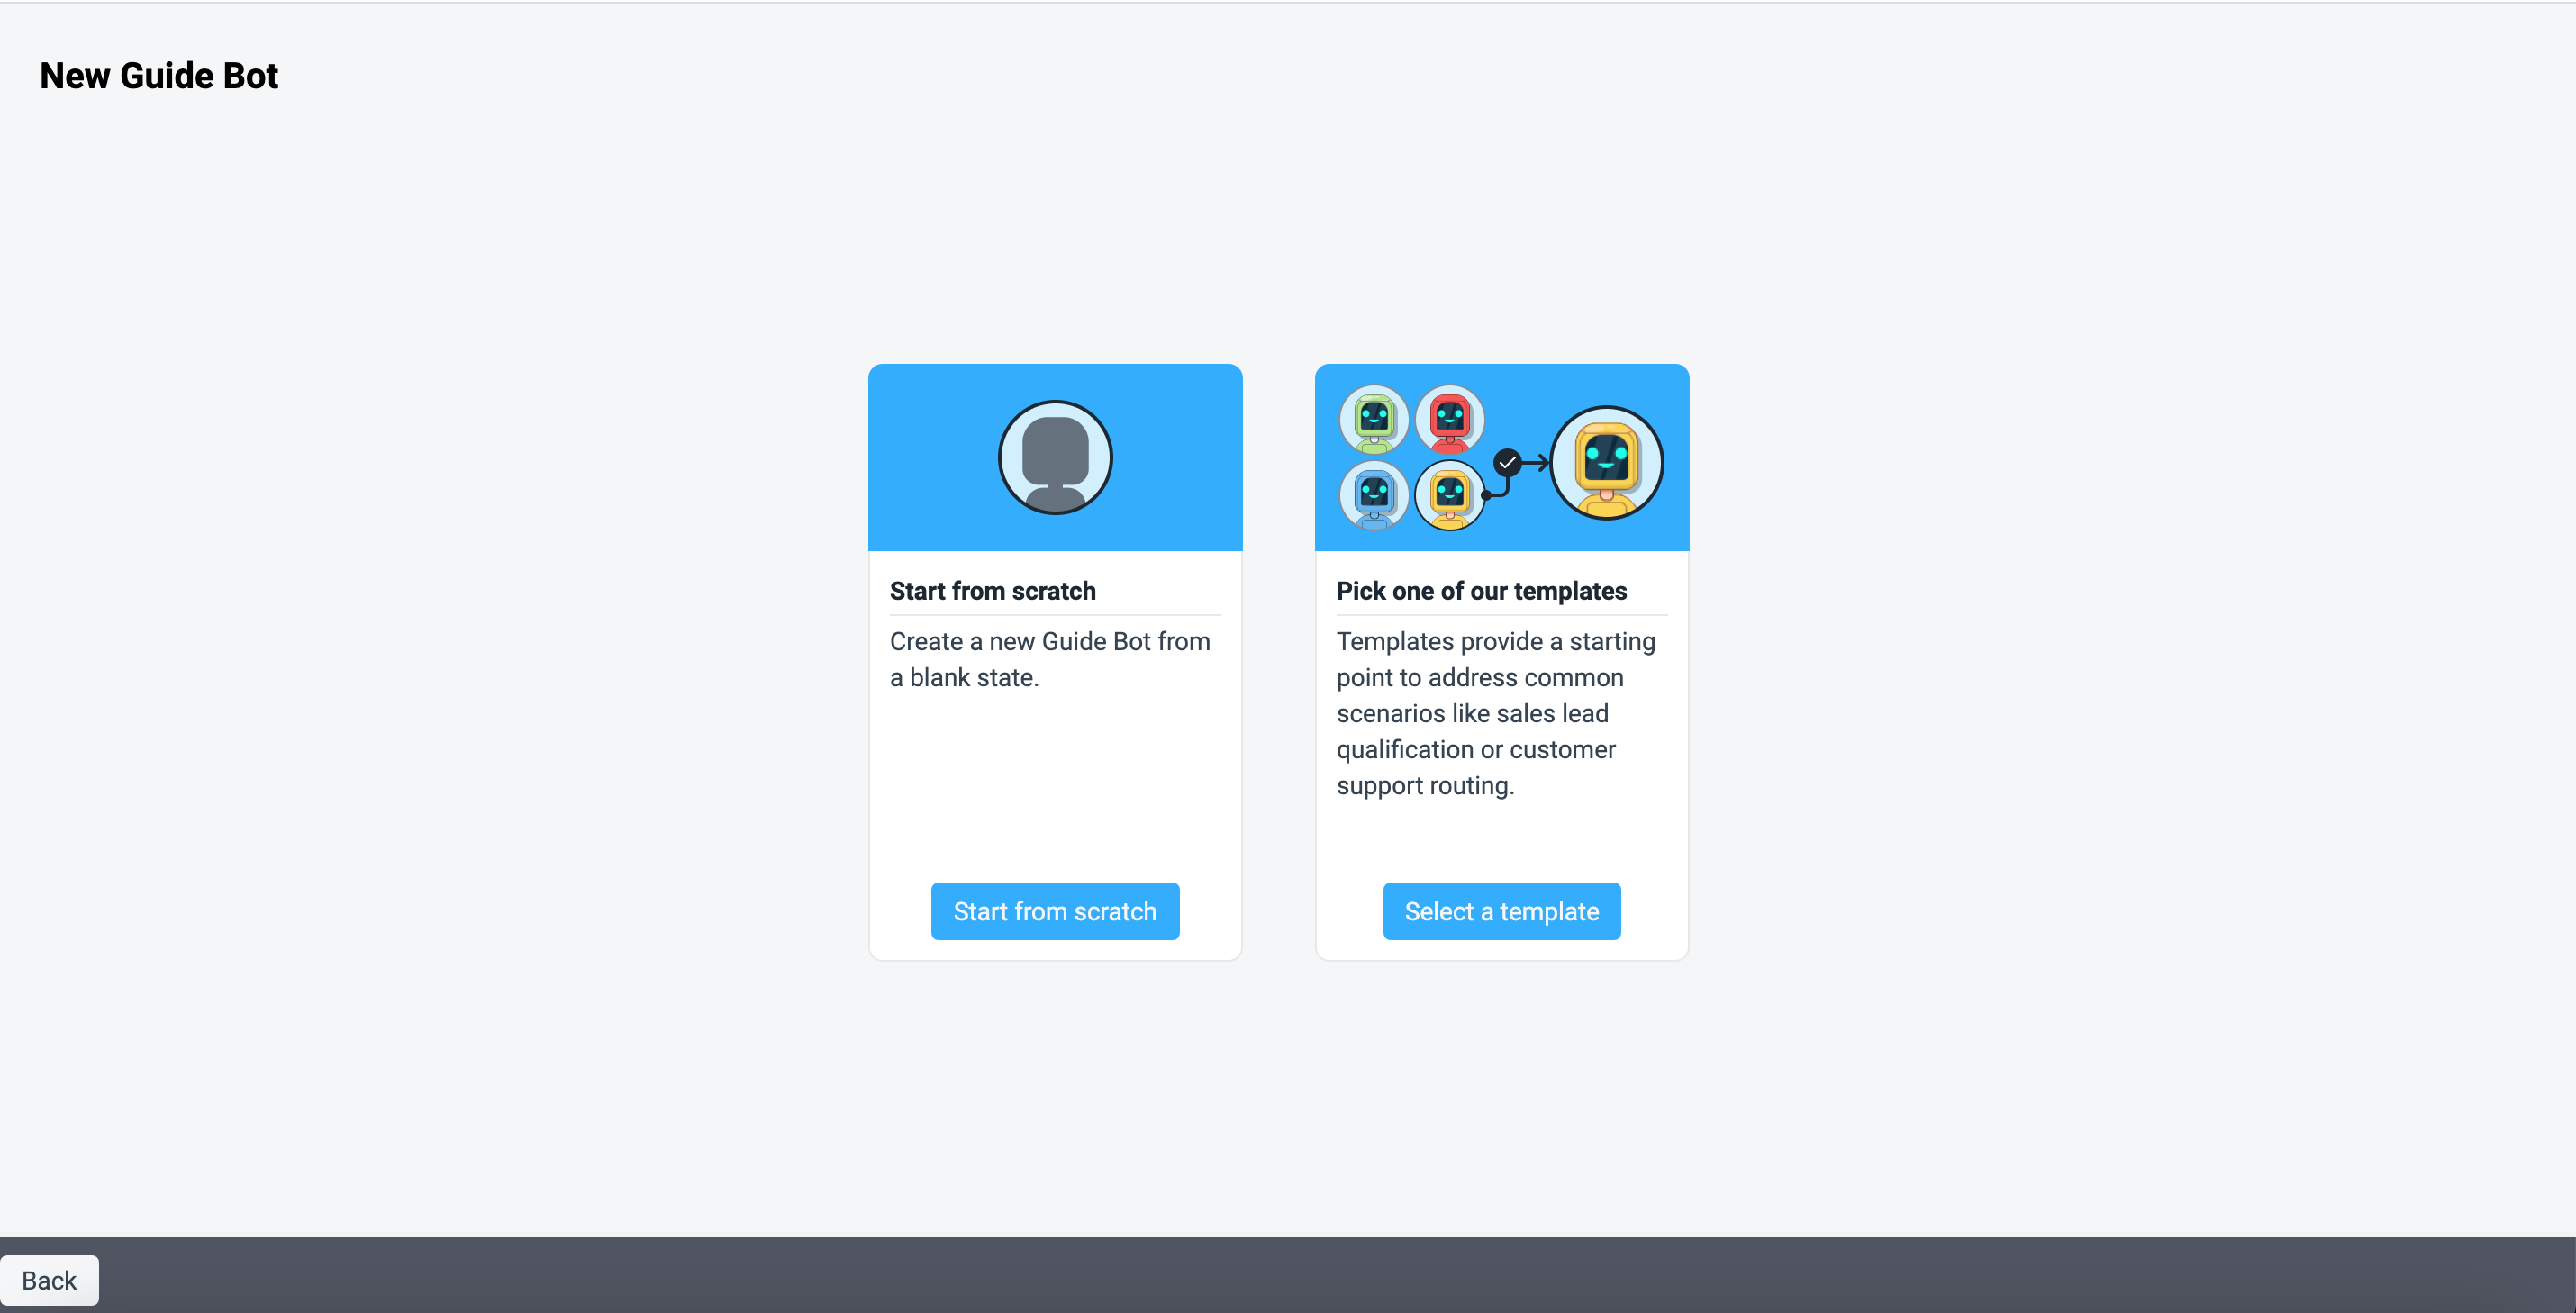
The right side of this screen allows you to configure chatbot dialog.
Bot Settings
In the first box you can configure the primary bot settings.
Internal Name
This name will be viewable only within SnapEngage Admin.
Alias
This is the name that visitors will see when they interact with the bot.
Bot Image
If you would prefer an image other than our adorable little green robot, click on the image to upload a new one.
Enable/Disable
Click this slider to Enable or Disable your bot. It is recommended that you only enable the bot when you are ready for clients to interact with it.
Agent Tags
Add relevant agent tags to assist in routing certain visitors to the bot. Learn more about routing with tags here.
Integration Mapping
You can map visitor guide bot interactions to a specific agent record in your integrations (Salesforce shown above.) This feature allows you to send bot transcripts to you integration and associate them with a particular agent, or you can create a “Bot” in your CRM or Ticketing system to map them to. Learn more about Integrations here.
Show Advanced
Click Show Advanced to reveal two buttons.
Import: Import an existing bot configuration. Note: This overrides any existing configuration.
Export: Export your current bot configuration as a JSON file. You can then import that file into a different bot.
As you add options on the right-hand side, you will see buttons appear on the left-hand side.
On the left-hand side, you can navigate between a preview and a live test. The preview shows you an example workflow and gives you an idea of how the steps will look. The live test allows you to test your workflow as a visitor:
You will notice that one step is added by default, but you can add additional steps by clicking on “Add Step” underneath:

You can also add a message which is displayed to visitors when no agent in the routed widget is available:
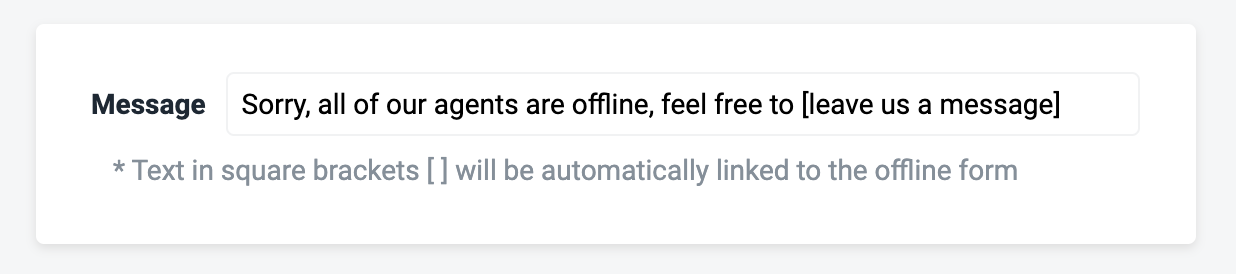
The text contained within the squared brackets can be clicked by the visitor to send an offline request to your team.
Creating Your Dialog
You bot is essentially a series of Prompts that help you efficiently gather information and guide your visitors to the resources or person that is best suited to help them.
Step Types
There are currently 5 different step types to choose from:
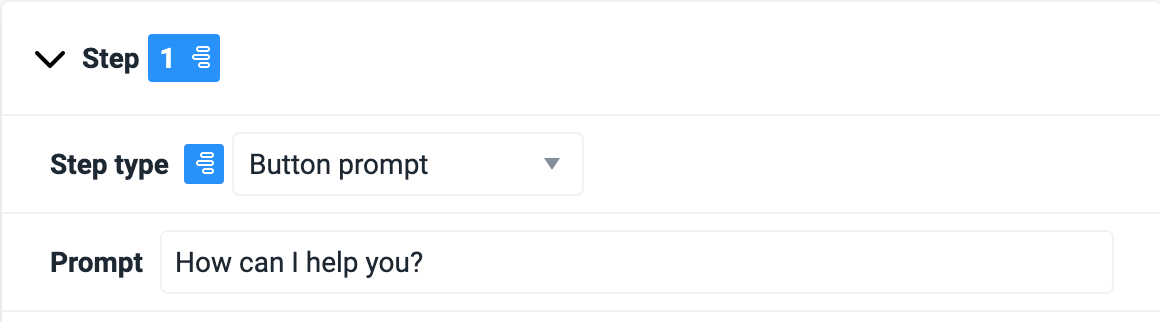
1. Button Prompt
This will display multiple buttons to the visitor which they can click to progress through the Guide Bot flow.
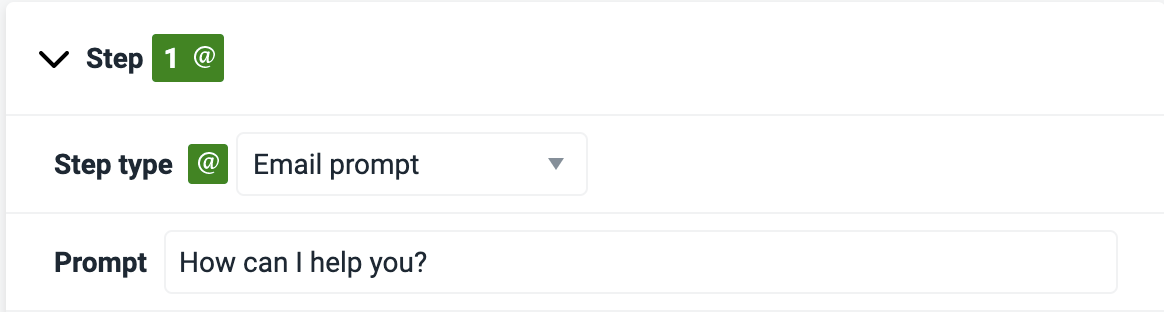
2. Email Prompt
This will prompt a text field to appear where the visitor can enter an email address. This will attach the email address to the chat.
The email input will validate if the visitor reply includes an email string (i.e. the format of an email – [email protected]). If it does not find one it will throw an error. The email can be extracted and assigned to a Label (see more below on adding Labels using the Guide Bot).
The contact assignment continues to work as it does now in a live chat: If the visitor was unknown the email will be assigned, if the email was known before it will not be assigned to the contact.
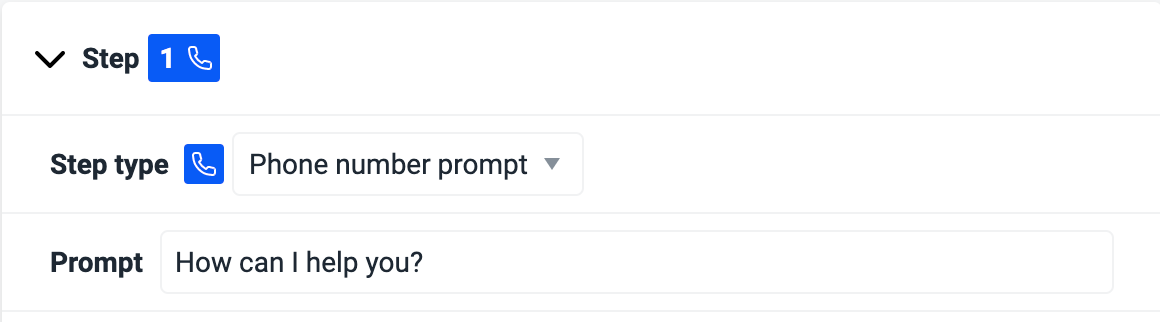
3. Phone Number Prompt
Similarly to the Email prompt, the Phone prompt will display a text field to the visitor so they can enter a phone number. This is captured and tied to the chat.
The Phone prompt will validate if it finds a number between 4 and 20 integers and will extract this to a Label, if one is set.
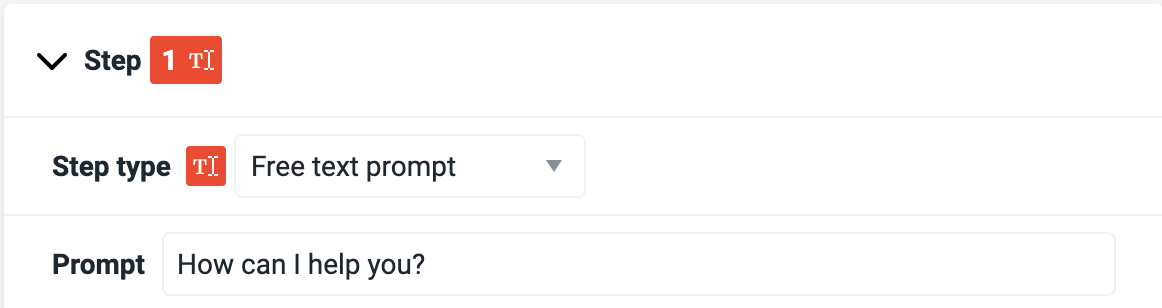
4. Free Text Prompt
This allows the visitor to enter free text. This is useful for cases where the visitor needs to enter a post code or address, or information about a product or the topic of interest. This is especially useful when you use the Guide Bot during offline hours as you can gather more information. It allows the visitor to respond freely to a prompt from the Guide Bot, enabling so many more workflow options.
The Free text prompt has a maximum of 1024 characters.
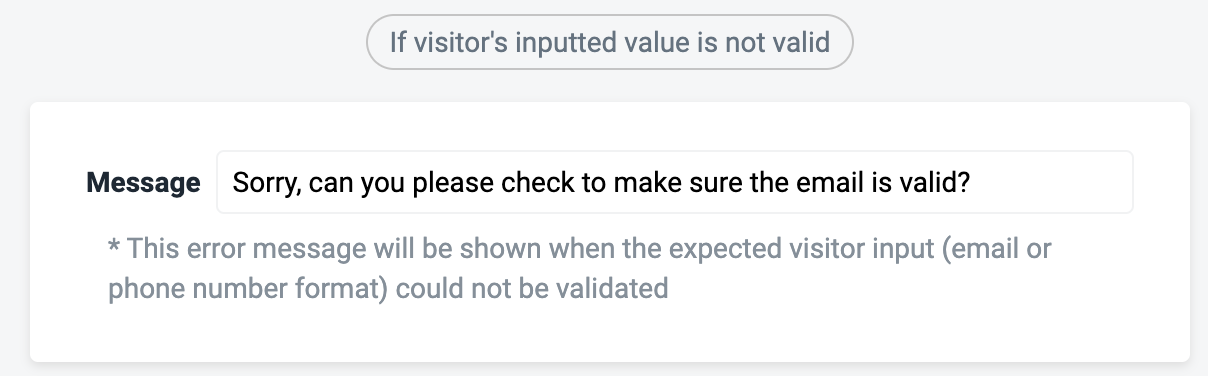
**Please be aware that the Email prompt and Phone number prompt require certain validation prior to being accepted. If the visitor sends an incorrect email format or phone format, you can program a prompt that is sent at the bottom of the Guide Bot configuration page:
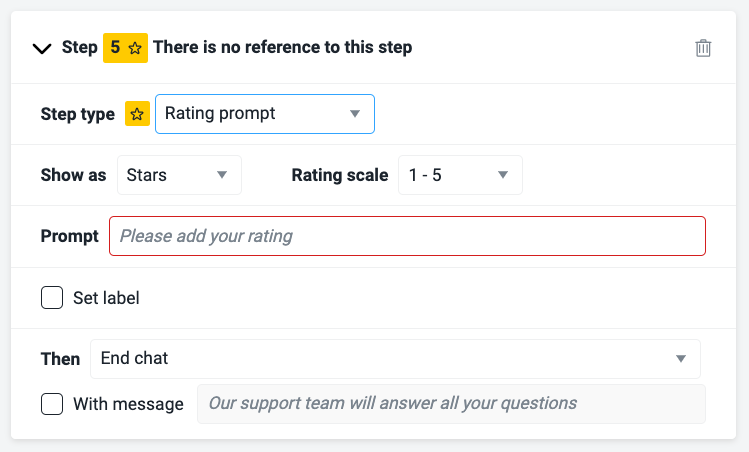
5. Rating Prompt
This option allows you to request a Star or Number rating from your visitor. This could be a way to gather feedback on a product, the website experience, the chatbot itself or anything else you might be seeking client feedback on.
Configuration Options
Prompt / Question
On the right side of the bot configuration screen, you can edit the initial prompt or question that the bot will ask your visitor. This can be anything you like, but we recommend keeping it short and clear. For example, you might prompt, “Hi there! What can I help you find today?”
You can also populate Guide Bot messages and buttons with Javascript variables. Read more here.
Dialog Options
Below the prompt, you will set up the steps that your visitors can choose, as well as the actions the bot will take when the visitor clicks a button. You can add, edit, or remove choices as needed. Each choice is structured as an “IF – THEN – MESSAGE” set:
- IF the user picks this answer
- THEN take this action
- WITH MESSAGE to display during the transition.
You can click Add Another Action to enable the option to direct a visitor to a specific URL.
You can add up to 10 buttons options, but be aware of the size of the chatbox and make sure they all fit in it. Otherwise, visitors will need to scroll and may not see all options. We recommend keeping things simple and only using 2-5 choices for most applications.
**If you are using the Facebook Messenger channel, please be aware that buttons need to be shorter than 20 characters.
THEN action options include:
- Transfer to widget : This will transfer the chat to the widget you choose under the Select widget option, and direct it to the team on that widget. The chat will be assigned based on your rules for that widget. Make sure that widget is configured to be able to receive chat transfers from under Settings – Agent settings.
- Route to tag : If routing by tag is enabled, you will be able to route the chat to agents in the current widget who have that tag. Bots can also have tags, allowing you to route to a specific secondary bot.
- Route to Bot: This will allow you to direct the visitor from one bot to another.
- Jump to Step : Will prompt the bot to move to the next step in the conversational flow.
- End the chat : This will end the chat (it can be used if an option is not available)
Example:
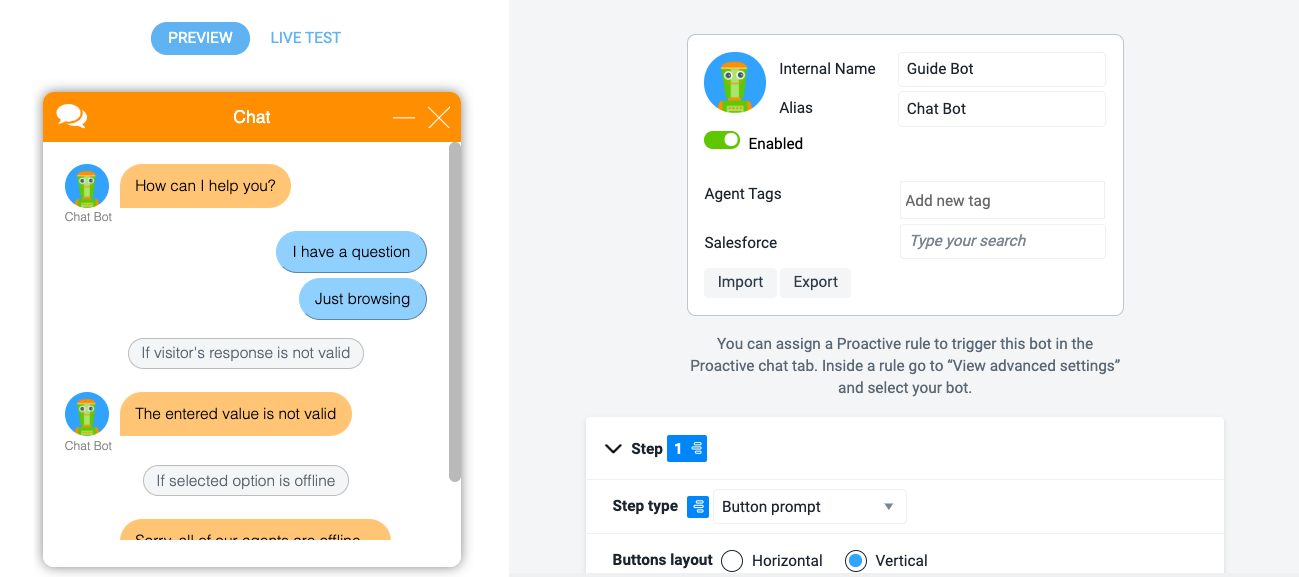
In the following example, we have 2 buttons.
- “I have a question about a product I bought” – when a visitor clicks on this button, the second step will be prompted.
- “I am looking for a job in your company” – This will end the chat, with the message “Please check our careers page”
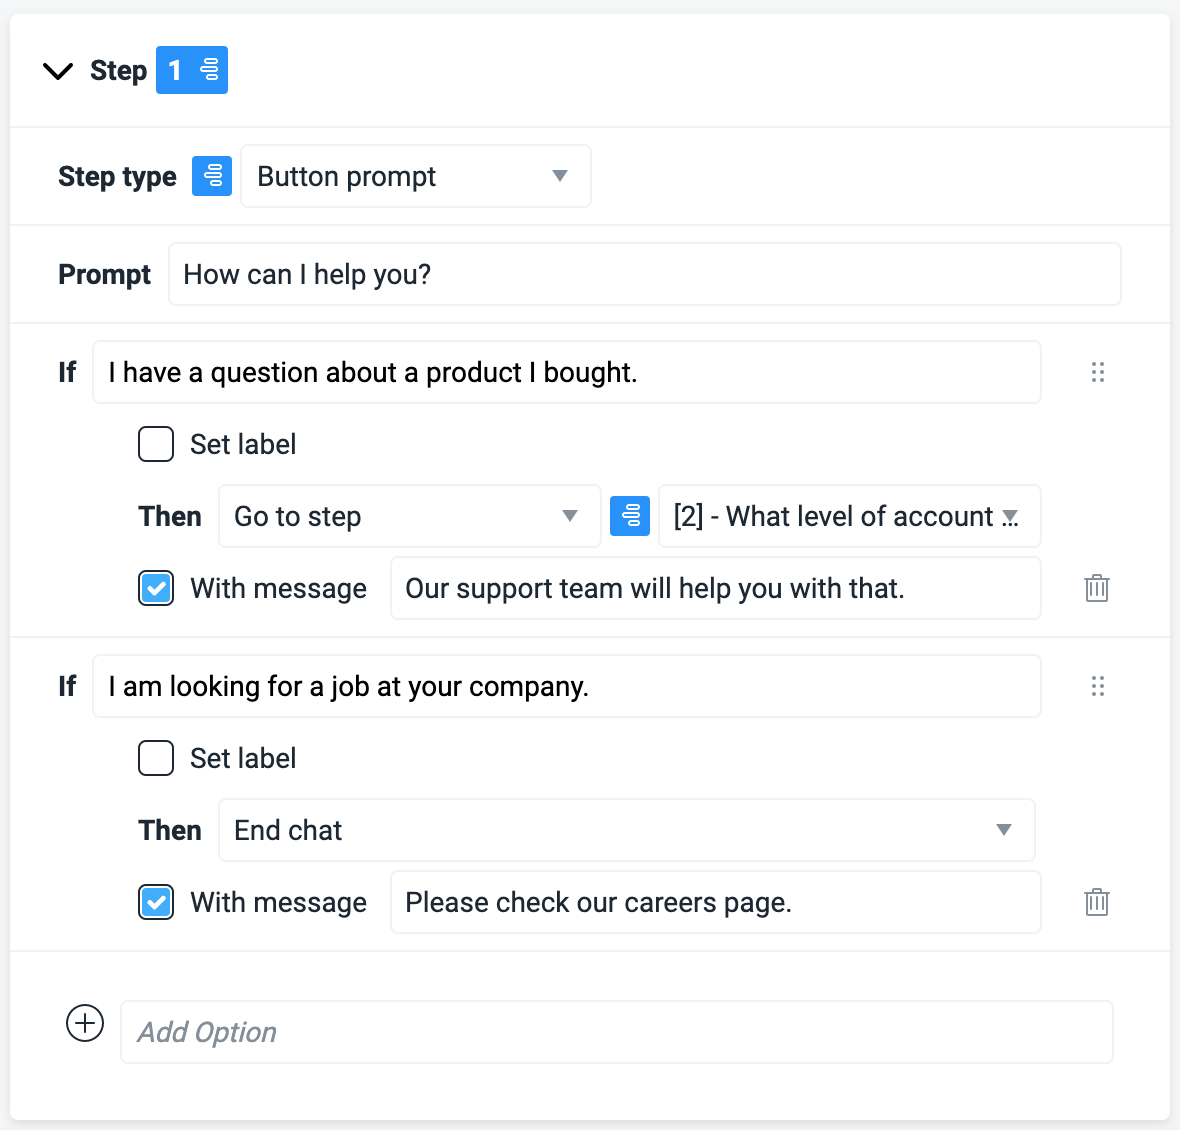
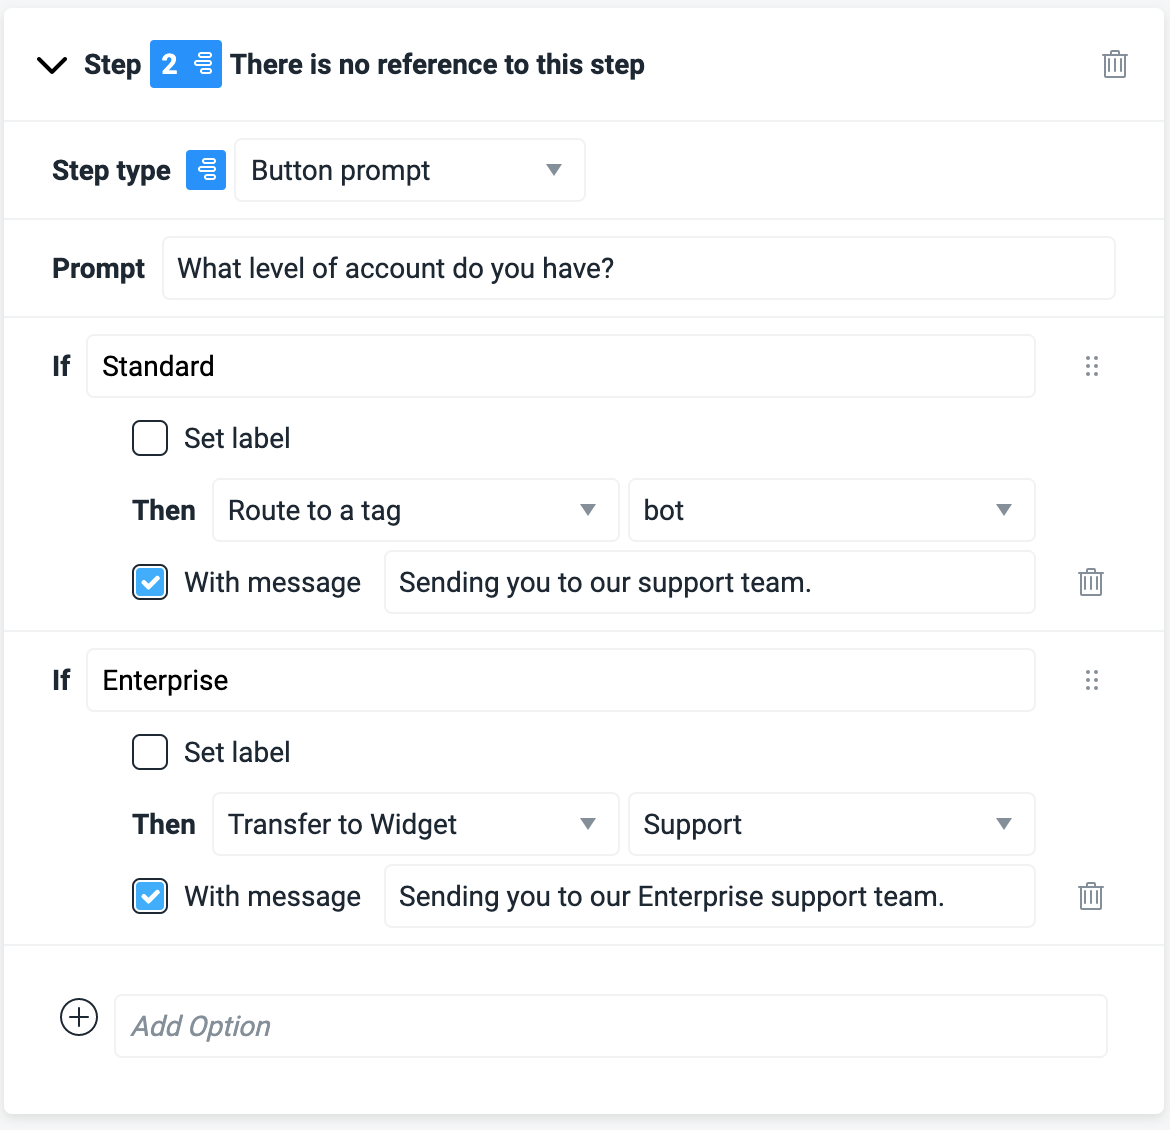
If the visitor clicks on “I have a question about a product I bought”, they will be shown the second step in the flow:
This second step asks “What level of account do you have” and it has two options.
- “Standard” – This will route the chat to any agent in that particular widget with the tag “bot”. You can read more about tags here.
- “Enterprise” – This will route the visitor to a different widget called “Support”.
On the top left, under the bot’s name, you will also be able to assign tags to this specific bot, ( the same as you would to an agent) so that other bots can assign chats to this bot. You may also assign chat via routing by tag. If the Bot transfers the chat to a widget, and the agent does not respond, the agent reassignment rules would still be triggered.
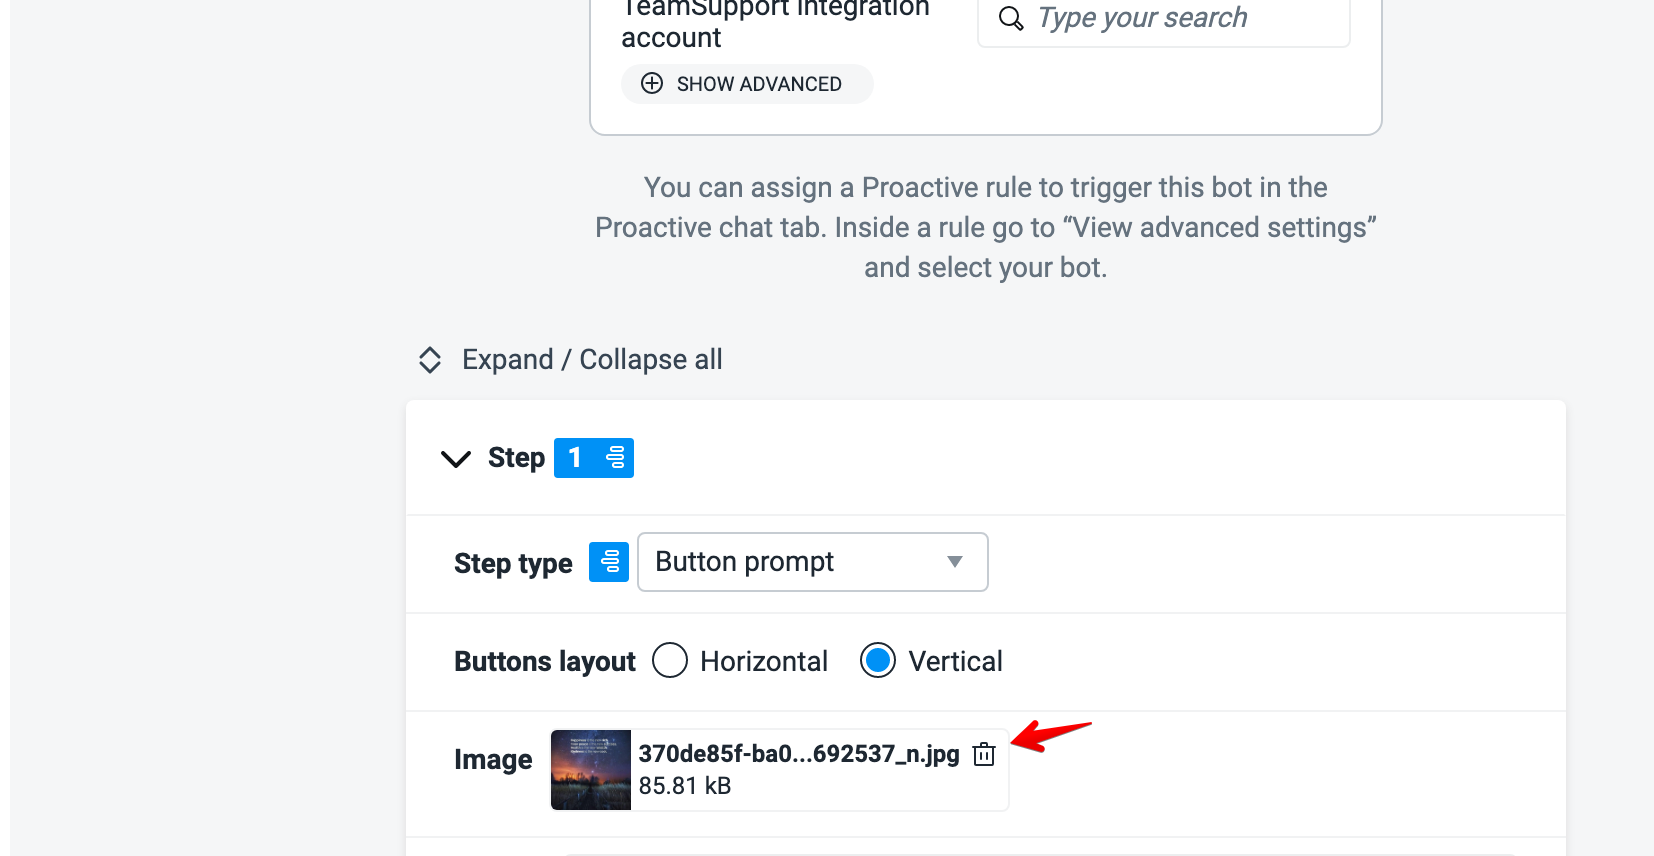
Add Images to Bot Prompts
Users can now upload images and animated GIFs to all bot prompt types (button, email, phone number, free text, and rating prompts). In the bot editor simply click on the Add image icon.
There is currently a limit of one image per bot prompt. Images always occur before the prompt message. We currently support the following file types for bot images: PNG, JPG, animated GIF.
Note: Max file size is 25mb
Images can be deleted by admins using the trashcan icon.
During the chat, website visitors can click on the image or animated gif and open it (full-sized) in a new tab. Bot images provide a richer, more interactive and automated bot experience. Adding images and gifs to the response options greatly increases the range of concepts that can efficiently communicated in the chat window. Bot images help communicate information quickly and succinctly in a small space. They help provide step by step tutorials with gifs and images. You can show product images to generate interest in prospects and for initial sales qualification. Additionally, you can take prospects through a guided product walkthrough.
Note for proactive chat scenarios: If you are using a Guide Bot to launch a proactive chat message, currently the very first step/message prompt does not support images. You can still add images to all subsequent steps/prompts within any proactive bot. As a future enhancement, we will add the ability to add an image to the proactive chatbot’s very first message.
Add Labels
You can also add Labels to the chat with the Guide Bot. Underneath each Guide Bot prompt you can define a relevant Label to apply to the chat.
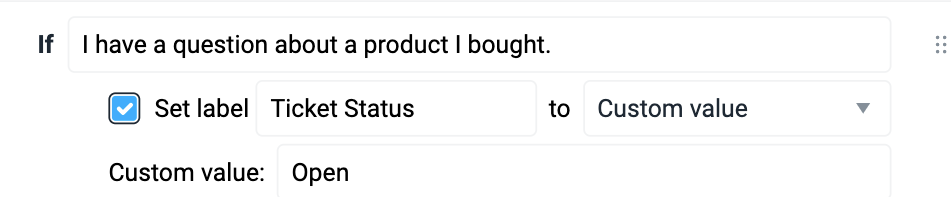
You can opt to either set a Custom value, or set the User’s response as the value. Setting “User’s response” will mean that the button the visitor selects will be the value of the Label. It’s important to note that Freeform Label values should be enabled for the Labels themselves, to ensure there are no errors.
You can measure usage and effectiveness of Labels to make informed business decisions. For instance, if Label options include “resolved” and “require further attention”, you can drill down and see which chats were not solved during the chat and why. Read more about our Labels Report here, which gives a valuable insight in to chat analytics.
Note : If you are looking to have the labels set appear in the CSV export please follow the below steps:
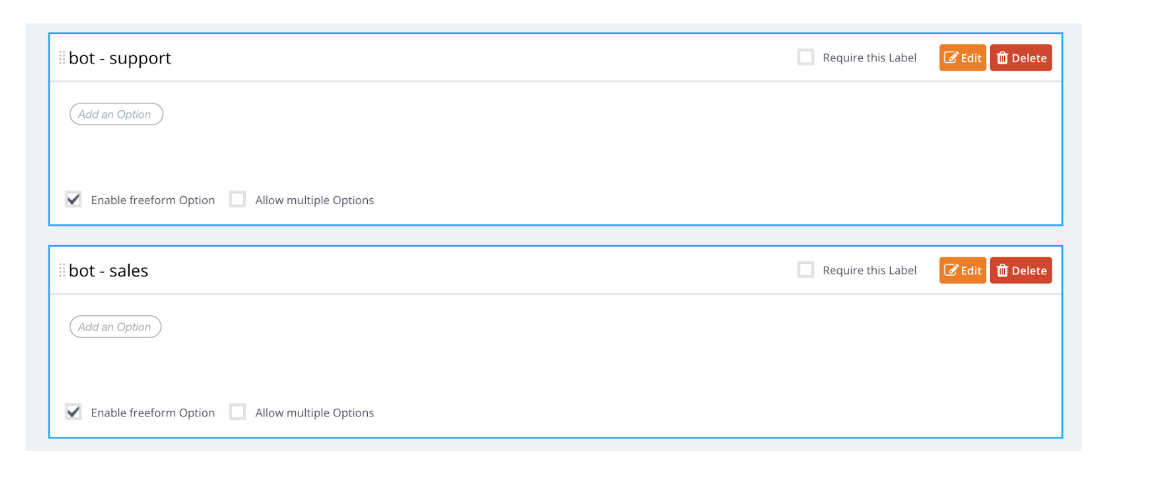
1. Navigate to the GuideBot editor, put appropriate labels in place after clicking the set label box. The example has added “bot” to the label for clarity on the agent view.

- Navigate to the Settings > HUB tab. Here you will replicate the labels exactly as they were placed in the bot editor (above image). Two keys here, DO NOT make this required. We are going to use required as another distinction for the agent view. Agents will have to fill out required labels, all bot labels should not be required. All bot labels should also have “enable freeform option” selected as shown in the bottom left hand corner of the below screenshot.
- Test Chat Results: This is what the labels tab will look like for the agent. You will see that the bot label for sales is already in place, as this was selected during the bot editor interaction (step 1). The two required labels “follow up” & “monkeys” will have to be answered by the agent, the other labels can be ignored.
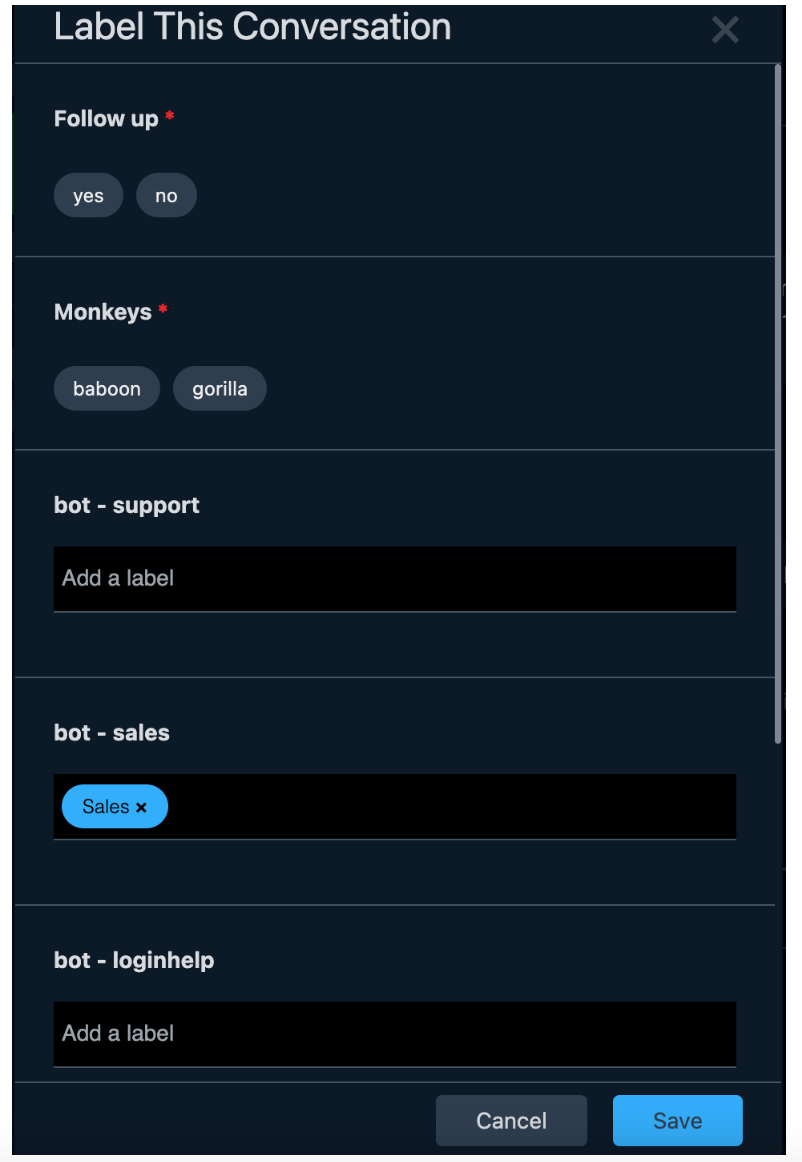
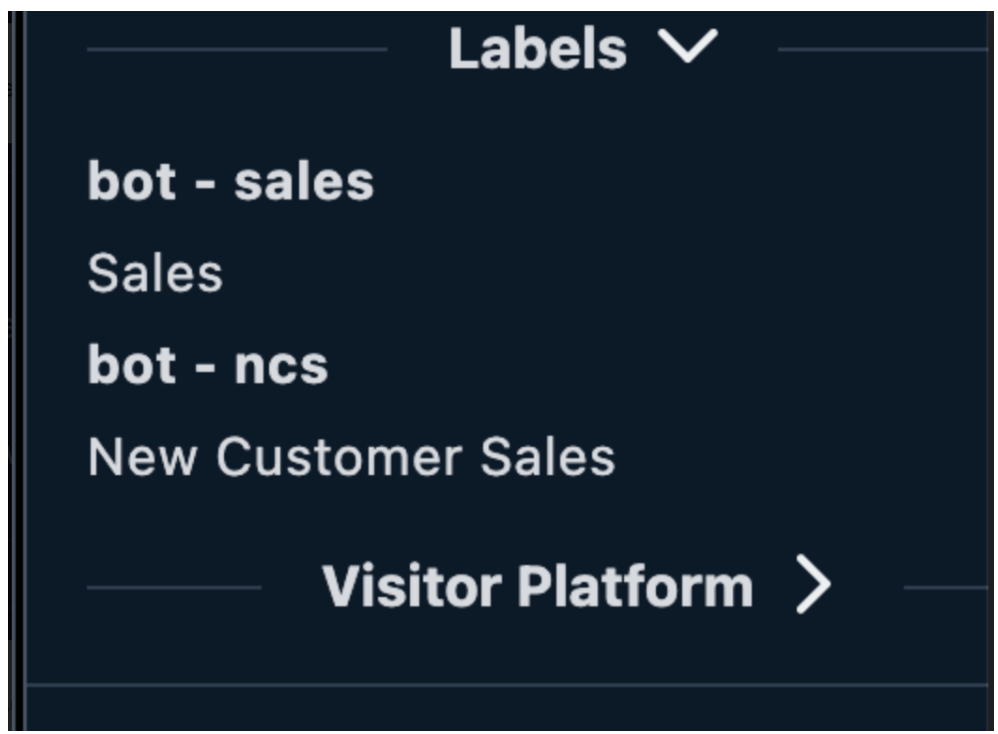
Labels selected by the bot also show up on the right hand side of the agents chat panel as well.
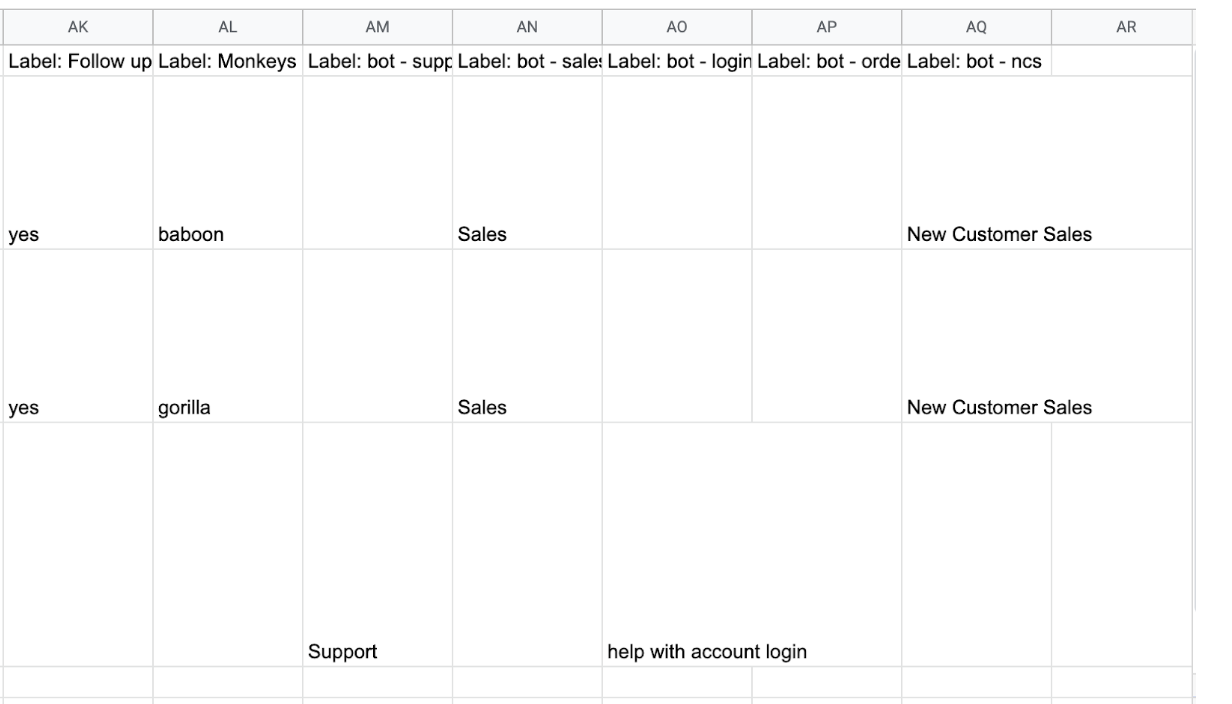
- Log Results: these logs were exported via the chat logs and are separated by column to get to the logs tab click here.
Send Visitor to Page
To send visitors to another page, click on “Add Another Action” under the Set Label setting to toggle the “Send visitor to Page” setting.

to toggle the “Send Visitor to Page” setting. From there, you simply add the destination URL (the page you wish to send visitors), and an optional departing message.
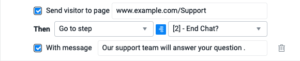
Please note the following considerations:
- “Send the visitor to page” feature cannot be tested in Live Test in the guide bot configuration. Please place the widget, containing the guide bot, in a test environment to evaluate redirect functionality.
- Both the origin page (e.g., www.example.com/Guidebot) and the destination page (e.g., www.example.com/Support) should have the same domain name (www.example.com) otherwise the page redirect can break because of the security permissions on the destination page.
Remember to Enable the bot on the left-hand side to activate it!
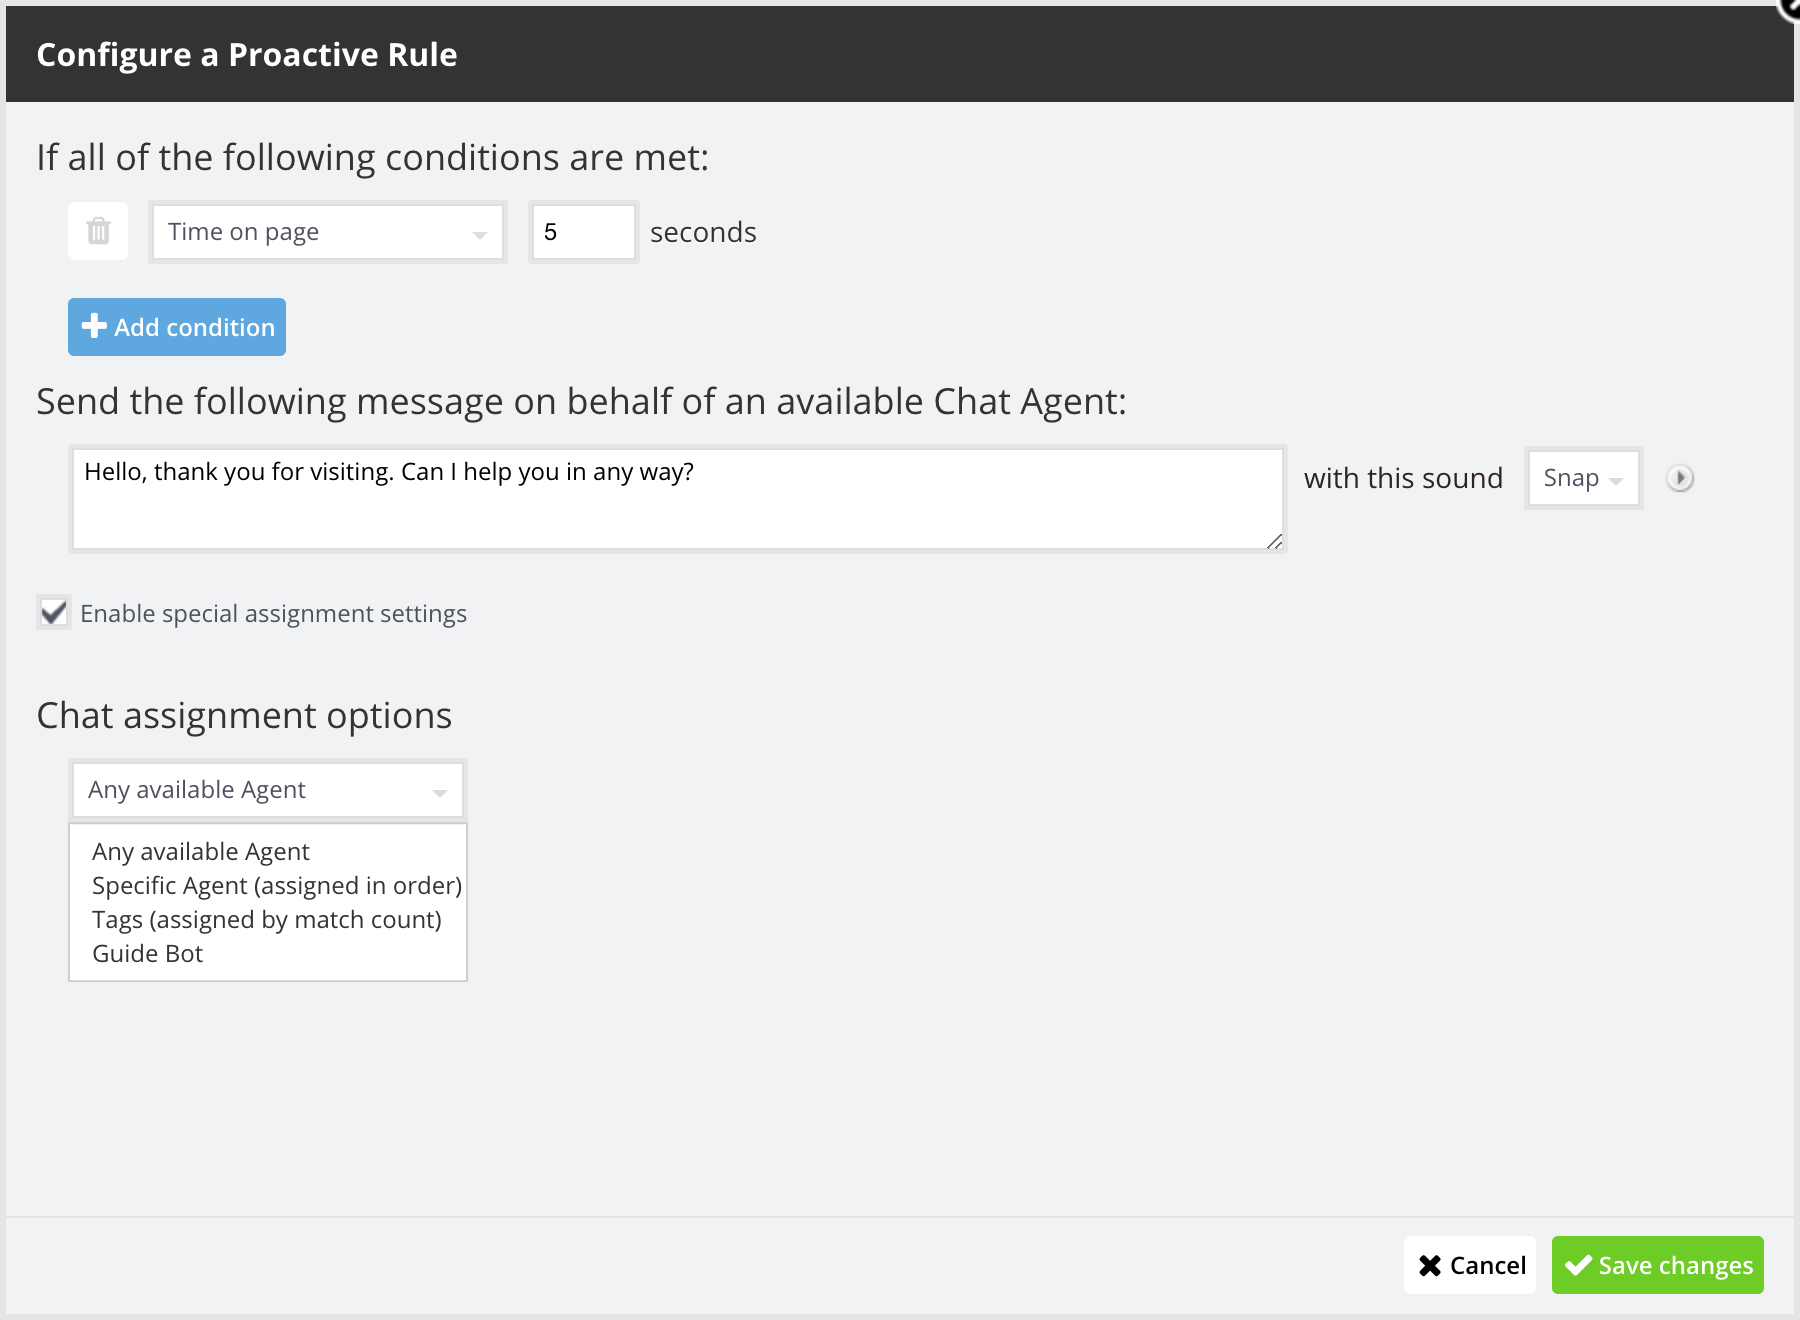
Proactive chat
When creating a proactive trigger for proactive chat, you can also assign that chat to the Guide bot by clicking the checkbox “Enable special assignment settings” and selecting the Guide Bot from the dropdown.
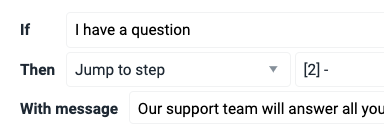
Multi-Step routing
You can create complex routing strategies by using our Multi-Step routing system. To create a new step, firstly change the Then condition to “Jump to Step” as shown below:
This will open up a completely new step for you to ask an additional question. This step will be prompted if the visitor clicks that specific option. This can create a conversational flow. Each option can trigger a different question to be asked. Up to 100 steps can be added to one Guide Bot, but for ease of use, it is best to keep it concise.
When working with steps, our recommendation would be to strategize first, and perhaps to even draw a diagram on how you want your visitor experience to be. Once you have that, creating the flow will be a piece of cake!
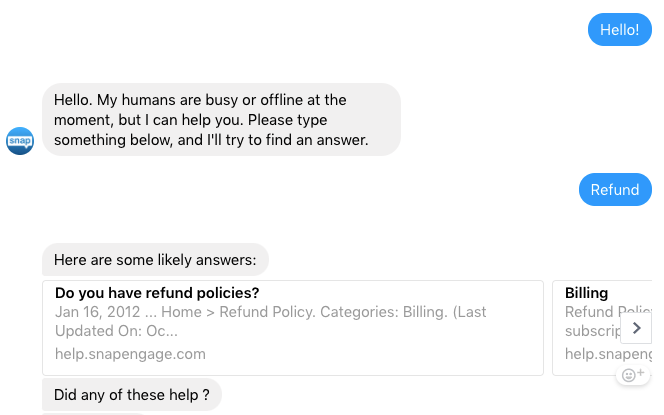
Using Answer Bot with Channels
You can also use your Answer Bot with our SMS and Facebook Messenger Channels. This means that queries coming from either channel can be picked up by your Answer Bot.
Facebook Messenger
On the Facebook Messenger Channel, the search results will be shown in a sliding carousel:
The visitor can click on one of the results, or search again.
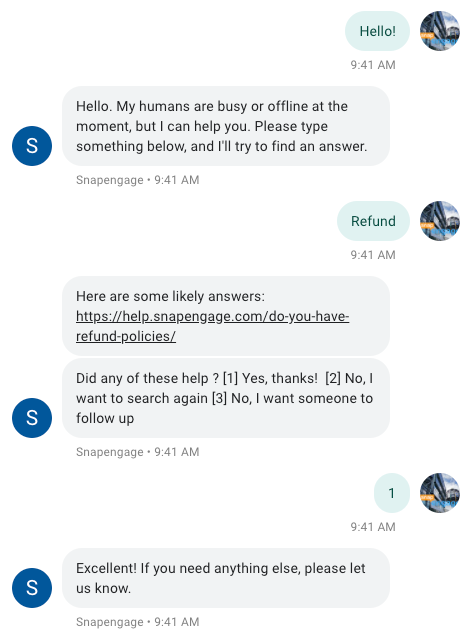
SMS Live Chat
When sending a message via the SMS Live Chat Channel, we want to ensure that the visitor does not need to type out the whole answer. There are two reasons for this:
- It can cause frustration for your clients
- It can also result in mistakes, which would break the flow.
To combat this, the visitor will be able to respond by typing a number:
Did you find this article helpful?

 (4 votes, average: 4.50 out of 5)
Published January 20, 2020